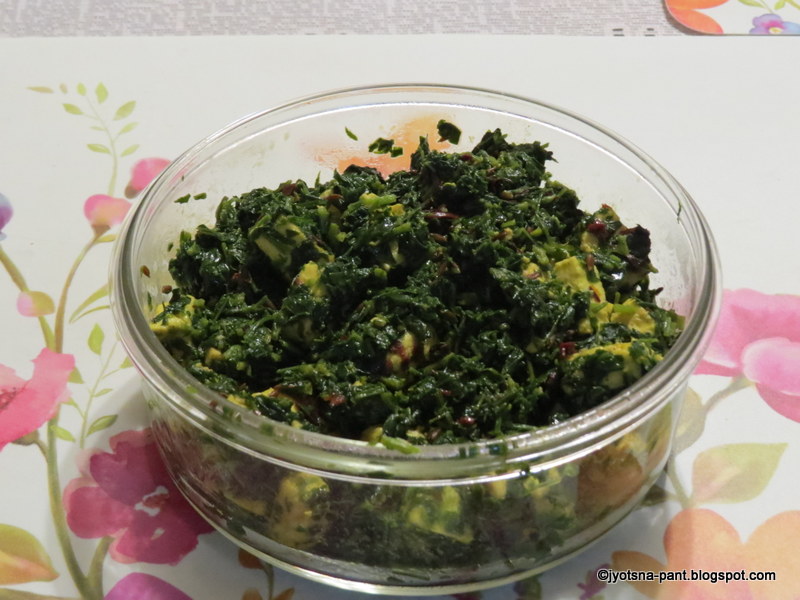
Showing posts with label Cottage Cheese. Show all posts

Tuesday, 24 June 2025

पनीर भुर्जी / Paneer Bhurji (Cottage Cheese savory)

Paneer Bhurji

Paneer (Indian cottage cheese) is full of Protien, and many micro nutrients. Mixed with lots of vegetables it's nutritional value increases so does the taste. Matar-Paneer, butter-paneer, shahi-paneer are all very tasty and delicious savory of paneer, but tare very high on fats and cholesterol as they require lots of butter/nuts etc. Paneer Bhurji (पनीर भुर्जी) requires very less cooking oil. The moisture of vegetables and paneer renders the bhurji soft texture. 

Nutritional value (approx.) 

  • Energy : 400 cal
  • Carbohydrates :  2-3 gm
  • Fats : 40 gm
  • Sugar :
  • Protein : 22 gm
  • Calcium : 450 - 460 gm 
  • Micronutrients:Magnesium, Phosphorus, vitamins 

Preparation Time : 15 minutes 

Cooking Time : 10 minutes 

Servings : 4Medium helpings 

Ingredients for Making Paneer Bhurji : 

  • Paneer : 100 gm
  • Onion : 1medium size (50 gm approx) 
  • Capsicum : 50 gm
  • Tomatoes : 100 gm 
  • Ginger :1inch piece 
  • Green chilies :1-2 according to taste (optional) 
  • Green coriander : 10 - 15 leafs 
  • Salt :1teaspoon or to taste 
  • Cooking oil : 10 ml 

Directions For Making Paneer Bhurji :

  • Wash and chop all vegetables 

Chopped vegetables 
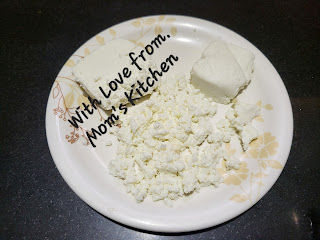
  • Break the paneer into crumbs.
Paneer crumbs
  • Heat oil in cooking pan. Add chopped green chillies and grated ginger to hot oil. Sautee for 30 seconds then add chopped onions. 

Green chillies ginger and onions in oil 
  • Sautee for a minute or two till onions become transparent. Add chopped capsicum. 
 Onion sautéed 

Capsicum added 
Capsicum after cooking for a minute 
  • Mix and cook for a minute or so.
  •  Add chopped tomatoes. Mix and cover, allow it to cook for two minutes stirring it atleast once 
All vegetables cooked
  • The vegetables should be little crunchy not mushy after cooking.
  • Add paneer to cooked vegetables. 
Paneer added 
  • Add salt and mix. 
  • Cover and cook for two to three minutes on low heat with stirring in between. Switch off the heat and allow it to cool. Paneer Bhurji is ready. 
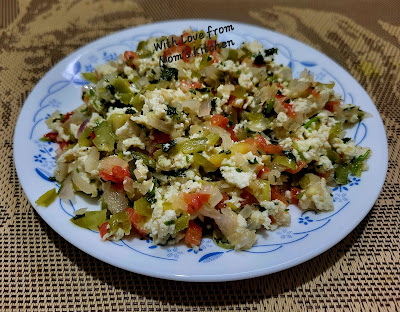
Paneer Bhurji
  • Add chopped coriander and mix. Paneer Bhurji is ready to serve. 
Paneer Bhurji
Tips: 
  • Vegetables should be finely chopped. 
  • Vegetables should be sautéed not cooked fully. 
  • After adding paneer stirring regularly is must and cooking should be done on medium heat. 
  • Do not over cook, else paneer bhurji will become dry not juicy and soft. 
Alternate Suggestions :
  • Boiled green reen peas can be added to increase the taste and Protien content.
  • Red chilli powder can be added, if one wants spicy bhurji. 

Thursday, 2 April 2020

Methi Paneer (Savory of Fenugreek leaf and Cottage Cheese)


Methi-Paneer
 Paneer is vegetarians delight, because it brings with it the so dearly required protein which otherwise vegetarians get from lentils and pulses and legumes. It can be paired with so many vegetables to give delicious and nutritious main course. Apart from paneer being paired with other vegetable, who does not know the world famous dishes like Butter Paneer, Kadhai Paneer to name few. Paneer stuffed parantha is also one of my favorite stuffed parantha.
Methi is rich in fibers, Iron, Potassium and protein with very low calorific value. Paneer (Cottage Cheese) is rich in protein, fats and sugars but no dietary fibers. Thus the combination of the two balances the dish and we have extremely healthy, rich, nutritious and very tasty vegetarian savory. I prefer 1:1 ratio of paneer and methi leaves (By weight), but the ratio of Methi:Paneer can be changed to 1.5 or 2:1.

Preparation Time: 20-25 minutes
Cooking Time: 15 minutes
Servings: 4 Medium Servings

Nutritional Value For total vegetable cooked with given ingredients)
  • Energy: 698.36 cal.
  • Fat: 49.5
  • Carbs:  23.5gm
  • Sodium: 1501.6mg
  • Protein: 48gm
  • Fibers: 10gm
  • Sugars: 11.6gm
  • Iron 6.5 mg
  • Calcium: 210mg
  • Potassium 1410mg
  • Vit A,C 
Ingredients Required For Making Methi-Paneer:
  • 1 Big Bunch of Fresh Methi leaves (Fenugreek leaves)/ 250-300 gm of cleaned leaves
  • 200 gm Paneer (Cottage cheese)
  • 10-15 ml cooking oil (I use mustard oil)
  • 2-3 Whole Red Chilies
  • 1/2Teaspoon Turmeric Powder (Haldi)
  • 1 Teaspoon Cumin seeds (Jeera)
  • 1/4Teaspoon Asafoetida (Hing)
  • Salt to taste
Direction To make Methi-Paneer:
  • If you have got bunch of methi leaves then pick the leaves and soft tips. Discard the stalk part. The picked leaves should be approximately 250-300 gm.
  • Wash the picked methi in flowing water. Drain the water and leave the washed methi on a dry kitchen towel for 10-15 minutes so that all water is removed.
  • Chop washed methi as fine as possible. Keep aside.
Chopped Methi
  • Cut paneer to 1-1.5 cm cubes. Keep aside.
Pieces of Paneer
  • Crush the red chilies to small pieces and remove the seeds. Keep aside.
Crushed Dry Red Chili
  • In a thick bottom wok or pan, heat cooking oil on medium heat. When the oil is hot add cumin seeds. Let the seeds splutter. Immediately add crushed red chilies and hing. Cook for 30 seconds on medium heat.
Cumin seeds spluttering in hot oil
Crushed Chili pieces added to oil
  • Add paneer pieces and bring the heat to low and cook paneer in spices with continuous stirring, Make sure the paneer pieces do not break while stirring.
Paneer added to spices 
  • Cook for 2-3 minutes. Paneer pieces will start looking firmer and color will also change.
  • Add chopped methi. Mix nicely but with care.
Methi added to paneer
  • Add
    • Turmeric
    • Salt
  • Mix and cover the wok. Cook for 3-4 on medium heat with stirring in between.
Teumeric, salt added before covering
  • Remove the lid, there will be liquid do not worry. Bring the heat to high and cook for just one minute, turning the contents in the wok so that they do not get stuck to the bottom of the wok.
Excess liquid in vegetable being evaporated on high heat
Excess liqid  evaporated on high heat
  • Switch off the heat, let thye cooked vegetable in the wok till it gerts cooled. this will ensure removal of any extra moisture.
Cooked Methi-Paneer
  • Remove cooked Methi-Paneer in serving bowl.
Methi-Paneer
  • Serve with Roti / Parantha along with curd/raita/dal etc.
Tips:
  • Take only leaves and soft tip of methi. If stalk is taken then it will not give too palatable result.
  • It is must that water from methi leaves is removed before chopping. Any extra water will cause the vegetable to have lots of water content while cooking thus require to be cooked for longer time thus changing the appearance and taste of vegetable.
  • Methi and paneer ratio by weight is preferably 1:1 or methi amount can be increased.
  • Do not cook the paneer or the vegetable after adding methi too much. Leafy vegetables taste best when the leaves retain the green color (Do not turn blakish due to over cooking).
Suggested Variations:
  • Finely chopped garlic can be added to the oil once cumin seeds have spluttered, cook it till pinkish brown color comes in garlic pieces then add chili and hing.
  • Coarsely ground roasted groundnut can be added after the heat is switched off. This gives a crunchy texture and nutty flavor to the vegetable.

Monday, 28 October 2013

Minty-Paneer Tikka/पुदीना - पनीर टिक्का (Mint Flavor Barbecued cottage Cheese)

Minty-Paneer Tikka
Paneer tikka is made in many different ways and each preparation is absolutely delicious. Paneer, Mushrooms, chicken, Fish when marinated and barbecued to make tikka are best. The smoky, minty flavor of hot barbecued Minty-paneer  makes it very special. Simple to make, healthy and completely devoid of oil this paneer tikka is weight watchers delight.

Preparation Time: 45 min.(Including marination time)
Cooking Time: 5 -7 Minutes for each skewer
Servings: 10-12 pieces of Minty- Paneer Tikka

Ingredients required for making Minty-paneer Tikka:
  • 250 gm. Paneer ( Cottage cheese/ Ricotta cheese)
  • 1 Medium size Fresh coriander bunch (Cilantro)
  • 15-20 Fresh Mint sprigs
  • 100 gm. Fresh thick Curd
  • 1 Tea spoon Coriander Powder
  • Salt to taste
  • 2 Tea spoon Amchur Powder
  • Bell pepper of different colors

Directions For Making Minty- Paneer Tikka:
  • Cut paneer to 4 cm. Cubed.
  • Clean coriander sprigs (Cilantro)of any fellow leaves and hard stem.Wash coriander sprigs in running water.
  • Clean mint of hard stem and discard the hard stem. Wash the leaves and soft portion of mint in running water.
  • Grind mint, coriander and green chilies to thick paste.
Green Paste of Cilantro (Dhaniya patta), Mint, and green chilies
  •  In a bowl take
    • Curd
    • Salt
    • Coriander-mint paste
    • Amchur
Curd, Green paste, Amchur and salt
  • Beat to make uniform paste for marinade.
Thick creamy green marinade for Minty-Paneer Tikka
  • Dip paneer cubes in the marinade and keep in a bowl.
  • Pour remaining marinade on the top of paneer pieces. Cover and keep aside for marinating for minimum 30 minutes.
Paneer cubes Marinated in green Marinade
  •  Remove the stem and seeds from pepperoni and cut bell peppers to 4 cm. cubes.
  • Skewer the marinated paneer piece and bell pepper pieces alternately at a distance of 1-2 cm.
Marinated Paneer and Yellow Pepperoni in skewer
  • Barbecue the paneer on the red hot amber with regular turning of the skewer.
Paneer marinated in green marinade being barbecued
  • Remove the skewer from amber the moment paneer starts getting dark brown edges. It will take 4-5 min. for paneer tikka to be cooked to perfection.
  • Serve hot Hara Paneer tikka with Coriander-mint chutney as an appetizer and with Laccha Paratha and chutney for main meal.
Minty-Paneer Tikka (Barbecued Green paneer Tikka)
 Tips:
  • Make sure curd is thick otherwise the marinade will become too runny.
  • Paneer should be fresh and juicy not brittle and old.
  • If the paneer has been kept in deep fridge then allow it to stand at room temperature till it becomes soft, do not thaw in micro-wave or dip in hot water.
  • Turning of skewer during cooking on hot coal is must to ensure even cooking.
  • One paneer piece can be sandwiched between two pepperoni pieces.
Suggested Variations:
  • Other vegetables like cauliflower, thick round pieces of carrots round tick pieces of brinjal can be marinated along with paneer and skewered with paneer for barbecuing.

Monday, 5 August 2013

Paneer-Dahi-Tikka(Paneer Marinated In curd and Barbecued)


Paneer-Dahi Tikka Skewer on the Barbecue
Paneer or cottage cheese is similar to the    cheese. Paneer makes a wonderful starter/appetizer/main course snack. In my house if there is a party then paneer as appetizer as well one vegetarian dish as main course is a must else the meal as grand as it may be would be incomplete for my family members. Paneer tikka made on non-stick tawa/ pan is very easy to make but barbecued paneer is the best. Changing the marination of the paneer make tremendous difference in the taste and flavor of the Tikka. Paneer Dahi Tikka is oil less and very easy to make but extremely tasty.

Preparation Time: 45-50 min. (Marination time included)
Cooking Time: 5-10 min / Skewer
Servings: 6 Medium Servings

Ingredients Required For Making Paneer-Dahi-Tikka:
  • 250 gm. Paneer (Cottage cheese/Ricotta cheese)
  • 100 gm. Thick Fresh Curd
  • 50 gm. Cream (Optional)
  • 1/4Teaspoon Coriander Powder
  • 1/2Teaspoon Red Chili powder
  • 1/4Teaspoon garam Masala
  • 1 Teaspoon Garlic paste (Optional)
  • 1 Teaspoon ginger past.
Ingredients of Marinade for Paneer-Dahi-Tikka
  • Different color bell pepper
  • Salt to taste
Direction For Making Paneer-Dahi –Tikka:
  • Cut paneer to 3-4 cm. Cubes.
  • Take
    • Curd
    • Garlic paste
    • Ginger paste
    • Salt
    • Garam masala
    • Dhaniya powder
    • Red chili Powder
    • Cream and beat nicely to make thick, creamy, marinade for Paneer-dahi-tikka.
Spices in cream and curd mixture for making Marinade
Marinade for Paneer-Dahi Tikka
  • Dip each paneer piece carefully in the Curdy-Creamy-Marinade and keep in a bowl.
  • Pour the remaining marinade on the paneer pieces.
Paneer in Marinade
  • Cover and keep for marinating for 30 min.
  • Cut the pepperoni to 3-4 cm. cubes after removing the seeds.
  • Skewer the marinated pepperoni first and then paneer piece. Alternate the paneer and bell pepper pieces.
Marinated Paneer and Yellow Bell Pepper In Skewer
  • Each Bell pepper-Paneer pair should be 1 cm. apart from the other Paneer-pepperoni pair.
  • Keep the skewer with paneer on the red hot charcoal barbecue and keep turning regularly to make sure that all side of paneer get cooked uniformly.
Tips:
  • Do not cut the paneer pieces small and thin else they will break while skewering or fall off while barbecuing.
  • Never keep the skewer directly on charcoal they should be kept above the charcoal not on it.
  • Remember when it is garlic paste and ginger paste then take as said in recipe. Do not change it to garlic-Ginger paste, else the taste will change.
Suggested variations:
  • Par boiled cauliflower can be skewered along with bell pepper.
  • Barbecued tomato pieces taste great with Paneer-Dahi-Tikka so thick pieces of fleshy tomatoes can be skewered along with Pepperoni.
  • Cherry tomatoes can be skewered after giving them a prick with tooth pick.
  • Those who do not wish to eat garlic can avoid garlic from marinade mixture.

Friday, 14 December 2012

Ande Ka Paratha/अंडा पराठा (Egg stuffed Pan fried Indian Bread)


Ande Ka Parantha (Egg stuffed Indian bread)

Ande ka paratha is very convenient, nutritious, filling easy to make fast food which no mom should desist from giving the children. I used to make it for my children when they used to go to school. Because they were always late for getting ready then would not take egg (which I had made mandatory) for breakfast. They would just gulp milk and run to bus stop with soaked 4 almonds in their hand. Ok!! So they do not mind carrying almonds in their hand, so they may carry paratha also wrapped in foil / napkin and eat while waiting for bus or inside the bus. Thus I came upon the idea of making these parathas for breakfast so that they will whole some nutritious breakfast .The parathas became instant hit and I never had to force them to come 5 min. early from their room for breakfast, because they used to make it a point not to miss breakfast anymore and even if late would carry the paratha and eat in bus.
Preparation Time: 10 min.
Cooking Time: 20 min
Servings: 4 Parathas

Ingredients required for making Ande Ka Paratha:
  • 100 gm. Whole Wheat flour
  • 4 Eggs
  • 1 Medium size Onion
  • 4 Cloves of garlic
  • 3-4 Sprigs of fresh Coriander leaves
  • 1-2 Green chilies (optional)
  • Salt to taste
  • Water for making the dough
  • 2-3 ml Olive oil / Ghee / any cooking oil
Directions for making the dough:
  • Take flour in a big plate / bowl and add 20ml. water.
  • Mix and knead.
  • Add water in little portions and keep on kneading till soft pliable dough is obtained. (Roughly 50 ml. Water will be required)
Dough fro Paratha
http://jyotsna-pant.blogspot.in/2012/12/making-dough-for-roti-and-paratha-dough.html

Directions for making Ande Ka Paratha:
  • Wash and drain the fresh green coriander leaves.
  • Cut the washed and drained coriander leaves finely.
Finely cut Coriander leaves
  • Cut green chilies finely.
Finely cut Green Chilies
  • Peel and cut garlic finely.
  • Cut onion finely.
Finely cut Onion
  • Break an egg in a bowl.
One Egg in a bowl
  • Add 
    • 1 Tea spoon finely cut onions.
    • 1 Tea spoon finely cut coriander leaves.
    • 1/2Tea spoon cut green chilies.
    •  1/4th Of the finely cut garlic.
Coriander,Green Chilies,Coriander leaves,salt,Garlic added to the Egg
  • Beat egg and all ingredients in it to homogenous frothy consistency.
All ingredients with egg beaten to frothy state
  • Divide the dough in 4 portions.
  • Make ball of one portion of the dough.
Amount of dough for ball
  • Sprinkle some dry flour on the rolling board and the flour ball.
Dry flour sprinkled and dough ball kept on rolling board
  • Place the flour ball on the rolling board and roll the dough ball to 12-15 cm. diameters.
Dough ball rolled to 6 inches round
  • Heat a tawa on high flame.
Non-stick Tawa heated on high flame
  • When the tawa is hot lower the flame and place the rolled round on the hot tawa.
Rolled dough on hot tawa and being cooked on low flame
  • Bring the flame to high and cook till the top side of the rolled round of dough starts changing the color but remains soft.
Base ready for egg filling to be put
  • Pour whole egg mixture on the half cooked dough round and lower the flame.
Egg filling put on the dough base
  • Cook it for 30 sec. on low flame.
  • Fold the base of paratha from the edges to half, so as to cover the egg mixture with the base.
Base folded to semi circle and cover the egg filling

Base folded to a semi-circle and cooking on low flame
  • The paratha now will look like a semicircle.
  • Cook for roughly 1 min. The egg inside will start getting cooked and the filled semicircular base of paratha will start swelling.
Stage when oil should be sprinkled
  • Bring the flame to high and pour 1/4tea spoon oil / ghee from the edges and press gently with a spatula.
Oil sprinkled  from the edges and paratha being cooked on low flame by pressing with a spatula
  • The egg of the filling in the paratha will cook fast and the paratha will swell and the side touching the tawa will become golden brown.
Egg Paratha cooked to golden brown color on one side
  • Flip the half cooked paratha and pour 1/4teaspoon oil / ghee from the edges.
  • Press with a spatula and cook for 30 sec. on high flame.
  • The other side will also become golden brown.
Egg Paratha cooked to golden brown color on the other side also
  • Take it out on a serving plate and serve hot with tomato sauce / chili sauce. 
  • Or open the paratha from the edges and pour some tomato sauce in it, close the edges again, wrap in a tin foil and give to your children.
Ande Ka Parantha (Egg stuffed Indian bread)
Tips:
  • The dough should not be hard otherwise when you will fold the base it will start cracking spilling the egg filling.
  • If your egg is big in size then either roll the dough ball to bigger size or reduce the amount of filling.
  • Do not allow the dough base to become hard and crisp before putting the egg filling while folding the base will crack and filling will spill, also the paratha will become hard nor crisp but soft.
  • While pressing always press from edges to the center not center to edges.
  • Put oil only when golden dots start appearing on the side touching the tawa.
  • Use non-stick tawa oil usage will reduce by half.
Suggested Variations:
  • One medium size finely cut tomato can be added to the filling of egg mixture.
  • Pepper powder can be added to the filling of egg mixture.
  • Very finely cut red bell pepper, capsicum, yellow bell pepper can be added to the egg mixture.
  • Coriander leaves can be replaced with fresh Basil / parsley / Thyme.
  •  Grated Cottage Cheese / Parmesan Cheese  can be added to egg while preparing the filling.
  • Instead of whole wheat flour 1:3 ratio of refined flour and whole wheat flour can be taken.

LinkWithin

Related Posts Plugin for WordPress, Blogger...