Thursday 31 October 2013

सिंगल कुमाऊँ का पकवान /Singal A Kumaoni Delicacy (Fried spirals of Samolina / Rice Flour)


A Typical Kumaoni Prasad Thali of Singal,Meethi Puri Ganesha Modak,Puye,Kajoore and Fruits For Diwali

Singal are one of those fried semolina spirals that are part and parcel of Kumaon culture and festivals especially deepawali and Bhaiduj. Though it is very rich in fat and sugar yet the weather and all the waking done in hills it is easily digested and provides the much needed calories. The life style of hills makes sure that all fat and consumed calories are burnt off so no hassle in indulging in such rich delicacies. Singal with Aloo Gutuk and Pahari raita are heavenly combination and the taste of singal made by my granny remain unparalleled till date. I tried to replicate the same but then the recipe may be the same how can I say the Love and care she put for us in it is the same.

Preparation Time: 10 min. (Soaking time not included)
Cooking Time: 60 min
Servings: 6-7 Medium size Singal

Ingredients Required For making Singal:
  • 250 gm. Suji / Rice fl our
  • 150 gm. Thick Curd
  • 100 ml. Milk
  • 100 gm. Sugar
  • 10 gm. Ghee (Clarified butter)
  • 1 Ripe Banana
  • 5-6 Green cardamom
  • Ghee/ Cooking oil for frying.
Making Rice Flour : 
  • Wash rice  and soak it in excess water for one hour.
  • Drain all water and dry under sun till rice is completely dry.
  • Grind to fine powder.
  • Sieve to remove any coarse particles. 
Direct ions For Making Singal:
  • Peel green cardamom and pound the seeds of green cardamom coarsely.
  • In a bowl take
    • Suji / Rice flour
    • Sugar
    • Thick curd
    • 10 gm. Ghee
  • Mix them nicely and keep the mixture for at least 60 min. for soaking 
Suji, Curd, Ghee and Sugar added to make the batter for Singal
  • The suji / rice flour will become soft and the mixture will become nice and soft.
  • Add milk and mix so that the batter is of pourable consistency. If the batter is too thick then add 10-20 ml. milk and mix to bring it to thick but pourable consistency.
Milk added to the batter
Batter ready after mixing the milk to the suji,curd and sugar mixture
Batter consistency should be hick but pourable
  • Mash the banana while it is in the peel. This will make mashing banana easy and it will get mashed nicely.
Ripe Banana being mashed with the peel intact
Mashed Banana
  • Peel the mashed banana, add the mashed banana and cardamom powder to the suji / rice flour mixture.
Mashed Banana added to the Batter
  • Mix nicely and beat it with fingers for 10 min. so that it gets creamy feel.
  • Heat ghee / cooking oil in a thick bottom wok till becomes smoking hot.
Batter ready for making Singal
  • Fold the fingers and palm to make a cup shape and scoop batter in it.
Batter of singal in the cup of palm
  • Pour the batter in a spiral shape in the hot ghee / oil.
Batter being poured to a spiral in smoking hot ghee
  • Let it cook on low flame till the color becomes golden yellow turn and cook again till both sides become golden yellow / golden brown.
Singal being fried
  • Drain the excess fat with the help of ladle.
  • Repeat same with rest of the mixture.
Deepawali treat of Singal,Kheer,Besan Laddu Meethi Puri,Ganesh Modak,Puye 
  • Singal are ready to be enjoyed with Aloo Gutuk and raita.
Tips:
  • Piping bag can be taken for putting the batter as a spirals in the oil for frying.
  • Wok with flat bottom is better for frying Singal.
  • Small grain suji is better for this dish
  • Curd should not be too sour.
  • Make sure your hand is not too near the ghee while pouring the batter as your fingers may touch the hot ghee and get burnt.
  • For frying if ghee is taken then the original taste is guaranteed.
  • If rice flour is taken then soaking the batter for 45-60 min. more is the better option.
Suggested Variations:
  • 50 gm. Khawa can be added and mixed nicely after adding banana. When Khawa is added it has to be made sure that there are no lumps in the batter.
  • Finely cut almond, cashew nuts and raisins can be added to the batter after adding banana

Monday 28 October 2013

Minty-Paneer Tikka/पुदीना - पनीर टिक्का (Mint Flavor Barbecued cottage Cheese)

Minty-Paneer Tikka
Paneer tikka is made in many different ways and each preparation is absolutely delicious. Paneer, Mushrooms, chicken, Fish when marinated and barbecued to make tikka are best. The smoky, minty flavor of hot barbecued Minty-paneer  makes it very special. Simple to make, healthy and completely devoid of oil this paneer tikka is weight watchers delight.

Preparation Time: 45 min.(Including marination time)
Cooking Time: 5 -7 Minutes for each skewer
Servings: 10-12 pieces of Minty- Paneer Tikka

Ingredients required for making Minty-paneer Tikka:
  • 250 gm. Paneer ( Cottage cheese/ Ricotta cheese)
  • 1 Medium size Fresh coriander bunch (Cilantro)
  • 15-20 Fresh Mint sprigs
  • 100 gm. Fresh thick Curd
  • 1 Tea spoon Coriander Powder
  • Salt to taste
  • 2 Tea spoon Amchur Powder
  • Bell pepper of different colors

Directions For Making Minty- Paneer Tikka:
  • Cut paneer to 4 cm. Cubed.
  • Clean coriander sprigs (Cilantro)of any fellow leaves and hard stem.Wash coriander sprigs in running water.
  • Clean mint of hard stem and discard the hard stem. Wash the leaves and soft portion of mint in running water.
  • Grind mint, coriander and green chilies to thick paste.
Green Paste of Cilantro (Dhaniya patta), Mint, and green chilies
  •  In a bowl take
    • Curd
    • Salt
    • Coriander-mint paste
    • Amchur
Curd, Green paste, Amchur and salt
  • Beat to make uniform paste for marinade.
Thick creamy green marinade for Minty-Paneer Tikka
  • Dip paneer cubes in the marinade and keep in a bowl.
  • Pour remaining marinade on the top of paneer pieces. Cover and keep aside for marinating for minimum 30 minutes.
Paneer cubes Marinated in green Marinade
  •  Remove the stem and seeds from pepperoni and cut bell peppers to 4 cm. cubes.
  • Skewer the marinated paneer piece and bell pepper pieces alternately at a distance of 1-2 cm.
Marinated Paneer and Yellow Pepperoni in skewer
  • Barbecue the paneer on the red hot amber with regular turning of the skewer.
Paneer marinated in green marinade being barbecued
  • Remove the skewer from amber the moment paneer starts getting dark brown edges. It will take 4-5 min. for paneer tikka to be cooked to perfection.
  • Serve hot Hara Paneer tikka with Coriander-mint chutney as an appetizer and with Laccha Paratha and chutney for main meal.
Minty-Paneer Tikka (Barbecued Green paneer Tikka)
 Tips:
  • Make sure curd is thick otherwise the marinade will become too runny.
  • Paneer should be fresh and juicy not brittle and old.
  • If the paneer has been kept in deep fridge then allow it to stand at room temperature till it becomes soft, do not thaw in micro-wave or dip in hot water.
  • Turning of skewer during cooking on hot coal is must to ensure even cooking.
  • One paneer piece can be sandwiched between two pepperoni pieces.
Suggested Variations:
  • Other vegetables like cauliflower, thick round pieces of carrots round tick pieces of brinjal can be marinated along with paneer and skewered with paneer for barbecuing.

Monday 21 October 2013

Doro Wat (Ethiopian Chicken Preparation)

Dora-Wat With Barbare Powder

Dora-Wat without Barbare Powder
Dora is chicken in Amharic (Language of Ethiopia). Wat is basically gravy. So Doro wat means chicken with gravy. This chicken preparation is not for weight watchers and people with heart ailment as it has ample of Chilies and butter / oil. Doro wat is made in every house hold as poor it may be on any good occasions. Those who cannot afford sheep/goat/beef, slaughter chicken as offering and make Doro wat to celebrate the festive occasion. There are two type of Doro Wat one with Barbare powder other with out barbare powder. It is extremely tasty but very rich as it has lots of oil / butter. In Ethiopia it is eaten with Injera/Dabbo. Try it with Nan / Tandoori roti / Kulcha or Chapatti this combination is simply irresistible. I did not make Doro-Wat but got the recipe and the pictures when Alenenish my Ethiopian daughter was cooking it for me in her house.

Preparation Time: 15-20 min.
Cooking Time: 3 hours
Servings 8 Large servings

Ingredients Required For Making Doro Wat:
  • 1 kg. Chicken
  • 1 Kg. Onion
  • 100 gm. Ginger
  • 100 gm. Garlic
  • 500+100 gm. butter ml oil/600 gm. butter
  • 2-3 Teaspoons Khemam Powder (Garam masala)
  • 200 gm. Barbare powder
  • 2-3 Teaspoon Red Chili powder
  • 30 ml. Juice of Fresh Lemons
  • Salt to taste
Direction For Making Doro-Wat:
  • Peel and cut onions long thin pieces.
  • Wash chicken in fresh water.  Sprinkle 4-5 ml. lemon juice on the washed and drained chicken and rub the juice nicely on chicken pieces. Wash again in flowing water and drain.
  • Repeat the washing process 2 times more to make sure chicken is not emitting foul odor.
  • Drain the washed chicken nicely.
  • In a thick bottom pan take chicken and cook on high flame. Water will come out of chicken. Cook with stirring till all water evaporates. Take care chicken pieces do not get burnt. (Do not add oil/butter) or any spices).
  • Take onions and 200 ml. water in a thick bottom cooking vessel and cook on low flame the onions till soft. Bring the heat to high and dry all liquid left in the vessel along with the onions.
  • Add to the boiled onions
    • Oil / Butter
    • Barbare powder
    • Garlic paste
    • Ginger paste
  • Cook with constant stirring till all ingredients mix and make a uniform paste. Add 250 water in small portions (10-15 ml.) while cooking to make sure none of the ingredients get burnt. This paste is called Shankurt Makulalath.
  • The above process will take 90-120 minutes.
  • Add chicken to Shankurt Makulalath.
  • Cook for 40-45 minutes on low flame with continuous stirring, keep adding 100-150- ml. water in every 10 minutes. (1-1 1/2lt.Water maximum)
  • Add Khemam powder (Garam masala), salt, and 100 gm. butter.
  • Mix and cook with stirring for 10 minutes.
  • Cover and keep for 10-15 min. 
Doro-Wat
  • Take out in a serving bowl. The red color of chicken with floating red oil / butter does not require any garnishing. 
Dora-Wat
  • Serve with plain boiled rice/Dabbo/Injera/Nan/tandoori Roti/Lachcha parantha or simple roti.
Tips:
  • Cooking of chicken in Shankurt Makulalath has to be done on low flame. No using pressure cooker please.
  • The pieces for this chicken preparation should be big. Aleminish had cut one big chicken to only 15 big pieces. Because cooking is done on low heat for long time with stirring otherwise the flesh from bones from small pieces will fall apart.
  • Oil/butter and Barbare powder are the high light of this chicken preparation thus do not reduce it but surely can increase it.
  • Barbare powder gives red color and increases thickness or the gravy along with giving wonderful flavor to the chicken and the gravy, the amount can be increased to 300 gm. but not reduced than above told amount.
  • Marination of chicken is not required.
  • Do not add oil / butter while cooking the washed and drained chicken as it is meant to dry off all the water from the chicken.
Suggested Variations:
  • Olive oil (500 ml.) can be taken as cooking medium and then 100 gm. butter can be added.
  • Boiled whole (Not cut) eggs can be added along with salt, Khemam powder and cooked for 10 minutes.

Thursday 17 October 2013

Preserving Whole Fresh Lemons

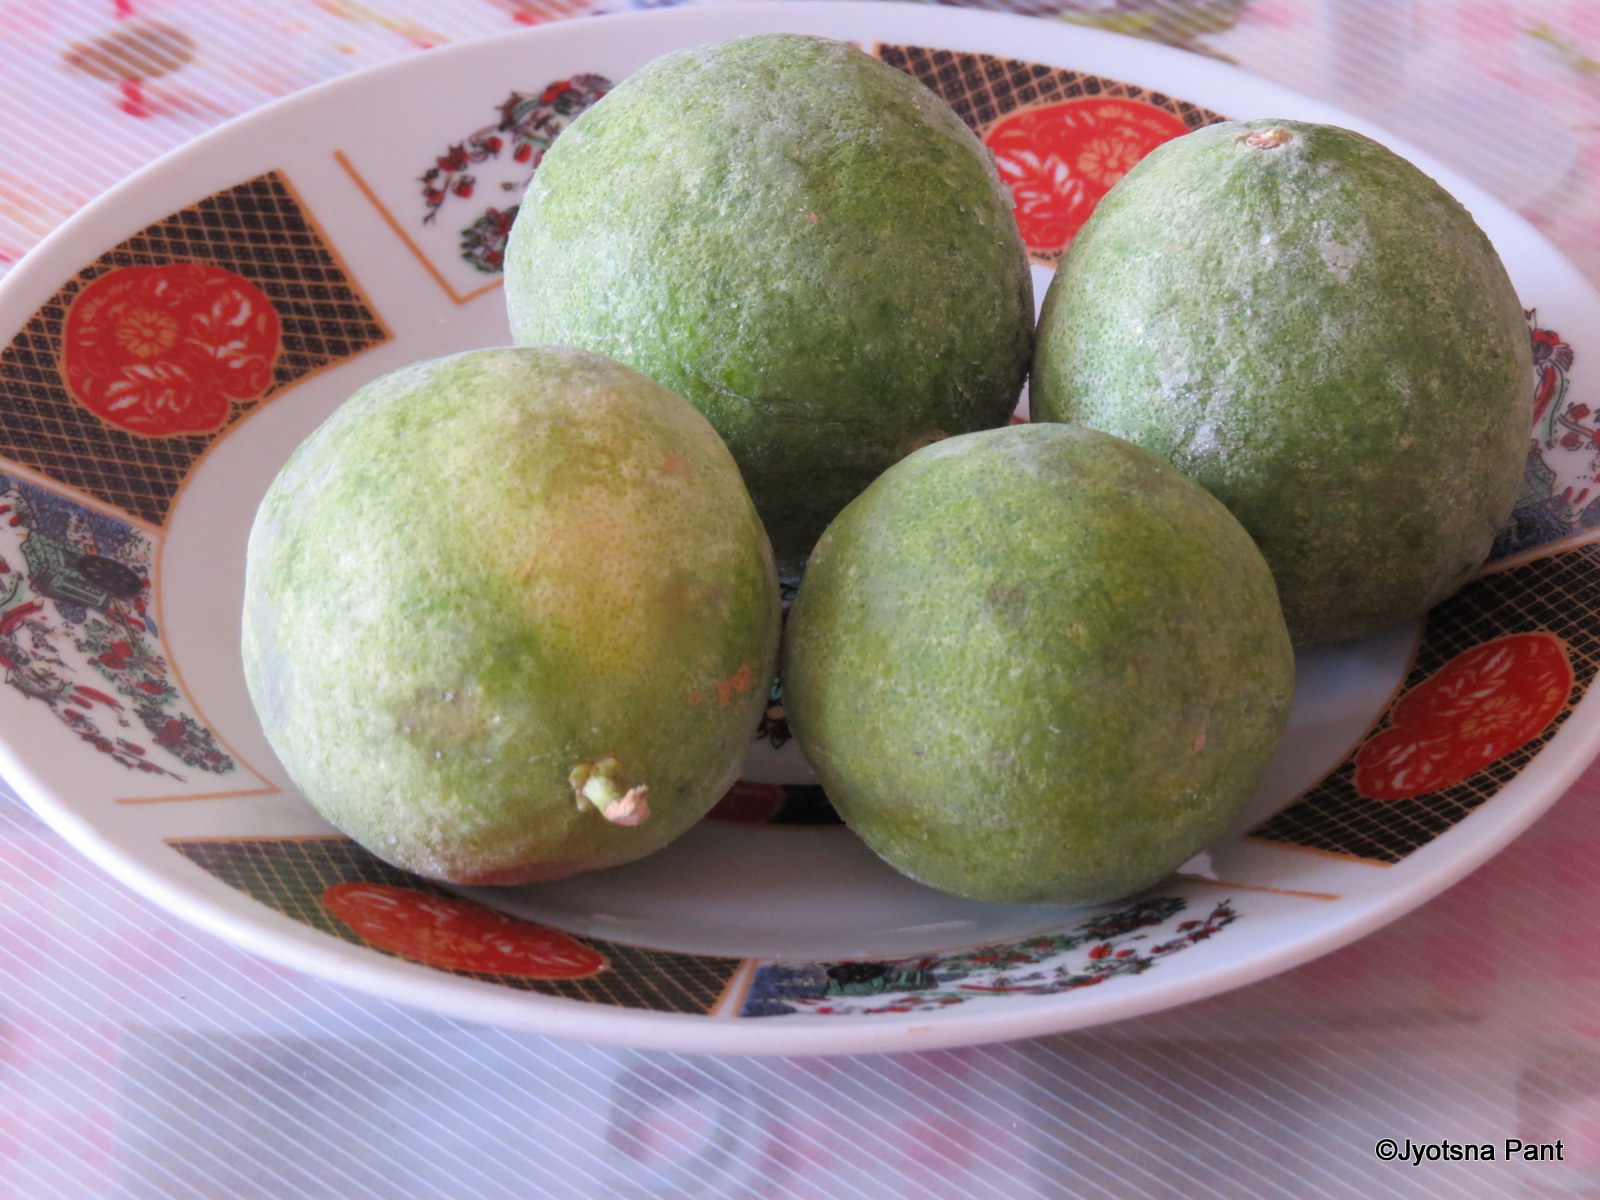
Fresh Lemons Frozen For Preserving

To run a house is the most difficult and tasking task as one has to manage the house within a budget yet have all necessary item ready at home. It is a regular practice that even items like fruits and vegetables are purchased from market in large amount as it comes out to be cheaper. Lemon is one thing that is required in every household daily for one purpose or the other.
It is a common complaint of the house wife that lemons get spoilt if kept for more than a week in fridge. Either they dry and become hard and thus break when squeezed for taking out juice and thus go waste or they rot thus are rendered useless. So what is the purpose of purchasing in bulk? How to keep them fresh for a long time?
Do not despair and purchase as many lemon you want when you get them less expensive in market and yes you can keep them as fresh as if they have been plucked fresh from the tree. 
Direction to Preserve Lemon:
  • Purchase fresh yellow / green juicy lemons in bulk when less expensive.
  • Wash the lemons and towel  dry them.
  • Keep the washed and dried lemons in a Container with lid (Glass or plastic) / Plastic beg / Zip pouch.
  • Keep the container with washed and dried lemons in the freezer and let them solidify.
  • Lemon will become hard as the juice in lemon will solidify.
  • Leave the container with lemons in the fridge and take out the lemon as and when require.
  • Lemons can be kept like this for as long as a year also and the freshness will remain intact.
Fresh Lemons Frozen To Preserve For Long Time
  • This is most effective method because if one takes out juice of lemon and freezes it there is chance that with passage of time lemon juice will start becoming bitter; also some amount of wastage is unavoidable.
How to use frozen lemons:
For making Lemonade:
  • Take the frozen lemon and grate it.
  • If one requires only half lemon then after grating half lemon rest can again be kept with rest of the frozen lemons.
Frozen Lemon Grated
  • Add one eating spoon of the grated lemon in one glass of water (150 ml.) and stir nicely.
One spoon Grated Frozen Lemon For one Glass of lemonade
Grated lemon dissolved in water
  • Filter and discard the solid.
Filtering the solid
  • Add one / two teaspoon of sugar (as per the taste), and a pinch of salt.
  • Dissolve salt and sugar by stirring and add few cubes of ice (optional).
  • Enjoy lemonade of fresh lemon even after long time of purchasing the lemons.
  • Grating the lemon is very easy and ensures least sloppiness and no wastage.
  • The rind of frozen lemon which gets grated adds a great flavor to the lemonade.
Lemonade made from frozen lemon
 For making Fresh Soda Lime:
  • Keep the glass in which soda lime is to be served in the fridge for cooling.
  • Take one teaspoon of grated frozen lemon and add it to 20 ml. of water.
  • Add 1 teaspoon of sugar and pinch of salt and dissolve.
  • Filter the solution and discard the solid.
  • Take the filtered solution of lemon juice, sugar and salt in the chilled glass.
  • Place a stirrer in slanting position in the glass with juice.
  • Pour chilled soda from the edge of glass slowly till the glass is half full.
  • Stir and add more soda leaving an inch space of the glass empty. Stir gently and serve.
Fresh Soda lime
For salad:
  • Take the grated lemon and add it to the salad just before serving.
  • Toss the salad to mix lemon along with other seasonings in the salad.
  • Rind of frozen lemon which gets grated finely a fantastic flavor to the salad.
For making Seasoning for Salad or any other dish where lemon juice is required:
  • Take out the lemon an hour before use and keep it at room temperature.
  • Lemon will come to its original texture and can be cut and squeezed to get the pure juice.
Tips:
  • If you require more lemons in a day  grate them and keep in a airtight container as grated frozen lemons can be kept for 12 hrs. in fridge without turning bitter.
  • Rind of grated frozen lemon add a lovely flavor and some tanginess  so do not get worried about rind spoiling the taste.

How To Make Moongodi / मुंगोड़ी बनाने का तरीका (Moong Dal Badi / Wadi / Bari)


 Moongodi of Split Green Gram with Cover removed (Badi of Dhuli Moong Dal)
 Chilke wali dal ki Moongodi (Badi of Split Green Gram)

Moong dal is very tasty, nutritious and easy to digest. It is very rich in protein and if moong dal with its green cover / whole moong dal is used then its nutritional value increases many folds as the minerals and vitamins remain intact with the cover. Whole moong dal is sprouted and the sprouts are extremely healthy,  and apart from protein and minerals it becomes very rich in Vitamin C. Mungodi is one of the many ways moong dal can be included I the diet.  Mungodi is made to vegetable exactly like Badi / Vadi / Bari. Mungodi is a wonderful variation of moong dal savory and can be had with roti / parantha / rice. Mungodi fried or roasted with 2-3 drops of oil (Microwave) is a wonderful appetizer. My husband loves all form of Mungodi, thus I always stock it by making Mungodi at home.

Preparation Time: 2-3 hours (15 min. for grinding to paste, rest soaking time)
Making Time: 15 minutes
Drying Time: 1-2 days (Depends on the weather)
Servings: makes 250 gm. Mungodi

Ingredients required For Making Mungodi:
  • 250 gm. Chilke Wali Moong dal / Dhuli Moong dal (Moong dal with green cover (Split Green gram / or yellow moong dal (Split Green gram with cover removed)
     Moong dal (Green Gram)
  • Water
Directions For Making Mungodi (Moong Dal Badi / Vadi / Bari):
  • Wash moong dal nicely and soak it in excess of water for 2-3 hrs.minimum. (Can be soaked for 6-8 hrs.)
  • Drain excess water and grind the dal to thick paste in a grinder-mixer. If water is required while grinding then it should be added in very very small proportions as moong dal grinds easily and quick.
  • The paste should be thick.
Paste of Moong Dal With Green Cover (Split Green gram paste)
Paste of Dhuli Moong dal (Split green gram with its green cover removed)
  • Take a steel plate/ plastic sheet. Oil the plate, not the plastic sheet.
  • Take the dal paste in your fingers and using the thumb drop them to small rounds.
Paste of Moong Dal made to small rounds
  • Each portion of paste put on the plate/sheet should be at 2-3 mm. distance from each other.
  • Keep the plate/ sheet with wet moongodi under the sun for drying.
Moongodi drying under the sun
Moongodi drying the sun
  • It will take two days if the temperature is 25-35oC and one day if the temperature is 35-45oC.
  • Nicely scrape the almost dried moongodi from the surface on which they are drying.
  • Turn them upside down and allow to dry for one day if the temperature is low else 4-5 hrs, of hot sun drying is enough.
Moongodi scraped from the plate and kept for drying
Ready for storing
  • Store the dried moongodi in a airtight container / zip pouch.
  • Make vegetable of Moongodi or just take handful moongodi add 3-4 drops of oil. Mix so that oil is coated on all moongodi. Micro wave them for just 30 sec. Turn them upside down with the help of spoon. Microwave for 30 sec. They will become golden brown. Sprinkle salt pepper/ red chili powder. Enjoy as snacks  appetizer with cocktails. 
Tips:
  • Do not add strong smelling spices in dal paste of moongodi as the subtle flavor of moongodi will be over powered by them.
  • Dal should be soaked nicely. When the soaked dal is pressed with finger nail it should be soft enough to break.
  • Paste of soaked dal should be thick.
  • Do not add water in large portions while grinding, add only when required, that also in very small portions.
  • Scrape the moongodi from the plate / plastic sheet only when it is dry else it will get mashed to pulp and become useless.
Suggested variations:
  • Finely cut coriander sprigs / spinach / green chilies can be added to the dal paste before making moongodi.
  • Red chili flakes can be added to the dal paste.

LinkWithin

Related Posts Plugin for WordPress, Blogger...