Showing posts with label Appetizer. Show all posts

Monday, 21 July 2014

 Multi Layered Bruschetta

Bruschetta
An amazing preparation with veg or non-veg topping on bread slices bruschetta is best for breakfast or snacks. My daughter in-law is an enthusiast cook and modifies each and every recipe according to our taste. This version of bruschetta is her creation. We love to have it in our weekend brunch menu. It is a variation keeping in mind our love for mushrooms.

Preparation Time: 20-30 min.
Cooking Time: 30-40 minutes
Servings: 10-12 Bruschetta

Ingredients Required For Making Bruschetta:
  • 400 gm. Fresh Mushrooms
  • Sliced Bread (Multigrain/Whole Wheat)
  • 4-5 Leaves of Basil
  • 100 ml. Thick Coconut milk/100 gm. Coconut milk Powder
  • Salt to taste
  • 10-15 gm. Walnuts
  • 1 capsicum (small)
  • 1 Tomato
  • Pizza spread
  • Butter

Direction For Making Fresh Coconut Milk:
  • Grate fresh coconut after removing the kernel from the shell.
  • Grind the grated coconut to fine paste by adding 100 ml. water in little amounts.
  • Sieve the thick liquid from the paste.
  • To the remaining solid add 50 ml. of water and grind again. Sieve the paste. This will give thinner liquid.
  • Mix the two milky liquid obtained. Fresh coconut milk is ready.
  • If you are using coconut milk powder then add the coconut milk powder to 100 ml. of luke warm water and stir till it dissolves. Heat for 1 min. on low flame with continuous stirring to ensure it dissolves completely.

Direction For Making Bruschetta:
  • Wash the mushrooms nicely.
  • Drain all water and pat dry them with a cloth.
Cleaned Mushrooms
  • Cut the mushrooms to small pieces.
Chopped Mushrooms
  • Remove seeds from capsicum and tomatoes and cut then to fine pieces and keep aside in separate bowl.
Finely chopped Capsicum
  • Cut the walnut kernels to small pieces (size of pieces may vary as per liking).
  • Put the chopped mushrooms in a thick bottom wok and cook on low flame. Mushrooms will start losing water and shrinking. Keep cooking with regular stirring.
Mushrooms cooking in thick bottom wok on low flame
  • Once the water reduces considerably the total amount of material in the wok will reduce to half.
Mushrooms ready for Coconut milk to be added
  • Add
    • Coconut milk
    • Salt to taste
    • Shredded Basil leaves
  • Cook on low flame with regular stirring till all liquid dries off and a thick mass of mushrooms is left. 
Mushrooms cooking in Coconut milk along with herb 
Mushrooms ready for Bruschetta
  • Remove the mushroom cooked in coconut milk.
Mushrooms Cooked in Coconut milk
  • Butter one side of bread slice and toast it on a pan till light brown repeat same on the other side also.
Crisp toasted slices  and coated with Pizza spread
  • Apply pizza spread on one side and keep the slice of bread on hot pan/tawa with the side having pizza spread facing down.
  • Toast for just one minute on low flame. Remove from pan and spread a liberal coat of cooked mushrooms above the pizza spread on the toasted bread slice.
Slice Toasted on Both Side 
Toasted Slice With Pizza Spread
Mushroom spread over toasted slice with Pizza spread
  • Sprinkle
    • 5-10 pieces of capsicum
    • 5-10 pieces of tomato
      Capsicun and Tomatoes sprinkled over Mushrooms
  • Sprinkle pieces of walnuts.
  • Enjoy Hot, crisp juicy Bruschetta with tea/coffee/milk/fruit juices
Bruschetta
Tips:
Do not use butter too much slices are supposed to become crisp not full with butter.
Make sure the side with pizza spread should be cooked with care on low flame otherwise they will get burnt and the taste will get spoiled. It has happened with me so be doubly sure that the heat is on low while toasting the slice.
Burnt and blackned slices along with correctly cooked slices
  • Basil should be always shredded not chopped with knife.
  • Mushroom should not become dry and retain the moisture.
  • Multigrain bread is best as the nutritive value as well as the taste gets enhanced.
  • Fresh herb give the best flavor.
Alternative Suggestions:
  • Sautee one medium size finely cut 100 gm. onion in olive oil till they turn transparent. Add finely chopped 150 gm. tomatoes till they get cooked completely and the mixture become mushy. Add salt to taste. Cook till the liquid start drying and the mixture starts leaving the edge of pan. Add one teaspoon oregano, 1 teaspoon red chili flakes (or to taste), 1 teaspoon soy sauce and one teaspoon ginger-garlic powder. Cook for just one minute. Cool the cooked mixture and make a fine paste.
  • Walnuts can be replaced with Almonds or 1:1 ratio of walnuts and almonds.
  • Red bell pepper/yellow bell pepper can be chopped and mixed with capsicum for toppings.
  • Basil can be replaced with fresh parsley/celery for change of taste.
  • Each slice can be cut to four pieces before making bruschetta. It makes very good appetizer.
  • Walnuts can be roasted before adding to toppings.

Tuesday, 25 March 2014

Barbecued Herbaceous Mushroom


Herbaceous Mushrooms
Mushrooms are one my favorite. Smoked/barbecued/ in salad/stir fry or any form I just love them. But herbaceous mushrooms are absolute winners for me. Delicately flavored with herb and barbecued to tenderness the juicy mushroom with pitta is heavenly combination.

Preparation Time: 10 min.
Cooking time:3-5 minutes for each skewer of mushrooms
Servings: 4 larger servings

Ingredients Required For Making Herbaceous Mushrooms:
  • 500 gm. Button mushrooms
Mushrooms
  • 3 Tea spoons Dry Parsley / Basil / Oregano / celery
  • 2 Tea spoon Olive oil
  • 2 Tea spoon Lemon juice
  • Salt to taste
Direction For Making Herbaceous Mushroom:
  • Wash and towel dry the mushrooms.
  • In a bowl take
  • Olive oil
  • Salt
  • Herb of your choice
  • Lemon juice
  • Mix all ingredients by beating with a fork till a homogenous mass is obtained.
  • Coat all mushrooms with the marinade; keep in a bowl and cover.
  • Let the mushrooms marinate for 5-10 min.
Mushrooms marinated in herbs marinade
  • Skewer the mushrooms and place on hot amber. Keep turning the skewer for even and uniform cooking.
Skewered marinated mushrooms
Mushrooms marinated in herbs being Barbecued on ambers
  • Cook for 2-3 min only with constant turning of skewer.
  • Remove the juicy, tender but firm herbaceous mushrooms on a serving plate and serve piping hot with chilled wine.
Herbaceous Mushrooms
Tips:
  • Mushroom should be salted very gently little excess of salt can spoil the taste completely.
  • Mushrooms should not be left in the marinade for more than 10-15 min. Because the marinade contains salt and mushrooms if left for longer duration will lose water and turn limp.
  • Do not leave the skewer with mushroom for longer duration on coal, neither cook them in advance as reheating or over cooking will make them lose the juices and mushrooms will turn chewy.
  • Do not mix two herbs, make two or more marinade with different herbs and marinate mushrooms in different marinade separately.
Suggested variations:
  • Mixture of salt and pepper powder can be sprinkled just before removing from skewer along with a dash of lemon juice.
  • Salt can be added just before skewering the mushrooms to avoid leeching of juices.
  • Fresh herbs can be taken for marinating mushrooms, but make sure that the herbs are pounded very fine or cut extremely fine not made to paste. Fresh herbs add a totally different dimension to the Herbaceous-Mushrooms.

Monday, 28 October 2013

Minty-Paneer Tikka/पुदीना - पनीर टिक्का (Mint Flavor Barbecued cottage Cheese)

Minty-Paneer Tikka
Paneer tikka is made in many different ways and each preparation is absolutely delicious. Paneer, Mushrooms, chicken, Fish when marinated and barbecued to make tikka are best. The smoky, minty flavor of hot barbecued Minty-paneer  makes it very special. Simple to make, healthy and completely devoid of oil this paneer tikka is weight watchers delight.

Preparation Time: 45 min.(Including marination time)
Cooking Time: 5 -7 Minutes for each skewer
Servings: 10-12 pieces of Minty- Paneer Tikka

Ingredients required for making Minty-paneer Tikka:
  • 250 gm. Paneer ( Cottage cheese/ Ricotta cheese)
  • 1 Medium size Fresh coriander bunch (Cilantro)
  • 15-20 Fresh Mint sprigs
  • 100 gm. Fresh thick Curd
  • 1 Tea spoon Coriander Powder
  • Salt to taste
  • 2 Tea spoon Amchur Powder
  • Bell pepper of different colors

Directions For Making Minty- Paneer Tikka:
  • Cut paneer to 4 cm. Cubed.
  • Clean coriander sprigs (Cilantro)of any fellow leaves and hard stem.Wash coriander sprigs in running water.
  • Clean mint of hard stem and discard the hard stem. Wash the leaves and soft portion of mint in running water.
  • Grind mint, coriander and green chilies to thick paste.
Green Paste of Cilantro (Dhaniya patta), Mint, and green chilies
  •  In a bowl take
    • Curd
    • Salt
    • Coriander-mint paste
    • Amchur
Curd, Green paste, Amchur and salt
  • Beat to make uniform paste for marinade.
Thick creamy green marinade for Minty-Paneer Tikka
  • Dip paneer cubes in the marinade and keep in a bowl.
  • Pour remaining marinade on the top of paneer pieces. Cover and keep aside for marinating for minimum 30 minutes.
Paneer cubes Marinated in green Marinade
  •  Remove the stem and seeds from pepperoni and cut bell peppers to 4 cm. cubes.
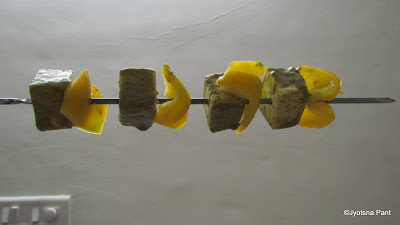
  • Skewer the marinated paneer piece and bell pepper pieces alternately at a distance of 1-2 cm.
Marinated Paneer and Yellow Pepperoni in skewer
  • Barbecue the paneer on the red hot amber with regular turning of the skewer.
Paneer marinated in green marinade being barbecued
  • Remove the skewer from amber the moment paneer starts getting dark brown edges. It will take 4-5 min. for paneer tikka to be cooked to perfection.
  • Serve hot Hara Paneer tikka with Coriander-mint chutney as an appetizer and with Laccha Paratha and chutney for main meal.
Minty-Paneer Tikka (Barbecued Green paneer Tikka)
 Tips:
  • Make sure curd is thick otherwise the marinade will become too runny.
  • Paneer should be fresh and juicy not brittle and old.
  • If the paneer has been kept in deep fridge then allow it to stand at room temperature till it becomes soft, do not thaw in micro-wave or dip in hot water.
  • Turning of skewer during cooking on hot coal is must to ensure even cooking.
  • One paneer piece can be sandwiched between two pepperoni pieces.
Suggested Variations:
  • Other vegetables like cauliflower, thick round pieces of carrots round tick pieces of brinjal can be marinated along with paneer and skewered with paneer for barbecuing.

Sunday, 25 August 2013

Chicken Angara/चिकन अंगारा (Spicy - Barbecued Chicken)


Chicken Angara
As the name suggests Chicken Angara is chicken cooked on Angara (Amber). Piping hot chicken pieces spiced with red chili powder and marinated with curd and cream, served with sour and sweet barbecue sauce and tandoori roti make wonderful combination. Chicken Angara can be taken as appetizers as well as main course or side dish. Oil less, lean healthy can be enjoyed by all those who are watching their weight and also by those who avoid fatty substances and red meat for health reasons.
Preparation Time:30 min.
Cooking Time:5 min per skewer
Servings: 4 Medium size servings
Ingredients Required For Making Chicken Angara:
  • 250 gm. Bone less chicken
  • 100 gm. Thick Curd
Thick fresh curd
  • 1 Tea spoon Garammasala Powder
  • 1 Tea spoon Coriander Powder
  • 1 Tea spoon Garlic Paste
Garlic paste
  • 1 Tea spoon Ginger Paste
Ginger paste
  • 2 Tea spoon Red chili Powder
  • Salt to taste
  • 2 Tea spoon Cream
Cream
  • 3 Tea spoon Lemon Juice
Directions For Making Chicken Angara:
  • Wash the chicken and drain the water nicely.
  • Poke washed and drained chicken with fork.
  • Cut chicken to 4-5 cm. big pieces.
Chicken pieces cleaned for marination
  • Take all chicken pieces in a bowl and add lemon juice to the chicken, mix nicely, cover and keep aside for 15 minutes.
Lemon juice added to washed poked and cut boneless chicken
Chicken in lemon juice
  • In a bowl take 
    • Curd
    • Red chili powder
    • Coriander powder
    • Turmeric powder
    • Ginger paste
    • Garlic paste
    • Salt
Spices added to the thick fresh curd
  • Mix nicely
  • Add cream and beat to mix all ingredients nicely and make smooth, curdy-creamy marinade.
Marinade for Chicken Angara
  • Drain all juice from the chicken and discard the juices.
Chicken pieces after squeezing lemon juice from them
Lemon juice drained from chicken
  • Dip the chicken pieces in marinade and keep in a big bowl.
  • Pour all remaining marinade over the marinade coated chicken pieces. Cover and keep aside for 15 minutes.
Chicken in marinade
  • Skewer the marinated chicken pieces and cook them over red hot amber (Barbecue) with occasional turning the skewer for 4-5 min.
  • The chicken pieces will start becoming black at the edges and yummy smell will start coming from your barbecue pit.
 Chicken Angara (Barbecued chicken) on the skewer
  • Remove the barbecued chicken pieces and serve hot with rings of onion, lemon wedge and red chili sauce / any sauce of your liking/coriander-mint chutney.
Chicken Angara with onion rings and salsa sauce
  • Tandoori roti and Angara chicken are wonderful combination.
Tips:
  • Skewer the chicken pieces at least 1 cm. apart to make sure chicken gets cooked from all sides.
  • Curd should be fresh and should not be sour.
  • Cut the onion to rings and dip them in ice cold water the onion rings will remain fresh and crisp.
  • Drain the lemon juice completely, if required give a gentle squeeze to the chicken pieces to remove the excess lemon juices.
Suggested Variations:
  • A small piece of grated nutmeg can be added to the curd while making marinade.
  • For those who are watching weight and dieting cream can be avoided while making marinade.
  • Red chili powder can be increased /decreased as per taste but my suggestion increase but do not decrease Angara chicken tastes best when really spicy.

Monday, 5 August 2013

Khandvi (Indian savory made of Gram Flour)


Khandavi
Khandavi is a Gujarati preparation from Bengal gram / Chana flour (Besan). In Maharashtra some thing similar in looks and taste is there called Surali Vadi. In Gujarat Dhokla, Khaman, Farsan, Khandavi are a must accompaniment with any and every main meal and of course they double up as wonderful snack also.  In my endeavor to taste different type of food from Indian as well as other part of world (Whenever possible) I order different Thali (Complete meal) from different state of India. Once while I ordered for Gujarati Thali I never imagined it will be an array of savories. Kadi, Khichadi, rice and vegetables etc. Almost everything in Gujarati food has a touch of sweet taste. They add bura(http://jyotsna-pant.blogspot.com/2012/11/bura-dry-grainy-powdered-sugar.html) in the food. Extremely tasty filling and nourishing food but what I loved most was Dhokla, Khandavi and Khaman. In Ethiopia I met Sefali a young lady who not only demonstrated the whole process of making Khandavi but gave me and my husband a sumptuous treat of Gujarati meal and hospitality. Thank you Sefali for this. I share what I learnt for the benefit for all my followers and friends.

Preparation Time: 5 min.
Cooking Time: 10 min
Setting Time 10-15 min
Servings: 4-5 Medium helpings.

Ingredients Required For Making Khandavi:
  • 1 Cup Besan (Bengal gran / Black gram flour)
  • 1 Cup Butter milk
Besan and butter milk
  • 1/2Tea spoon Red Chili Powder
  • 1/2Teaspoon Salt / or to taste
  • 1/4Teaspoon Turmeric Powder
  • 1 Pinch asefoetida
  • 1/2Teaspoon oil / ghee
  • 1/2Teaspoon Mustard seeds
  • 1/2Teaspoon Cumin seeds
  • 2-3 Teaspoons Sesame seeds (Preferably white)
  • 5-6 Teaspoon freshly grated coconut
Direction For Making Khandavi:
  • In a big thick bottom stain less steel container take
    • Besan
    • Butter milk
    • Salt
    • Turmeric powder
    • Red chili powder
Butter Milk, Besan, Red Chili Powder, Salt, Turmeric Powder before mixing
  • Mix all ingredients nicely to get a uniform paste.
  • Cook the mixture of spices, besan and butter milk on low flame with continuous stirring till a thick paste is obtained. It will take 10 min.
Butter milk, Besan, Spices added and mixed and being cooked on low heat
Khandavi mixture after 5 min of being cooked on low heat
Cooked Khandavi Mixture after 10 min of being cooked on low heat
  • Add asafoetida and cook for one minute.
Consistency of Khandavi mixture before spreading
  • Spread the hot cooked mixture on the plastic sheet thinly.
Khandavi Mixture Spread on Plastic Sheet
  • Allow to cool. It will take 5-10 min.
  • When cold the spread paste should be set nicely so that it can be peeled from the plastic sheet.
Checking Before cutting
  • Cut the set paste carefully to square pieces (4-6 inches). 
Cutting before rolling
  • Roll each piece from the sheet to make a roll.
  • Place each roll on a serving dish.
Khandavi Ready For Garnishing
  • Grate coconut (Fresh/Dry) and spread 2-3 teaspoon on the rolled Khandavi.
  • In a pan take 1/2Teaspoon oil / ghee and heat.
  • When the oil is smoking hot add
    • Mustard seeds
    • Cumin seeds
    • Sesame seeds
    • Green Chilies
    • Kadi patta
  • Let the seeds splutter and the sesame seeds become light brown in color.
  • Pour the mixture on the rolled Khandavi.
  • Mouthwatering, soft, Delicious Khandavi is ready.
Tips:
  • Measure the butter milk and besan with the same size cup.
  • While cooking keep stirring and cook on low flame. Else either lumps will be formed or the mixture will get burnt.
  • Before spreading all paste for setting test with one spoon. If the mixture peels off nicely after getting cold then it is ready for spreading else cook for some more time. The thickness of the mixture should be as shown in the picture.
  • While preparing the garnishing for Khandavi add coconut last else it will get burnt.
Suggested Variations:
  • Very finely cut 2-3 teaspoon coriander leaves (Cilantro) can be added to the besan mixture before cooking.
  • When coriander leaves are added then the mixture should be spread slightly thicker (2 mm. maximum).
  • 1 Teaspoon sugar / Jaggery can be added to the besan mixture before cooking.

LinkWithin

Related Posts Plugin for WordPress, Blogger...