Sunday 30 December 2012

Parantha Sadabahar/सब्ज़ी भरा पराठा (Vegetables stuffed Pan fried Indian Flat Bread)

Breakfast of Sadabahar Parantha with Mango pickle and Sweet Lime juice
During child hood I used to detest cauliflower vegetable though now it is one of my favorite dishes specially when made with Peas or in Creamy Delicious Gravy / Sweet and Sour Gravy. My mother used to be at her wits end as how to make me eat the food when cauliflower vegetable used to be cooked. She being most innovative house wife and a loving mother came up with the idea of stuffing the vegetable and making stuffed paratha. When I started developing the taste she slowly weaned me off this paratha and started serving me the vegetable. She never forced us to eat anything but made us develop the taste for each and everything so that we are not denied of nutrition for the want of taste.
Invariably in my house left over vegetables would be lying in fridge which being less in amount could not be served to the whole family. I borrowed the idea of my mom did my own variations and came up with these soft, crispy, tasty and nutritious parathas which can be served in breakfast/ lunch / dinner because they are evergreen parathas. 

Preparation Time: 10 min.
Cooking Time: 30min
Servings: 6 Parathas.

Ingredients required for making dough for Parantha Sadabahar
  • 150 gm. Whole Wheat Flour
  • 1/2Teaspoon Salt
  • 100 ml. Water
Ingredients Required For Making filling Parantha Sadabahar:
  • 2 Medium helpings of Left over dry vegetable (Cauliflower / Methi / palak / aloo)
  • 1 Medium size Onion
  • 1 Green Chili
  • 2-3 sprigs of fresh Green Coriander leaves
  • Salt to taste
  • 1 Tea spoon Garam masala
Directions For making filling for Parantha Sadabahar:
  • Peel and cut the onion very fine.
  • Cut green chili very fine.
  • Wash and cut coriander sprig very fine.
  • Mash the left over vegetable(s)
  • If you have more than one left over vegetables then mix them together after mashing.
  • If any vegetable has some liquid in it then cook it till it becomes dry them mash and add to other left over vegetable(s).
  • Add
    • Onion
    • Green chili
    • Coriander
    • Salt (optional)
    • Garam masala
    • Amchur
    • Mashed left over vegetable(s)
  • Mix all the ingredients nicely to make a uniform mixture.
Filling for Sadabahar Parantha
Direction for making the Dough for Parantha Sadabahar:
  • Take wheat flour in a bowl and add salt to it.
  • Mix nicely.
  • Add water little by little, mix and knead.
  • The dough should be soft and pliable.
  • If more water is required, add in little amounts as per requirement while kneading.
  • Soft dough for paratha is ready.
    Dough for Parantha
Directions for Making Parantha Sadabahar:
  • Divide the dough into 6 equal parts.
  • Make a nice smooth round ball of one part.
  • Make a cup shape from the dough ball by pressing the edges out and the center down wards .
  • Divide the filling into 6 equal parts.
  • Fill one part of the filling into the cup of the dough.
Filling in the dough cup
  • Close the cup by pressing the edges together.
Sealing the edges
  • Press the edges down and flatten the filled dough ball by pressing gently between your palms.
  • Roll the flattened ball in wheat flour and sprinkle wheat flour on the rolling board.
Filled dough ball ready for rollin
  • Roll the filled ball rolled in wheat flour gently without applying too much pressure.
Rolled Parantha
  • Heat a tawa on high flame and when it becomes hot lower the flame and place the rolled parantha on hot tawa.
  • Cook on low flame till it gains golden brown spots.
Rolled Parantha being cooked on one side
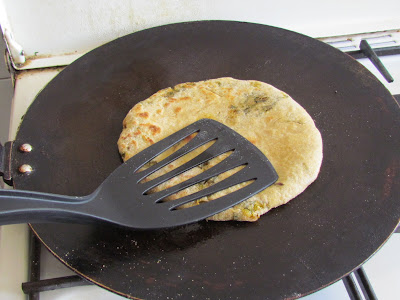
  • Flip the paratha with the help of spatula and cook the other side also till it gains golden brown spots.
Cooked on one side and being cooked on the other side
  • Apply 1/2teaspoon oil / ghee on the upper side and flip so that the side with oil touches the hot surface of tawa.
  • Press with spatula and cook for 30 sec.
Oil / ghee applied and being cooked by gently pressing with spatula
  • Apply 1/2 tea spoon oil the other side also and turn upside down.
  • Press and cook for 30 sec. 
Sadabahar Parantha ready to be served
  • Remove from tawa on a serving plate and serve hot Parantha Sadabahar with curd/ pickle/ chutney/raita.
http://jyotsna-pant.blogspot.com/2012/06/spicy-mixed-vegetable-pickle-less-oily.html
http://jyotsna-pant.blogspot.com/2011/10/green-coriander-and-mint-chutney.html

http://jyotsna-pant.blogspot.com/2012/06/mango-pickle-north-indian-style.html

http://jyotsna-pant.blogspot.com/2012/06/tangy-mango-pickle-maharashra-style.html

Prantha Sadabahar
Tips:
  • Do not use brinjal, pumpkin or any gourd vegetable for these parathas.
  • The dough should be soft and pliable otherwise while rolling the stuffed dough ball it will crack from edges.
Suggested Variations:
  • If the left over vegetable has some gravy  then cook it till it becomes dry.
  • Left over dal from meals can be cooked to dry in wok and stuffed to make paratha, or mixed with mashed vegetable to make paratha.

Sunday 23 December 2012

Methi Parantha/मेथी परांठा (Indian flat bread with Fenugreek leaves)


Methi Parantha 

Methi is leafy vegetable with high nutritional value as well as medicinal value. It has slight bitter taste.High in iron and vitamins. Methi made with potatoes / Paneer / Nutrela is extremely tasty.Methi puri and parantha are easy and quick to make healthy meal. Methi puri and parantha are very good for lunch box of children as they get tasty fulsome meal. For ever hungry growing children keep the dough ready in fridge so that you just have to roll and cook the parantha.

Preparation Time: 15 min.
Cooking Time: 60 min
Servings: 15 Parathas

Ingredients Required for Making Methi Paratha:
  • 250 gm. Whole Wheat Flour
Whole wheat flour
  • 1 medium size bunch of Methi (Fenugreek leaves)
  • 2 Green chilies
  • Salt to taste
  • Water for making the dough
  • 15 ml. Olive oil / Ghee / Any cooking oil
Direction for Making Dough for Methi Paratha:
  • Clean Methi of all hard twigs and keep only soft twig and leaves. Discard the hard twigs and yellowed leaves.
Methi leaves with very soft twigs for use in making Methi Parantha
  • Wash cleaned methi in running water to remove all dirt and mud from it.
  • Drain cleaned and washed methi of water.
  • Cut cleaned, washed and drained methi finely.
Finely cut Methi
  • Cut green chili finely.
  • In a big plate or bowl take
    • Wheat flour
    • Finely cut methi
    • Finely cut green chili
    • Salt 
Finely cut Methi, green chili, Whole wheat flour and salt
  • Mix then together.
  • Add water (approximately 100 ml.) in little amounts and mix and knead till soft dough is formed
  • If the dough is hard add some more water and knead it to soft pliable dough.
Dough for Methi Parantha
  • Divide the dough to 15 parts.
  • Make ball of one part.
  • Sprinkle some dry flour on the rolling board and the dough ball.
Dough ball for Methi Parantha
  • Roll the methi flour dough ball to a 5-6 cm. diameter flat round.
Rolled dough ball
  • Heat a tawa on high flame.
  • When the tawa is hot lower the flame and sprinkle 3-4 drops of oil on it.
  • Put the rolled paratha on the hot tawa and cook on low flame till it stars getting golden brown dots on it.
Methi Parantha being cooked on hot tawa
  • Flip with the help of spatula and cook the other side also till it gets golden brown dots on it.
  • Put 1/2tea spoon oil on the paratha and flip it.
  • Press with the help of spatula and cook for 30 sec. It will gain beautiful golden brown color along with its original green color.
  • Pour 1/2Tea spoon oil on the other side cook by pressing with spatula till its color become golden brown along with its original green color.
  • Crisp, hot colorful methi paratha is ready.
Methi Parantha ready to be served
Methi Parantha
  • Repeat the same with rest of the flour.
Methi Paranthas
    • Serve theses parathas with Curd / raita / pickle / chutney.
    Tips:
    • Do not make the dough hard because if the dough is hard then the parathas will not be soft and the edges will crack.
    • Wash methi nicely because it always has lots of mud attached to it.
    • Cut methi as fine as you can. Take non-stick tawa this will reduce the use of oil to half.
    Suggested Variations:
    • These parathas can be made layered and triangular also, for this:
    • Roll the dough ball to 4-5 cm. diameter round.
    Dough ball rolled and oil applied to it
    •  Apply 3-4 drops oil the rolled round and fold it to a semicircular shape.
    Folded to half after applying ghee / oil on the rolled parantha
    • Apply oil on the surface of the semicircle of the dough and fold again so that it looks a small triangle.
    Folded to semi-circle and ghee / oil applied on the surface
    • Sprinkle flour on the dough triangle and roll it to a triangular shape of 2 mm. thickness.
    Rolled Triangular Layered Methi Parantha
    • Cook on the tawa to golden brown color.
    Triangular Layered Methi Paratha being cooked
    • Triangular layered methi paratha is ready.
    Methi Parantha
    • In the absence of fresh methi Dry powdered methi (Kasoori) can be used.

    Saturday 22 December 2012

    Making Badi (Wadi) at home


    Badi(Wadi)

    Badi are dry preparation of urd dal along with vegetables / spices. They are made during summer or winter season when the sun shine is good and are preserved so that they can be made to vegetable for main course with rice / roti. http://jyotsna-pant.blogspot.com/2011/08/badi-ki-sabji.html . In Kumaon Badi are preferably made from Urd dal and Cucumber, whereas in Punjab Badi are made from Urd dal and lots of spices. Badi once made can be stored for as long as 1-2 years in a dry air tight container. The Badi available in the market are sometimes too spicy for one’s taste,  thus makes them at home as per your taste and combine the Kumaon and Punjabi Badi style to get your own composition like I do always.
    Badi made at home are better because they are hygienically made and are cost effective also.

    Preparation Time: 7 Hrs. (6 hr. soaking time included)
    Making Time: 15 min. (Time taken for drying not included)
    Servings: 40-50 badi (Wadi) 

    Ingredients Required for making Badi:
    • 250 gm. Dhuli Urd Dal (Split urd dal without black cover)
    • 250 gm. Cucumber 
    Cucumber
    Direction For Making Badi:
    • Wash urd dal till water comes out clean.
    • Soak washed Urd dal in excess of water for at least 6 hrs.
    • Wash and peel cucumber.
    Peeled Cucumber
    • Cut the cucumber to two halves lengthwise.
    • Remove the soft part with seeds from cucumber and do not use it for making Badi.
    Peeled Cucumber with center soft portion removed
    • Grate the hard part of cucumber after removing the soft part.
    • Squeeze water from the grated cucumber as much as possible and keep the juice of cucumber in a bowl.
    Squeezed juices to be used for grinding the Dal
    • Keep the grated and cucumber aside.
    • Drain the water from soaked Urd dal.
    • Discard the water.
    • Grind the soaked urd dal in a grinder mixer to a thick fine paste.
    Urd Dal paste
    • If required add the juice squeezed from the grated cucumber while grinding the dal.
    • Add the grated cucumber to the thick paste of Urd Dal and beat to a fluffy smooth uniform mixture.
    Grated ,squeezed cucumber added to Dal paste
    mixture of grated cucumber and dal paste beaten to creamy consistency
    • Grease a plate and portion out small part of this mixture with the help of fingers and thumb in the form of a blob on the greased plate.
    • Each portion should be at least 2 cm. away from each other.
    Mixture of dal and cucumber blobs for badi
    • Keep the plate with the Badi in open, under sun so that Badi dry fast.
    • It will take 1-2 days for the Badi to dry in summers and 3-4 days in winters.
    • Dried badi will be easily removed from the plate.
    • Scrape them off the plate and turn them upside down and keep under the sun for drying for a day more.
    • Badi should become dry form both sides before storing.
    Cucumber badi dried and to be stored
    Zucchini badi
    • Store the dried Badi in a dry airtight container.
    • Use them to make Badi ki Sabji as and when you want. Badi ki sabji is a good variation in diet from regular Dal.
    Tips:
    • Do not use the water in which dal is soaked else the Badi will get slight unpleasant odor.
    • Do not throw away the juice squeezed from the grated cucumber; always use it for grinding the dal.
    • If the juice is left even after grinding the dal then use it for making dough for chapatti.
    • Each portion on the plate of the dal paste and cucumber should not be more than 2-3 cm big.
    • Make sure Badi are dried from both sides properly else fungus will grow on badi.
    • Do not add salt to the mixture from which badi are being made. Salt loses its water of crystallization thus causing the badi blob which has been portioned out to spread thin and badi will become thin and crumbly. Not good for making badi sabji.
    Suggested Variations:
    • Deep fry the Badi to golden brown color and sprinkle some salt,chili powder and amchur enjoy as snack.
    • Badi can be made by filling the badi batter in a plastic bag and piping them on a greased 
    Batter of badi being piped from plastic bag
    •  Zucchini, Green pumpkin can be taken instead of Cucumber.

    Zucchini
    • Zucchini and Green pumpkin should not be peeled only soft seed part should be removed from them before grating.
    Unpeeled Zucchini cut to half
    Washed Zucchini with center soft portion removed
    Zucchini and dal batter for badi
    • Red pumpkin, bottle gourd if taken then they should be peeled before grating.
    • Finely cut Palak, (Spinach), Methi leaves, Coriander leaves can be added to the Paste of Urd dal to get badi of different flavor and taste.
    • Coarsely ground spices like cloves, cinnamon, red chilies can be added to the dal paste with vegetables individually to get badi with different spicy flavor.
    • 2-3 cm. stick of cinnamon, 4-5 cloves, 10-12 black pepper and 5-6 red chilies can be ground together coarsely and added to the dal paste with vegetables before making badi.
    • Spices can be added to the dal paste without any vegetables and made to Badi.

    LinkWithin

    Related Posts Plugin for WordPress, Blogger...