Showing posts with label Non-vegetarian. Show all posts

Monday, 24 August 2015

Whole-Wheat-Carrot-Cinnamon-Muffins


Whole Wheat flour-carrot-Muffin
Muffins are denser than cakes and require less fat (Oil/Butter). Carrots/Apples/Pear and other fruits make it very healthy and nutritious along with tasty. If these muffins are made brown sugar or yet better organic unrefined jaggery then it tops the list of all muffins for its nutritional, health and taste quotient. Since I am a chocolate buff thus I divided my batter to two parts (3:1) and in one part added dark chocolate and put it in the bottom and the rest 3 parts was used for pouring above the chocolate batter, I found this experiment unique and yummy. Try if you are cocolate buff like me. Else avoid the cocolate part.

Preparation Time: 20-30 min.
Baking Time: 25-30 min. maximum
Servings 4 large muffins (100gm each muffin)

Nutritional Value of Carrot muffins: (Approximate)
Calories:  1036
Total fats: 47.17 gm
Cholesterol: 478mg.
Sodium: 627mg
Potassium: 606 mg
Carbs: 151.34gm
Dietary fibers: 40.2 gm
Sugars: 71.05 gm
Proteins: 27.12gm
Vitamins A,B,C group
Minerals calcium, Iron
Divide the above data with 4 to get approx. value /muffin.
To reduce sugar amount and increase iron and fiber contents white sugar should be replaced with organic unrefined jaggery and to reduce fat butter should be replaced with Olive oil (60% of butter amount).

Ingredients Required For Making Whole Wheat Carrot Muffins:
  • 100 gm. Whole Wheat Flour
  • 50 gm. Salted Butter
  • 50 gm. Sugar
  • 100 gm. carrots
  • 2 Medium size eggs (The eggs I used weighed 50 gm each)
  • 1 Teaspoon Baking Soda/Eating Soda
  • 1/2Teaspoon Cinnamon Powder
  • 1 egg white for glazing muffins (Whisked separately)
Directions For making Whole Wheat Carrot Muffins:
  • Wash and remove the fibrous roots from carrots. Do not peel them else many nutrients will be lost.
Carrots Cleaned not Peeled
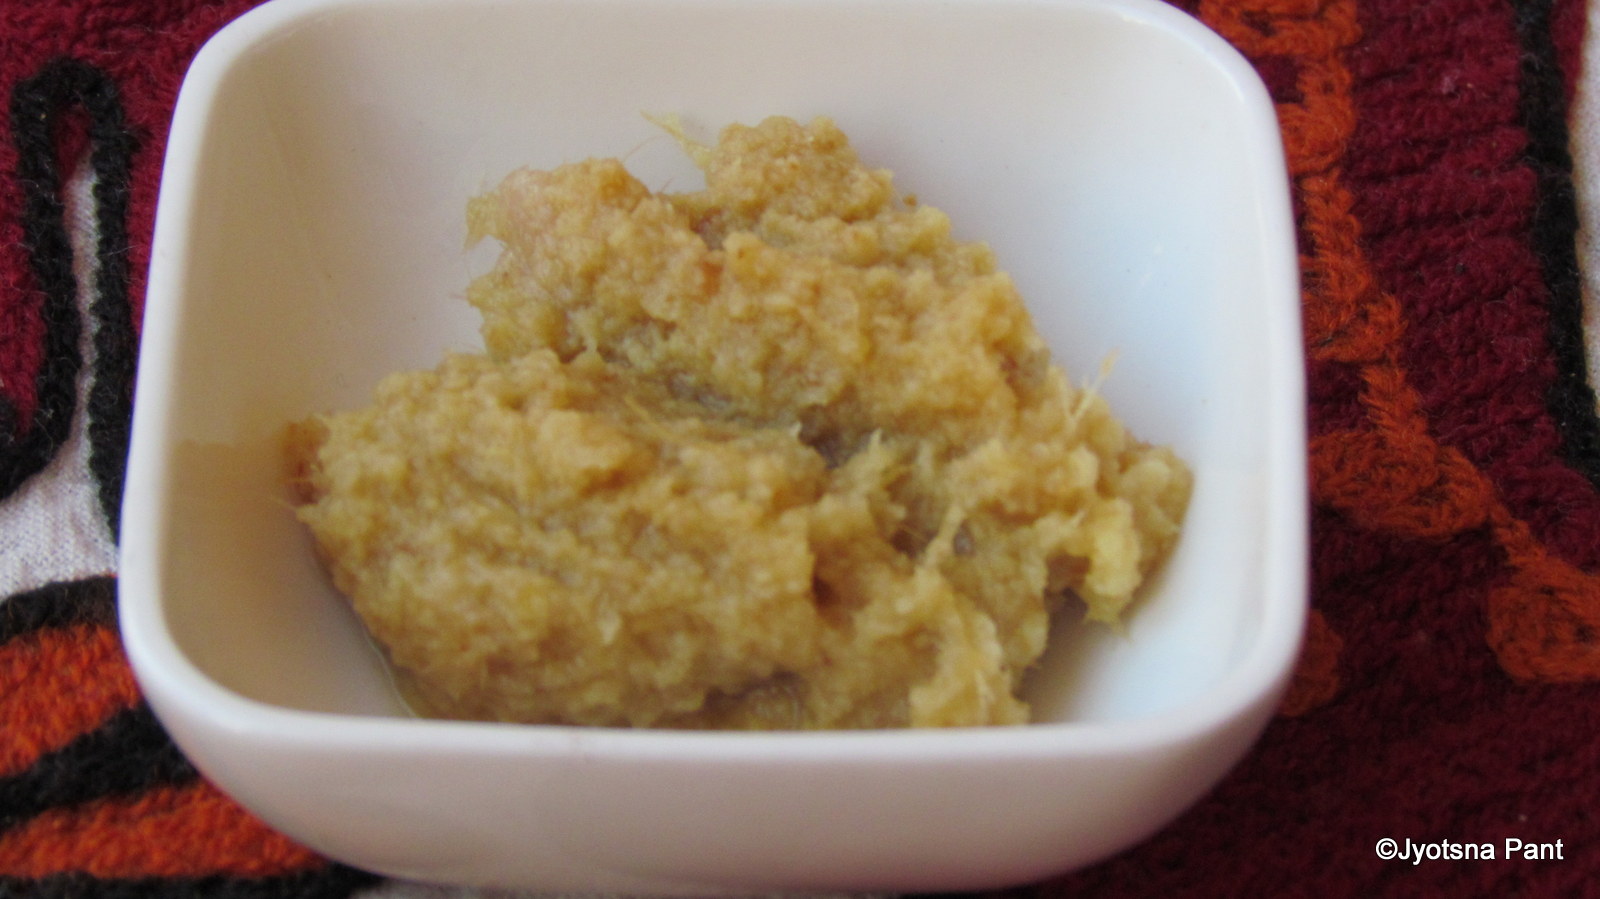
  • Grate the carrot and keep aside for later use.
Cleaned and grated carrots
  • Sift flour, cinnamon powder and baking soda 3-4 times to ensure even mixing of baking soda and flour also this incorporates air in flour which helps batter to rise.
  • Powder the sugar by pulsing it in grinder.
  • Cut the butter to small cubes and beat with sugar powder till creamy mixture is obtained. (3-4 min. with hand mixer)
Whisked Butter and sugar 
  • Add egg yolks and whisk for a minute.
Butter and egg yolk beaten to creamy texture
  • Whisk the egg whites till stiff peaks are obtained.
Egg white beaten to stiff peaks
  • Add flour to grated carrots and then add this mixture and whisked egg whites in butter and sugar mixture.
  • Mix with light hand without whisking, just swirl and mix this will give a thick uniform batter.
Thick batter for muffins
  • Pour the batter in muffin cups and brush the top lightly with whisked egg white.
  • Bake for 25-30 minutes or till done in a preheated oven at 180o C.
  • The top will become golden and the testing skewer should come out clean when baked.
  • Cool on the rake. Remove from the molds and when muffins come at room temperature wrap them individually with cling wrap. Store and enjoy with hot cup of coffee/tea/milk.
Whole Wheat flour-carrot-Muffin
Tips:
  • Do not beat while mixing the ingredients in final stage as the air trapped will get released and the muffins will not rise. Use swirl and cut method.
  • Under-mixing will result in non-uniform batter so mix slowly with light hands till uniform batter is obtained.
  • Eggs can be beaten together with butter without separating yolk and white. This will shorten the time required.
  • Carrots and flour mixture should be added together just before adding to butter egg mixture because moisture of carrot will start the reaction of soda.
  • Oven should be always pre-heated for baking else slow baking will start during heating of oven causing the baked product (Muffins in this case) to get spoiled.
Suggested Variations:
  • Nuts can be roasted and added to the batter this will add crunchiness to the muffins as well as nutrition.
  • Replace sugar with brown sugar/ jaggery for better nutrition.
  • Replace butter with Olive oil for reducing fat content and fewer calories.
  • Extra 50 gm of carrots can be added to the batter in paste form to get more carrot flavor and dietary fibers.
  • I prefer my cakes and muffins nude, if you want top them with whisked cream and fruits.
  • As I haqve mentioned in strating that for chocolate fans like me I included chocolate by taking 1/4 part of batter and adding melted dark chocolate 50 gm. Then this part of batter was poured at the bottom and above it pure carrot batter, then baked to get yummy muffins. Try it if you are chocolate buff like me.

Thursday, 16 October 2014

Mutton-Do-Pyaja मटन दो प्याज़ा (Indian Mutton Savory)


Mutton-Do-Pyaja
Steamed Rice and Mutton-Do-Pyaja
Mutton-do-pyaja is succulent pieces of mutton in gravy made by using onion in two different form i.e. long thin cut onion and well browned onion paste. The amount of onion taken is almost double by weight than that of mutton. I personally feel that since mutton has its own flavor which it imparts to the gravy also thus too much masala (Spices) overwhelm mutton and the muttonny flavor is completely camouflaged. Do-pyaja gravy has its origin in Lucknow in Mughal era. To give it Mughlai aura lots of Cashew nut, Almonds were added. I prefer Mutton-Do-Pyaja without any further addition of nuts so that the mutton can be enjoyed completely.

Preparation Time: 1 hrs.(Marination time not included)
Cooking Time: 1.30 hrs (Approximately)
Servings: 10 Large Servings

Ingredients Required For Making Mutton-Do-Pyaja:
  • 1 kg. Mutton (Goat meat)
  • 1 and 1/2kg. Onion
  • One tomato (roughky 100 gm)
  • 10-15 gm Garlic
  • 15 gm. Ginger
  • 2-3 Teaspoon Powder of Red Kashmiri Mirch Powder(optional)
  • 2-3 Lawang (Cloves)
  • 2 Bay leafs
  • 2 Whole Red Chili
  • 4-5 Sabut Kali Mirch (Pepper corn)
  • 2-3 cm. Stick of Cinnamon
  • 4-5 Teaspoon Coriander seed powder (Dhaniya)
  • 1 Teaspoon Turmeric
  • Salt to taste
  • 4 Red chili powder(Or to taste) (optional)
  • 10 ml. Cooking oil (I use mustard oil) 5+5 ml.
  • 10-15 ml. Ghee (Clarified butter)
  • 100 gm. Thick fresh Curd
Direction for Making Mutton-Do-Pyaja:
1.       Making Marinade:
  • Make fine paste of Garlic and Ginger. 
  • In a large bowl mix:
    • Curd
    • 1 Teaspoon salt
    • 1 Teaspoon Red chili powder
    • 1 Teaspoon Kashmiri Mirch powder
    • 2 Teaspoon Dhaniya powder
    • Garlic-Ginger paste
    • Turmeric powder
  • Thick uniform paste of marinade is ready.
2.       Marinating the Mutton:
  • Wash mutton thoroughly in flowing water.
  • Drain water completely.
  • Mix marinade to mutton making sure all pieces of mutton are coated with marinade.
  • Keep the mutton with marinade in a covered bowl for at least 2 to 3 hrs. Longer it is kept more will be the flavor of mutton and spices mixed with each other. Or 
  • Can keep for marinating before chopping work is done.
Marinated Mutton
3.       Cooking Process for Mutton-Do-Pyaja:
  • Peel 1/2 kg of onions and cut them to long pieces. Any thickness will do as they have to be cooked and made to paste.
  • In a thick bottom wok take 5 ml. of oil and heat. When the oil is hot add all cut onion and reduce the flame.
  • Cook on low flame till brown. Switch off the heat and allow the cooked onions to cool.
  • By the time onions are cooking peel rest of the 1 kg. Onions and cut them to long thin slices.
  • In a thick bottom wok take remaining 5 ml. of oil and heat on high flame. When the oil is hot, add the thinly slice onions and cook on low flame till transparent. Need not to brown them.
Sliced Onion cooking to trasparent state
  • In the same wok (Or other as per your wish) take 5 ml. of ghee and heat on high flame.
Spices in hot Ghee
  • When the ghee is smoking hot reduce the flame and add 
    • cinnamon
    •  cloves
    •  pepper corn 
    • Whole Red chili
    • Bay leafs
    • Cloves
 Let them split. (It will take a min. or two).
  • Add the marinated pieces of mutton without the thick liquid. Keep the liquid aside for later addition.
Mutton pieces in hot ghee with spices
Left over liquid of Marinated Mutton
  • Cook the mutton for 15 minutes with continuous stirring and turning upside down to make sure all pieces are evenly cooked in the oil. This will give the mutton a beautiful reddish brown color. Wonderful aroma of mutton and spices will start coming.
  • Add the thinly sliced transparent onions to mutton and cook for another 10 minutes with continuous stirring.
Transparently cooked onions added to mutton
  • Add onion paste and mix nicely and cook for another 5 min. this will make your onion mutton slightly brown and the color looks really wonderful.
Cooked onion paste added and mixed
  • Add all the liquid left from the marination and bring the flame to high.
  • Cook with continuous stirring till all the water evaporates.
Liquid of marination added and reduced
  • Bring the heat to low and add:
    • Salt (totaste)
    • Chili powder (to taste)
    • Remaining Dhaniya powder 
    • Kashmiri mirch powder
Basically all remainder spices are added at this stage.
  • Mix nicely and cook for another 2-3 min.
Ready for water to be added
  • Add water as per your requirement and mix. Cover and cook for 15-20- minutes with stirring occasionally. Or you can transfer the mutton from the wok with all the spices mixture to a pressure cooker and add water, cover the cooker with its lid and bring the heat to high till pressure is formed in the cooker. Lower the flame and cook for 10 min (Two whistles from the cooker).
Mutton-Do-Pyaja
  • Switch off the heat and allow pressure cooker to cool before removing the cooked mutton-do-pyaja from it.
  • Pour the remaining ghee on the top of cooked Mutton-Do-Pyaja and mix.
  • Serve piping hot delicious Mutton-Do-Pyaja with steamed rice/parantha/Chapatti.
Steamed rice with Mutton-Do-Pyaja 
Tips:
  • The state of mutton when it just starts falling off the bone is best cooked mutton. Over or undercooked mutton would spoil the whole dish.
  • Do not add too much water right in one stage as excess af water will have to be evaporated and this can cause overcooking of mutton, where as if more water is required then it can be added anytime of cooking.
  • Onion paste masala and ginger-garlic paste can be made before hand and kept in fridge.
    http://jyotsna-pant.blogspot.in/2013/11/onion-masala.html)
    http://jyotsna-pant.blogspot.com/2012/11/home-made-ginger-garlic-paste.html
  • Non-stick/Anodized woks reduce the usage of oil thus I always use them if you are using any other wok then oil requirement may change.
  • Always taste the chili powder before adding as the degree of hotness of different brands is different.
  • You can garnish the cooked Mutton-Do-Pyaja with finely cut Coriander leafs.
  • Curd/Papad/salad served along with steamed rice and Mutton-Do-Pyaja are best accompaniment.
  • If you wish you can avoid adding ghee to cooked Mutton-Do-Pyaja but believe me it brings a certain different texture and flavor to the dish.
  • The consistency of gravy can be changed as per requirement by adding required water.
  • Whole spices should be cooked in ghee not oil to get best result.
Alternate Suggestions:
  • If in hurry one hour marination will do.
  • Mutton can be cooked along with sliced 1 kg onions. This reduces the cooking time and efforts.
  • If you wish then the amount of onions can be reduced to 1.500 kg. (1 kg +500 gm).
  • Red Kashmiri mirch powder adds lovely red color so if you do not have it then avoid. Only color will be different not the taste.
  • If curd is not available then 8-10 small pieces of raw papaya can be added in marinade. Papaya pieces should be removed before cooking the mutton. Curd/papaya helps in cooking the mutton fast. If papaya pieces are not removed then mutton pieces will literally melt in gravy an unwelcome thing.

Friday, 11 July 2014

Chicken-Coriander Soup


Chicken-Coriander Soup
Chicken soup is very rich in nutrients and when mixed with coriander and lemon it becomes rich in vitamin C and Iron also. This gives it an edge over rest of the soups in taste as well as its therapeutic value. For a person suffering from cough, cold, and sore throat or is feeling low in energy this is the soup which helps tremendously and rejuvenating the system completely.  The lemony flavor along with the coriander makes it not only tasty but very appealing to our olfactory system. In simpler words the flavor of coriander and lemon make it very tempting and second helping is always called. If I am making the soup while my children are not well then I do not remove the fat otherwise fat is removed before dicing the chicken. It is very easy to make and does not require big preparations or long intricate steps.

Preparation Time: 5-10 min.
Cooking Time: 10-15 min
Servings: 4 Large helpings

Ingredients Required To Make Chicken-Coriander Soup:
  • 150 gm. Bone less chicken
  • 800 ml. Water
  • 10 ml. Freshly Squeezed Lemon Juice
  • Small bunch of Fresh Green Coriander Leaves
  • Salt to taste
Directions For making Chicken-Coriander Soup:
  • Wash chicken thoroughly and drain all water from it.
  • Dice chicken to small (1cm. approx.) pieces.
Diced Chicken
  • Clean and wash the coriander leaves thoroughly.
Coriander Leaves
  • Cut the coriander leaves to small pieces. It is not required to be cut finely.
  • Squeeze lemon and store the juice in the fridge.
  • Take water in a big cooking bowl and add salt to taste. Put it on the heat and let it boil.
  • Once water starts boiling lower the heat and add diced chicken in it and keep stirring while it is being cooked.
Chicken being Added To Boiling Water
  • Cook on low medium flame for 5 minutes with constant stirring. Chicken will turn to pinkish white and will become soft.
Chicken pieces after 5 Min. of Cooking
  • Switch off the heat and add the coriander.
  • Cover and allow it to stand for 2-3 minutes for coriander flavor to mix nicely with the soup and chicken pieces.
  • Take required amount of pieces and liquid in a soup bowl/Cup and add freshly squeezed lemon juice as per the taste.
  • Serve hot. It is healthy tasty and taken with crisp toast/ garlic bread makes full meal.
Chicken-Coriander soup
Tips:
  • Chicken fat provides much needed energy and need not be removed but if it is being taken for watching the weight then it is suggested that fat be removed completely before dicing.
  • Wash coriander in flowing water even if it looks clean. Herbs grow nearest to the soil thus require utmost care during cleaning.
  • If the stalk of the coriander are hard then take only top green leafy part otherwise just remove the root and use rest, Why waste?
  • Do not cook the chicken for a long time as it will become chewy surely an unwelcome thing.
  • Keep stirring the chicken while it is cooking to avoid formation of chicken lump 
  • Add less salt to water during cooking the chicken more can be added after tasting the soup as per requirement. Excess salt will spoil the taste.
  • Do not add lemon juice while the chicken is cooking it will impart bitter taste to the soup. Add lemon juice to hot soup just before serving to get full flavor and taste.
Suggested Variations:
  • Few coriander leaves can be diced fine and added after adding lemon juice.
  • Cilantro which is one of the variety of coriander does not impart as good flavor as coriander leaves thus I prefer Coriander leaves (Dhaniya patta).

Tuesday, 28 January 2014

Chili Chicken(Chicken Cooked with Capsicum and Spring Onions)

Chili Chicken

Chili chicken is spicy chicken cooked with capsicum and spring onions. Extremely tasty and goes very well with all types of Indian bread. Since it is cooked in very little oil and has lots of green in it, it is very healthy. The sauces added to it give it distinct tangy flavor. I love this chicken preparation. No marination is required for making chili chicken so the preparation time is also reduced. Chili chicken is cooked on high flame if cooked on low flame it becomes chewy and rubbery.

Preparation Time: 30 min.
Cooking Time: 30-40 min
Servings: 8 large servings

Ingredients Required for Making Chili Chicken:
  • 1 Kg. Boneless Chicken
  • 1 Bunch spring Onions (Having at least 10-12 spring onions)
  • 500 gm. Capsicum
  • 5 Green chilies
  • 15 ml. Soy sauce (2 Table spoon)
  • 2 Table spoon Green Chili sauce
  • 5 ml. Vinegar
  • 4 Tea spoons Corn flour
  • 10 ml. Cooking oil
  • Salt to taste
Directions For Making Chili Chicken:
  • Roast corn flour on low flame to golden pink color.
Roasted Corn Flour
  • Wash the chicken in running water and squeeze water from it nicely.
  • Cut the chicken to 4 inches pieces. And keep aside.
Chicken Cleaned and Cut to Pieces
  • Wash and cut capsicum to 2 inches pieces.
Diced Capsicum
  • Clean the spring onion of all yellow leafs and roots.
  • Wash the cleaned spring onions in running water and drain all water.
  • Cut the spring onions finely.
Cleaned and finely cut Spring Onions
  • Remove the stalk of green chilies,wash and slit them. Remove the seeds and keep aside.
  • In a thick bottom wok take oil and heat it. When the oil is hot (Not smoking hot) add the washed and cut chicken and cook on high flame with constant stirring and turning over the chicken pieces. Cook till the chicken starts turning very light pink in color and becomes tender. (Juices from chicken will come out while cooking and chicken will get cooked in it). This will taker 15-20 min.
Chicken cooked and ready for Capsicum and spring onions
  • Add capsicum and slit green chilies. Mix nicely. Cook for 2-3 min. on high flame.
  • Add spring onions and mix.
Capsicum and Spring Onions added and mixed
  • Add corn flour and mix.
Corn Flour added to the cooked chicken, Capsicum and spring onions mixture.
  • Add
    • Soy sauce
    • Green chili sauce
    •  Vinegar
Sauces added
  • Mix nicely.
  • Add salt, roasted corn flour and mix nicely.
  • Add 15 ml. water and mix. Cover and cook for 5 minute with occasional stirring.
  • Chili chicken is ready. Serve with roti/parantha or crisp toast.
Chili Chicken
Tips:
  • Do not cook the chicken on low flame it will become chewy.
  • Too much of corn flour should not be added it is meant to hold all ingredients together.
  • The chicken should be almost cooked before adding capsicum because capsicum and spring onions tastes nice in it when it is not over cooked.
Suggested Variations:
  • Soy sauce can be replaced by dark soy sauce but the amount should be reduced to half.
  • Chili chicken is meant to be spicy and hot but if you prefer less spicy then reduce the amount of green chilies and chili sauce as per taste.
  • Amount of capsicum and spring onions can be always increased. It will enhance the taste.

Sunday, 25 August 2013

Chicken Angara/चिकन अंगारा (Spicy - Barbecued Chicken)


Chicken Angara
As the name suggests Chicken Angara is chicken cooked on Angara (Amber). Piping hot chicken pieces spiced with red chili powder and marinated with curd and cream, served with sour and sweet barbecue sauce and tandoori roti make wonderful combination. Chicken Angara can be taken as appetizers as well as main course or side dish. Oil less, lean healthy can be enjoyed by all those who are watching their weight and also by those who avoid fatty substances and red meat for health reasons.
Preparation Time:30 min.
Cooking Time:5 min per skewer
Servings: 4 Medium size servings
Ingredients Required For Making Chicken Angara:
  • 250 gm. Bone less chicken
  • 100 gm. Thick Curd
Thick fresh curd
  • 1 Tea spoon Garammasala Powder
  • 1 Tea spoon Coriander Powder
  • 1 Tea spoon Garlic Paste
Garlic paste
  • 1 Tea spoon Ginger Paste
Ginger paste
  • 2 Tea spoon Red chili Powder
  • Salt to taste
  • 2 Tea spoon Cream
Cream
  • 3 Tea spoon Lemon Juice
Directions For Making Chicken Angara:
  • Wash the chicken and drain the water nicely.
  • Poke washed and drained chicken with fork.
  • Cut chicken to 4-5 cm. big pieces.
Chicken pieces cleaned for marination
  • Take all chicken pieces in a bowl and add lemon juice to the chicken, mix nicely, cover and keep aside for 15 minutes.
Lemon juice added to washed poked and cut boneless chicken
Chicken in lemon juice
  • In a bowl take 
    • Curd
    • Red chili powder
    • Coriander powder
    • Turmeric powder
    • Ginger paste
    • Garlic paste
    • Salt
Spices added to the thick fresh curd
  • Mix nicely
  • Add cream and beat to mix all ingredients nicely and make smooth, curdy-creamy marinade.
Marinade for Chicken Angara
  • Drain all juice from the chicken and discard the juices.
Chicken pieces after squeezing lemon juice from them
Lemon juice drained from chicken
  • Dip the chicken pieces in marinade and keep in a big bowl.
  • Pour all remaining marinade over the marinade coated chicken pieces. Cover and keep aside for 15 minutes.
Chicken in marinade
  • Skewer the marinated chicken pieces and cook them over red hot amber (Barbecue) with occasional turning the skewer for 4-5 min.
  • The chicken pieces will start becoming black at the edges and yummy smell will start coming from your barbecue pit.
 Chicken Angara (Barbecued chicken) on the skewer
  • Remove the barbecued chicken pieces and serve hot with rings of onion, lemon wedge and red chili sauce / any sauce of your liking/coriander-mint chutney.
Chicken Angara with onion rings and salsa sauce
  • Tandoori roti and Angara chicken are wonderful combination.
Tips:
  • Skewer the chicken pieces at least 1 cm. apart to make sure chicken gets cooked from all sides.
  • Curd should be fresh and should not be sour.
  • Cut the onion to rings and dip them in ice cold water the onion rings will remain fresh and crisp.
  • Drain the lemon juice completely, if required give a gentle squeeze to the chicken pieces to remove the excess lemon juices.
Suggested Variations:
  • A small piece of grated nutmeg can be added to the curd while making marinade.
  • For those who are watching weight and dieting cream can be avoided while making marinade.
  • Red chili powder can be increased /decreased as per taste but my suggestion increase but do not decrease Angara chicken tastes best when really spicy.

LinkWithin

Related Posts Plugin for WordPress, Blogger...