Showing posts with label #main course. Show all posts

Sunday, 18 April 2021

Bhatt ki cuhdkani (भट्ट की चुड़कानी /Kumaoni savory of Black Turtle Beans)


 चुड़कानी भात चुआ का साग 

Black Turtle Beans are known in India by many names. In Uttarakhand it is called Bhatt. It is very rich source of Vutamins B6, B12, Folates, Omega 3, Omega 6, many minerals and micronutrients. Being rich in Proteins and low on carbs and fats it helps alleviate type 2 diabetes. It is also very good for heart patients and high fiber content helps in digestion. 
Bhatt in Uttarakhand is used to make Bhatt ka Jaulaa, Bhatt ke Dubke, Ras-Gude Chudkani and dry roasted to be eaten as snack. 
Chudkani is a thick dal / soup made by roasting Bhatt and then cooking. 
Recipe follows. 
Nutritional value of Chudkani made from 100 gm black beans  (approx.) 
Energy : 210 calories 
Proteins : 11.74 gm
Carbs : 25.7gm
Dietary fibers : 9.1 gm
Fats : 1.0 gm
Cholesterol : 0 
Sugar : 0.37 gm
Sodium : 470 mg 
Potassium : 377 mg 
Iron: 2.10 mg
Calcium : 27 mg 
Magnesium : 70 mg 
Phosphorus : 140 mg
Zinc : 1.2mg
Rich in Vitamins :
A
B1
B2
B3
B6

Preparation Time : 5 minutes max 
Cooking Time : 30 to 40 minutes 
Servings : 5 Medium size servings

Ingredients Required For Making Bhatt ka Chudkani (Thick soup of Black Turtle Beans) :

Few ingredients of Chudkani 
  • Black Turtle Beans : 100 gm. 
  • Rice flour : 4Tespoons 
  • Cumin seeds : 1 Teaspoon 
  • Dry Red Chilli : 2 
  • Asafoetida : 1/4th Teaspoon 
  • Turmeric: 1/4th Teaspoon 
  • Red Chili Powder : 1/2 Teaspoon (optional) 
  • Salt: 2 Teaspoons or to taste 
  • Ghee / clarified butter /cooking oil : 1 Teaspoon 
  • Wate
Directions For Making Bhatt ka Chudkani:
  • Wash Bhatt (black turtle beans) nicely and pat dry them with a kitchen towel /clean cloth. Keep aside. 
  • Break red chilies into and remove all seeds. 
  • In an iron wok take ghee (clarified butter) and heat on high heat. 
  • Once the ghee is hot bring the heat to low and into the hot ghee put washed pat dried Bhatt (black turtle beans). 
  • Bring the heat to medium and with constant stirring. After 3-4 minutes the seeds will start sputtering and slowly they will change color and beautiful roasting smell will start coming. 
  • It will take max 5 minutes for Bhatt to get roasted. Remove them when they become too dark. Once out of hot wok they will keep cooking due to heat in them. 
Ghee Roasted Bhatt 
  • In the hot ghee add cumin seeds, once the seeds splutter add chilli pieces and asafoetida. 
  • Cook for 30 sec. The chilli pieces will change color and nice aroma of cumin, chilies, asafoetida will come from wok.
Cumin, red chili hing in hot ghee 
  • Add rice flour and cook with continuous stirring till rice flour becomes golden brown. 
Rice flour roasted 
  • Add roasted black turtle beans and mix nicely.
Roasted Bhatt added 
  • Add
  1. Turmeric 
  2. Red chili powder 
  3. and salt. Give a nice mix. 
Masala added 
  • Add 250 ml. water and bring the heat to high. Keep cooking on high heat with constant stirring till water starts boiling. 
Water added and cooking on low flame 
  • Bring the heat to low and keep cooking with stirring occasionally. 
  • The material in the wok will start thickening. 
  • Keep adding 100 ml. water as required (normally every ten minutes). Keep cooking on low heat. 
  • Bhatt (black turtle beans) will start swelling in size in the process of cooking and will become tender. 
After 10 minutes 
  • It will take atleast 25 to 30 minutes more for the Bhatt to cook nicely. 
Chudkani is ready 
  • Add water according the consistency you desire.
  • Adjust seasoning. 
  • Add one teaspoon of ghee. Give a boil and switch off the heat. Cover the wok. 
  • Let ghee flavor seep into Chudkani nicely for 5 minutes. 
  • Take out hot Chudkani in serving bowl. Garnish with fresh coriander leaves.
Chudkani and Saag 
  • Serve delicious Uttarakhandi Bhatt ka Chudkani with hot steaming rice and any leafy vegetable. I prefer with green Amaranth( चु/चुआ /चवली चे पान) sabzi. 
Chudkani Rice and Chu saag 
  • This thick soup of black turtle beans is actually a meal by itself.
Tips: 
  • After washing Bhatt they should not be soaked it water. Pat dry them to reduce the surface moisture. Else they will not splutter. 
  • While roasting washed Bhatt in ghee make sure they are roasted in medium heat. With continuous stirring to ensure 
  1. Even roasting
  2. Not burning off Bhatt 
  • Once nice nutty roasted aroma starts coming from roasted Bhatt and they start turning brownish remove from heat. Cooking keeps on taking place once away from heat due to jot oil in the. 
  • Do not add lots of water at one go, keep adding in small portion. 
  • If in hurry once Bhatt chudkani is cooked for 10 minutes transfer it from wok to pressure cooker and cook till it gives one whistle (roughly 10 minutes). 
Suggested Variations:
  • In the absence of iron wok, cast iron wok or any other thick bottom container can be used. But best taste comes when cooked in iron / cast iron container. 
  • In the absence of rice flour, wheat flour can be used. 
  • Though chudkani tastes best when cooked with ghee but mustard oil is second best choice. Rest your choice for oil you take for cooking. 


Friday, 17 April 2020

Dabbo (Ethiopian Bread)


Dabbo (Ethiopian Bread)
Slices of Bread Made In Ethiopian House hold
Being Indian I am more into chapatti/roti/parantha/puri all sort of Indian bread, thus have only basic knowledge of baking a bread. I was really intrigued by Ethiopian families baking their own bread on regular basis. They bake 3-10 kg. big bread for the consumption of the family members. It was a wonderful experience watching them bake the bread. I wish to share their method of making the bread. They do not use egg, butter, milk in making bread. Bread being staple food along with Injera is eaten during fasting also and any form of animal product is taboo during fasting, also even poorest of the poor can afford to make this bread here. My Ethiopian friend Mulgeeta was kind enough to allow me to take the picture of bread baking and share the recipe.

Preparation Time: 15-20 min.
Fermentation Time: 3-4 hours
Baking Time: 2 hours
Servings: Bread of 3 Kg.

Ingredients Required For Making Dabbo:
  • 3 kg. Refined Flour
  • 1 Eating Spoon Dry Yeast
  • 1 eating Spoon Sugar
  • Water
  • Banana leaves
Directions For making Dabbo:
  • Dissolve yeast and sugar in 2-3 eating spoons of water.
  • Add 1-2 eating spoons of refined flour and keep aside for the yeast to rise.
  • Sieve the refined flour and add yeast solution.
  • Mix nicely.
  • Add water in little proportions and knead the flour yeast mixture to make soft dough. 1-1.5 Lt. water is required for making the dough. The dough should neither be hard nor runny. It should be soft and pliable.
  • Cover the dough and keep aside for fermenting for 4-5 hours.
  • The dough will rise and become pourable, not watery.
  • Do not beat this dough, if done so the air trapped in it will escape and the bread will not rise, and will not come out soft.
  • Line a bread baking dish with banana leaves (Here they line it with leaves of similar plant called false banana, it is similar to banana but it neither fruits nor flowers).
Bread Baking Dish Lined With False Banana Leaves
  • Pour the fermented dough on the in the container lined with banana leaves.
Ashakhale Pouring the Batter for bread
  • Sprinkle some Nigella / Sesame seeds and spread the dough uniformly. Make depressions with the fingers.

Bread Dough with Nigella seeds in the baking dish layered with False banana leaves
Making depressions with fingers
  • Cover the fermented dough in the bread baking dish with banana leaves.
Covering the dough with false banana leaves
  • The oven for making bread here is called Dabbo Miltad and has two different plugins for heating from bottom and top.
Aleminish showing the locally made Dabbo Miltad with two ends to heat top and bottom
Dabbo Miltad from inside
Muluget placing the bread baking dish with bread dough in Dabbo Miltad
  • Place the baking dish with bread dough in the bread oven (Dabbo Miltad) and heat it from the bottom.
  • After 40-45 minutes check, baking has started and the dough starts rising.
  • Bake for another 15-20 min.(Total 55-65 min.). The dough will have risen completely.
Rising Bread after 45 minutes
  • Heat the oven from the top now for 30-40 minutes. The top and sides of bread will become golden brown.
  • Remove the bread from oven. Remove the top leaves and carefully remove the bread and place on a plate for cooling.
Ethiopian Home Made Bread
Home Made Bread Slices
  • Bread here like Injera is kept in Mosab for storing.
Tips:
  • Add water in little proportions and knead.
  • Kneading has to be done at least for 15-20 minutes after the dough consistency is attained. More the kneading better the bread will be.
  • One cup of this dough can be stored in the fridge for future use. For next time you make bread you will have yeast culture with you. Take it out 2-3 hour before making the dough and allow the yeast to multiply and grow. Use this for fermenting rather than dry yeast.
Suggested Variations:
  • Instead of refined flour Mixture of whole wheat flour and refined flour in 1:1 ratio can be taken to make the bread healthier.
  • Barley flour can be added in 3:1 ratio.
  • Once the pink dots start appearing on the top then, remove the bread baking dish from oven and remove the leaves, polish the top with egg white (Beat 2 egg whites and with the help of a brush polish the top with egg white), then baked for 5 minutes. The top will become shiny and light brown.
  • Sugar can be sprinkled on the top 5 minutes before switching off the oven.
  • Milk and water mixture in 1:1 ratio can be taken for kneading the flour.
  • Add raisin, nuts, dry plum pieces, dry apricot pieces and you will have fruit bread.

Thursday, 2 April 2020

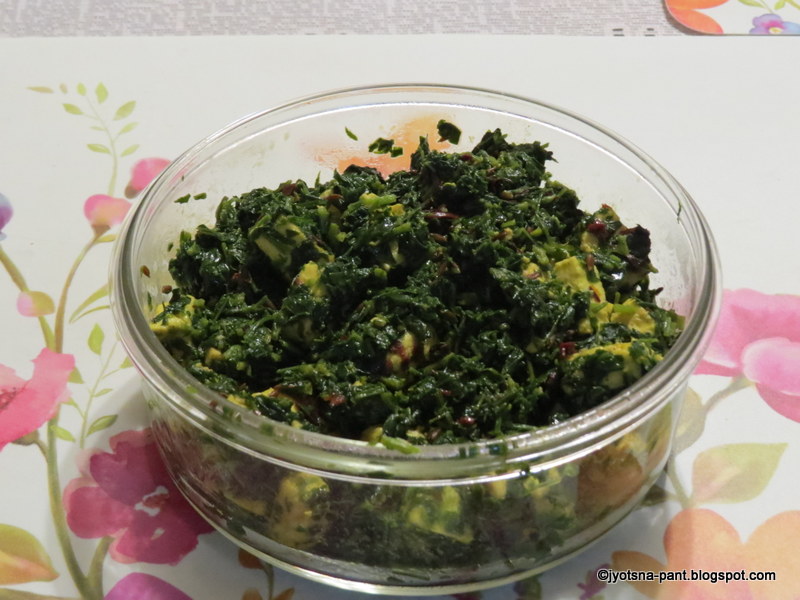
Methi Paneer (Savory of Fenugreek leaf and Cottage Cheese)


Methi-Paneer
 Paneer is vegetarians delight, because it brings with it the so dearly required protein which otherwise vegetarians get from lentils and pulses and legumes. It can be paired with so many vegetables to give delicious and nutritious main course. Apart from paneer being paired with other vegetable, who does not know the world famous dishes like Butter Paneer, Kadhai Paneer to name few. Paneer stuffed parantha is also one of my favorite stuffed parantha.
Methi is rich in fibers, Iron, Potassium and protein with very low calorific value. Paneer (Cottage Cheese) is rich in protein, fats and sugars but no dietary fibers. Thus the combination of the two balances the dish and we have extremely healthy, rich, nutritious and very tasty vegetarian savory. I prefer 1:1 ratio of paneer and methi leaves (By weight), but the ratio of Methi:Paneer can be changed to 1.5 or 2:1.

Preparation Time: 20-25 minutes
Cooking Time: 15 minutes
Servings: 4 Medium Servings

Nutritional Value For total vegetable cooked with given ingredients)
  • Energy: 698.36 cal.
  • Fat: 49.5
  • Carbs:  23.5gm
  • Sodium: 1501.6mg
  • Protein: 48gm
  • Fibers: 10gm
  • Sugars: 11.6gm
  • Iron 6.5 mg
  • Calcium: 210mg
  • Potassium 1410mg
  • Vit A,C 
Ingredients Required For Making Methi-Paneer:
  • 1 Big Bunch of Fresh Methi leaves (Fenugreek leaves)/ 250-300 gm of cleaned leaves
  • 200 gm Paneer (Cottage cheese)
  • 10-15 ml cooking oil (I use mustard oil)
  • 2-3 Whole Red Chilies
  • 1/2Teaspoon Turmeric Powder (Haldi)
  • 1 Teaspoon Cumin seeds (Jeera)
  • 1/4Teaspoon Asafoetida (Hing)
  • Salt to taste
Direction To make Methi-Paneer:
  • If you have got bunch of methi leaves then pick the leaves and soft tips. Discard the stalk part. The picked leaves should be approximately 250-300 gm.
  • Wash the picked methi in flowing water. Drain the water and leave the washed methi on a dry kitchen towel for 10-15 minutes so that all water is removed.
  • Chop washed methi as fine as possible. Keep aside.
Chopped Methi
  • Cut paneer to 1-1.5 cm cubes. Keep aside.
Pieces of Paneer
  • Crush the red chilies to small pieces and remove the seeds. Keep aside.
Crushed Dry Red Chili
  • In a thick bottom wok or pan, heat cooking oil on medium heat. When the oil is hot add cumin seeds. Let the seeds splutter. Immediately add crushed red chilies and hing. Cook for 30 seconds on medium heat.
Cumin seeds spluttering in hot oil
Crushed Chili pieces added to oil
  • Add paneer pieces and bring the heat to low and cook paneer in spices with continuous stirring, Make sure the paneer pieces do not break while stirring.
Paneer added to spices 
  • Cook for 2-3 minutes. Paneer pieces will start looking firmer and color will also change.
  • Add chopped methi. Mix nicely but with care.
Methi added to paneer
  • Add
    • Turmeric
    • Salt
  • Mix and cover the wok. Cook for 3-4 on medium heat with stirring in between.
Teumeric, salt added before covering
  • Remove the lid, there will be liquid do not worry. Bring the heat to high and cook for just one minute, turning the contents in the wok so that they do not get stuck to the bottom of the wok.
Excess liquid in vegetable being evaporated on high heat
Excess liqid  evaporated on high heat
  • Switch off the heat, let thye cooked vegetable in the wok till it gerts cooled. this will ensure removal of any extra moisture.
Cooked Methi-Paneer
  • Remove cooked Methi-Paneer in serving bowl.
Methi-Paneer
  • Serve with Roti / Parantha along with curd/raita/dal etc.
Tips:
  • Take only leaves and soft tip of methi. If stalk is taken then it will not give too palatable result.
  • It is must that water from methi leaves is removed before chopping. Any extra water will cause the vegetable to have lots of water content while cooking thus require to be cooked for longer time thus changing the appearance and taste of vegetable.
  • Methi and paneer ratio by weight is preferably 1:1 or methi amount can be increased.
  • Do not cook the paneer or the vegetable after adding methi too much. Leafy vegetables taste best when the leaves retain the green color (Do not turn blakish due to over cooking).
Suggested Variations:
  • Finely chopped garlic can be added to the oil once cumin seeds have spluttered, cook it till pinkish brown color comes in garlic pieces then add chili and hing.
  • Coarsely ground roasted groundnut can be added after the heat is switched off. This gives a crunchy texture and nutty flavor to the vegetable.

Thursday, 26 March 2020

Stuffed Sponge Gourd (Bharwa Ghia Tori)


Stuffed Sponge Gourd
Tender but firm to feel Bottle gourds are used to make savory in different part of India. It is known by many names in India, to name few Turai/Ghia Turai/Ghosali /Niyangnattakolu /Bhatkakrel/Abhi/Thupada heere. When it gets mature and seeds are formed, the dried sponge gourd is cut open to retrieved seeds and the remainder fibrous part is natural looffa.
Sponge gourd has various types of micro nutrients and vitamins. In fact its range of minerals and vitamins is very impressive.
Leafs, flowers, fruit all are used in cooking and then the magical plant gives us best luffa.
Today I am dealing with only fruit part of sponge gourd.
While somewhat thicker ones are used to make savory and pakodas (fritters), for this particular recipe we require very tender, soft but firm sponge gourd. The sweet taste of sponge gourd and slight tangy, salty and peppery mix of spices makes this juicy savory very tasty. So let us start.

Preparation Time: 10-15 minutes
Cooking Time: 20-25 minutes
Servings: 2 Medium Helpings

Nutritional value of Stuffed Sponge Gourd (Approx. value 100 gm Sponge gourd)
Energy 56 Cal
Protein 0.65gm
Carbs 14gm
Total Fat 0.34gm
Ash 0.38gm
Dietary Fibers 3.0gm
Sugars 5.2gm
Water 85.5gm
Manganese 0.232mg
Potassium452.8mg
Copper 0.84mg
Magnesium 20.22mg
Iron 0.359mg
Phosphorous 30.89 mg
Zinc 0.169mg
Sodium 20.78mg
Calcium 8.99mg
It is rich source of Vitamin B­1, B2, B3, B5, B6,B9
Vitamin A, C, E, K

Ingredients required For Making Stuffed Sponge Gourd:
  • 750 gm Tender Sponge Gourd
  • 2 Teaspoon Coriander seed powder (Dhaniya powder)
  • 1/4Teaspoon Turmeric Powder (Haldi powder)
  • 1 Teaspoon Dry raw mango Powder (Amchur powder)
  • 1/4Teaspoon Red Kashmiri chili Powder (Kashmiri mirch powder)
  • 1/4Teaspoon Black pepper powder (Kali mirch powder)
  • 1Teaspoon (or to taste)
  • 1-2 Teaspoon Clarified butter or any cooking oil
  • 1 Teaspoon Cumin seeds
  • 1 Whole Red Chili
Direction For Making Stuffed Sponge Gourd:
  • Wash and towel dry sponge gourd.
  • Peel and slit it lengthwise.
  • Cut the slit gourd to 3-4 inches pieces. Keep aside.
Peeled and Slit Sponge Gourd

  • Mix
    • Salt
    • Chili powder
    • Amchur Powder
    • Turmeric Powder
    • Pepper Powder
  • This is the stuffing for the gourd.
  • Pry open the slit gourd pieces and spread generous amount in the slit to stuff them with spices mixture.
 Sponge Gourd Stuffed With Spices

  • When all pieces of slit gourd are stuffed cover them and keep aside for an hour or so for marinating.
  • After 50-60 minutes the dry stuffing will have absorbed water from gourd and become moist. The gourd pieces will also feel a bit wilted.
  Sponge Gourd with Stuffing after an hour
  • Heat ghee/oil in a thick bottom non-stick pan and when the ghee is hot add cumin seeds and pieces of whole red chili.
Ghee Tempered with Cumin seeds and Red chili
  • Once the seeds have spluttered and chili pieces change color immediately add stuffed gourd and cook on high heat gently turning the pieces till all sides become light brown in color.  Approximately 8-10 minutes of cooking will be required. This will seal the juices in the gourd pieces.
Stuffed Gourd in Tempered Ghee
Cooking on high heat
Just Before Covering and cooking on medium heat
  • Bring the heat to medium and cover the pan. Cook for another 5 minutes with once or twice turning the pieces but gently.
2 minutes after covering on medium heat
  • The spices stuffing and some juice of gourd will seem to come out, do not worry.
  • Remove the lid and cook for 2-3 minutes more or till any liquid if present gets dried. 
Stuffed Sponge Gourd
  • Your stuffed sponge gourd is ready to eat.
Stuffed Sponge Gourd
Enjoy delicious and healthy stuffed sponge gourd with chapati/parantha.
Tips:
  • This tip is for any stuffed thing you bare making. If the stuffing is dry powder then after stuffing the vegetable allow it to stand for atleast 40-50 minutes. This will make stuffing absorb moisture from vegetable and while cooking it will not burn . Also it will aloow spices to seep deep inside the vegetasble.
  • Get tender gourds for this recipe.
  • Take care while slitting.
  • Do not add too much chili or pepper powder or dry mango powder, because it will overcome the sweetness and gentle flavor of gourd.
  • Adjust the chili powder according the hotness of chili powder.
  • If you are not using non-stick pan then cooking oil/ghee amount will have to be increased.
Suggested Variation:  None.

LinkWithin

Related Posts Plugin for WordPress, Blogger...