Showing posts with label North Indian. Show all posts

Monday, 28 December 2015

Lauki Ki dahi Wali Sabzi (Bottle Gourd savory)


Lauki Ki Dahi wali Sabzi
Lauki (Bottle gourd/calabash/Dudhi) is a vegetable having large amount of water and dietary fibers. It is easy to digest and has a slight sweet taste. Thought many people prefer peeling the Lauki before making the vegetable, it is advisable that choose tender bottle gourd for making vegetable and keep the peel on. The peel has micro-nutrients and dietary fibers. Even if you get the one with hard peel and do not wish to have grainy touch to your vegetable, peel it but do not throw the peel. The peel can be cut to fine strips and a good savory can be made out of it or the peels can be roasted in oven and made to good crisp side dish. Apart from sabji (savory) it can be used to make Koftas-Curry also. I prefer Lauki koftas make using Moong-dal flour, the Koftas come out crispier.
Lauki is not only used to make savory but good dessert like Kheer, Halwa and delicious healthy shake “Deli Milk Shake” http://jyotsna-pant.blogspot.in/2015/02/deli-milk-shake.html
The savory of Lauki can be made with or without adding curd/tomatoes. If sourness is not introduced to the sabji then it comes out a little on the sweeter side due to the sweetness of Lauki. Whatever way it is made Lauki sabji is very tasty and healthy. My daughter-in-law loves the Lauki I make using curd. She loves eating it with not only roti but with chawal (steamed rice) also.
Bottle gourd has tremendous health benifits. It is diuretic, cooling thus soothing to digestive system. Due to plenty of water content in it , it moisturises the skin internally and is reduces the chances of acnes.The fibers in peel help in absorption of water in elementary canal thus reduces the chances of constipation. 

Preparation Time: 5-10 minutes
Cooking Time: 15 minutes (max.)
Serving: 4 Medium Servings

Nutritional Facts: Omiting Potato amount of Carb and calories can be reduced along with few micro-nutrients)
85 Cal
20.56mg Carb
9 gm. Protein
7 gm. Sugars
1.50 mg. Dietary fiber
25 mg. Calcium
o.25 mg. iron
6ug folates
10 mg Vitamin C
Vitamin K
45.5 mg Potassium
90.6 mg Sodium
0.25 mg Vitamin B6
12 mg. Magnesium
0.7 mg. Zinc

Ingredients Required for Making Lauki-Ki-Dahi Wali Sabji:
  • 500 gm. Tender Lauki (Bottle Gourd)

Bottle gourd
  • 1 Medium size Potato (Optional) (10 gm. approx.)
  • 1 Green Chili
  • 2-3 Sprigs of fresh Coriander leafs
  • 1 cm. Piece of Ginger
  • 1/2 Teaspoon of Ghee (Clarified Butter) Melted not solid
  • 1/2teaspoon Jeera (Cumin seeds)
  • 1/4Teaspoon Hing (Asafetida powder)
  • 1/4teaspoon Turmeric Powder
  • Salt to taste
  • 200 gm. Thick slightly sour Curd (I use Skimmed milk curd) at room temp. 
  • 1-2 Sprigs of Fresh coriander leafs for garnish

Directions For Making Lauki-KI-Sabji:
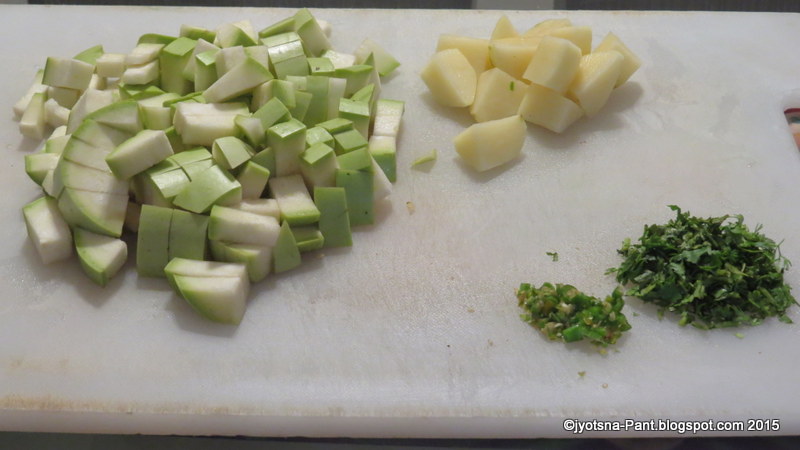
  • Wash Coriander leafs, chili and ginger. Chop them finely.
  • Wash Lauki and remove any blemishes fron Lauki surface usinf knife.
  • Chop Lauki to small pieces.

Chopped vegetable 
  • In a pressure cooker take 1/2teaspoon of ghee and heat till very hot.
  • Add cumin seeds and let them splutter.
  • Once the seeds had spluttered add
    • Hing
    • Ginger pieces
    • Green chili pieces
    • Chopped coriander leafs
  • Cook for 1 minute with constant stirring. Aroma of spices will start emanating.

Spices and coriander leafs cooking 
  • Add potato pieces and cook for 2 minutes on low flame with stirring two or three times.

Potatoes added and cooked for 2 minutes
  • Add Lauki pieces and stir. Cook for 2 minutes with stirring 3-4 times, so that all spices mix with vegetable.

Lauki (Bottle gourd) added and cooked for 2 minutes
  • Add
    • Turmeric
    • Salt
  • Mix and close the cooker with the lid. Place the weight of cooker on the lid and cook on low flame for 5 minutes (Till it whistles once).

Turmeric and salt added
Ready for cooking on low heat in pressure
  • Switch off the heat and allow the vegetable to cool. Open lid, Lauki and potatoes will have cooked.
  • Mash the vegetable(mostly potatoes) slightly.

Cooked vegetable
After mashing cooked vegetable
  • Whisk  curd (which should be at room temperature) to smooth consistency.
  • Keep the cooker on high heat and add curd.
  • Mix curd and vegetable, and cook with constant stirring for minutes or so. Once the vegetable starts bubbling, switch off the heat.

Curd added and given a boil
  • Do not get startled by slight splitting of curd. This is a natural phenomenon. But if cooked too much after adding curd the curdling will be excessive and the appearance as well as the taste will not be too good.

Lauki ki sabzi ready to be garnished
  • Remove the sabji in a serving bowl and garnish with coriander leafs (Chopped or shredded).
  • Serve with Roti/Parantha or Rice as my daughter-in-law likes.

Lauki ki Dahi Wali sabzi

Tips:
  • Curd should be at room temperature else it will split. 
  • Chop Lauki after you have done rest of the chopping because Lauki decolorizes if kept for long.
  • Do not chop Lauki first and keep it immersed in water, as the nutrients will leach out from Lauki into water.
  • If your Lauki has hard peel just scrape the upper surface, do not remove all the peel, in doing so you are loosing on important nutrients.
  • Remove the seeds only if they are hard, in any case good Lauki for savory is the one with soft interior.
  • Taste the chili before adding as some are too hot, and too hot chili will spoil the sweetness Lauki is associated with.
  • Ginger, chili and coriander leafs (Dhaniya patta) are added to the vegetable for flavor, do not over do them.
  • No water should be added to the Lauki in any stage as it is rich in juices and once it is in cooker the salt helps the juices to be released, Lauki and potatoes will cook in this juice itself.
  • Cooking should be done on low heat. Never on high or medium, else vegetable will get burnt.
  • Adding water will spoil the taste of Lauki sabji.
  • Potato is added to bring some natural starch along with nutrients to the vegetable, which binds the Lauki pieces together.
  • Never add curd or tomato before the vegetable is cooked.

Suggested Variation:
  • Ghee can be replaced with any cooking oil, though this vegetable tastes best when made in ghee.
  • Ghee or oil should be just enough to make the cumin seeds splutter, too much of ghee/oil will spoil the tatse and healthy benefit of Lauki.
  • Potato can be omitted, but the final outcome will be slightly different. The starch of potato binds the vegetable and curd together. Omitting potato will reduce calories and carb in vegetable.
  • Curd can be replaced with 50 ml. paste of tomato puree. If adding tomato puree, then cook the vegetable for 3-4 minutes after adding tomato puree so that the flavor of tomato mix nicely with Lauki.
  • 2 teaspoon ofroasted  flour (Wheat/Rice/Gram) can be added to curd before adding to the cooked vegetable mixture. This avoids curdling of curd. I prefer not to add it thus not shown in my recipe.

Tuesday, 17 December 2013

Masala Gobhi (Spicy Cauliflower Savory)

Masala Gobhi

Masala Gobhi with Matar
Indian cuisine is having tremendous variation due to difference in the culture, eating habit and climate variations. Same vegetable can be prepared in different style from east to west and north to south of India. Masala Gobhi is typical North Indian savory made from spices and Cauliflower. I love masala Gobhi so much that I always make it in larger quantity than required and next day stuff it between two slices of bread and toast the sandwich. 

Preparation Time:15 min.
Cooking Time:40 min.
Servings: 4 Large servings

Ingredients Required For Making Masala-Gobhi (Cauliflower cooked with spices):
  • 250 gm. Cauliflower
  • 1 Large Onion
  • 1 Tea spoon Garlic paste
  • 1 Tea spoon Ginger Paste
  • 1 Tea spoon Red Chili Powder
  • 1/2Tea spoon Turmeric Powder
  • 1/2Tea spoon Garam masala
  • 1 Tea spoon Amchur
  • Salt to taste
  • 15 ml. Olive oil / any cooking oil
Direction For Making Masala Gobhi:
  • Remove all leaves from cauliflower and cut the florets to long pieces.
  • Take 500 ml. water and one teaspoon salt in a pan and boil the water salt solution.
  • Soak cauliflower florets in salted water to ensure that the florets get cleaned thoroughly.
  • Remove the crisp and white cleaned florets from salted water sand give a nice wash with water.
  • Cut onions fine.
  • Peel, wash and cut potatoes long thick pieces.
Cauliflower and Potatoes
  • Heat oil in a thick bottom wok.
  • When the oil is smoking hot reduce the flame and add cumin seeds, cloves and bay leaves.
  • The seeds will splutter. Add onion to the seasoning immediately.
Onions being cooked with seasoning
  • Cook on low flame with constant stirring till the onion start becoming brown.
  • Do not let the onion become completely brown.
Stage when Garlic and Ginger paste is to be added
  • Add garlic and ginger paste and cook with continuous stirring till the paste leaves the edges of wok.
Garlic and Ginger paste added to onion
  • Add potato pieces and cook on low flame with occasional stirring for 4-5 min. Do not cover.
Potatoes Cooked On low flame with onions
  • Add cauliflower florets and mix.
  • Cook with occasional stirring for 10 min on low flame.
Vegetables cooked for 10 min. on low flame and ready for spices to be added
  • Add
    • Salt
    • Turmeric powder
    • Chili powder
Salt,Turmeric powder and Chili powder added to partially cooked vegetable
All Spices added and mixed
  • Mix nicely and cover.
  • Cook for 5 min. with stirring twice or thrice to ensure even cooking.
  • Sprinkle 5 ml. water and mix.
  • Cover and cook for 2-3 min. Potatoes and cauliflower will become tender but not mushy.
  • Add amchur powder and garam masala.
  • Mix thoroughly and cover.
  • Cook for 30 sec. and switch off the gas.
  • Let the flavor of spices seep in the vegetables.
Masala Gobhi ready to be served
  • Remove in the bowl and serve hot with roti/parantha/puri/rice as you like.
Masala Gobhi
  • My personal preference is not to garnish this vegetable with any herb as the flavor of masala is itself wonderful.
Tips:
  • Wash the cauliflower florets nicely after soaking in salted water to ensure no salt is left on them.
  • Do not brown the onion. They should be transparent when garlic-ginger paste is being added.
  • Do not replace amchur with tomatoes the taste will change completely.
  • Water should not be added to vegetable while cooking as the moisture of cauliflower is enough to cook the vegetable. If required then only 10 ml. water should be sprinkled.
Suggested Variations:
  • Par boiled peas can be added to vegetable 2-3 min before adding garam masala and amchur.
  • Potatoes can be omitted by those who do not prefer them.
  • Those who do not par take onion garlic can add Dhaniya powder (Powder of coriander seeds) and little roasted sesame seed powder along with amchur powder and garam masala.
Masala Gobhi with Matar

Tuesday, 15 October 2013

Lachcha Parantha / लच्चछा परांठा(Pan Fried Indian Bread With Ringlets)


Lachha-Parantha
Lachcha parantha is a delicacy of Mughal time which was made in main course along with Muglia mutton. In may be known by different names in south and north of Indian but the taste is same delicious and rich. This parantha is very in calories and fat as it has loads of ghee, but then we have to forget about calories if we want to enjoy some delicacies, until unless there is some health problem. Eating in moderation is never detrimental to health so do enjoy this parantha and let your family feast on these paranthas.

Preparation Time: 15 min.
Cooking Time: 10 minutes/ parantha
Servings: 6 Medium size paranthas

Ingredients required For making Laccha Parantha:
  • 350 gm. Maida (Refined flour)
  • 150 gm. Wheat flour
  • 200 gm. Ghee (Clarified Butter)
  • 1/2Tea spoon salt
  • 100 ml. Water
Direction for making Dough For Laccha Parantha:
  • Melt ghee.
  • In a plate / bowl take
    • Wheat flour
    • Refined
    • Salt
    • 50 ml. melted ghee
  • Mix all ingredients so as to form a uniform mixture.
Maida-Atta (Refined flour and whole wheat flour) for Lachha parantha
Ghee added to Maida-Atta and salt mixture
All ingredients mixed
  •  Heat water to luke warm temperature.
  • Add water in little portion (10ml. at a time) and mix with kneading action.
 Flour being kneaded
  • Knead the mixture to soft but firm dough.
Dough for Lachcha Parantha
  • Cover the dough and keep aside for one hour.
Kneaded flour covered and kept for 1 hr.
  • Heat a thick tawa (iron plate) on medium flame.
  • Divide the dough to 6 equal parts and make round balls of each portion.
  • Roll the dough ball on the rolling board and apply 1 ml. Ghee on the rolled dough ball.
Rolled dough
  • Pick the rolled dough  with ghee from one end and roll it to a till the other end is reached.
Melted ghee spread on the round rolled dough and being rolled to a roll
Roll of dough with ghee
  • Flatted the roll and apply ghee 1 ml. ghee on it.
Roll flattened and ghee spread on it
  • Roll it again from one end to other end to make a round shape.
  • Secure the ends in place by pressing them firmly.
Roll with ghee rolled to round
  • Sprinkle a little dry wheat flour and roll giving slight pressure with the rolling pin to make a rolled lachcha parantha of 6-7 cm. diameter.
Rolled Lachha-Parantha
  • Place the rolled parantha on hot tawa and cook on medium heat till brown dots start appearing on the side touching the tawa. 
Rolled Lachha-Parantha on Tawa
  • Turn and cook the parantha on medium heat till brown dots appear on the other side also.
  • Spread 1 teaspoon (1 ml.) ghee on the parantha and turn it upside down.
  • Cook for 30 seconds by pressing with a spatula.
  • Spread 1 teaspoon (1 ml.) ghee on the other side also and flip it.
  • Cook for 30 seconds the other side also after ghee has been applied on it. 
 Lovely Golden Lachha-Parantha
  • Lachcha parantha is ready. Gently press the hot parantha from the edges with a crushing action and serve hot lachcha parantha with Vegetarian /Non-vegetarian Indian savories.
Lachha-Parantha
Tips:
  • Make sure the dough for lachcha parantha is soft not hard like puri.
  • Adding the ghee to the flour mixture is must to get crisp ringlets (Lachcha) in parantha, so do not reduce the amount of ghee.
  • The amount of lachcha in parantha depends upon the way you make the roll after applying the ghee on rolled ball of dough. Better roll will produce more lachcha.
  • Do not apply too much pressure after the roundel is made from the roll, else the ringlets (lachcha) will not come nicely.
  •  2 ml ghee (one for each side) in required for pan frying. Do not reduce the amount other wise the parantha will not become soft and crisp. It will become limp or hard and dry.
Suggested Variations:
  • Instead of water milk/butter milk (Which is not too sour) can be taken for kneading the flour.
  • Instead of ghee 2 well beaten egg whites can be added to the flour while making dough. Beat 2 eggs white; add to the flour mixture along with salt and mix nicely to make the flour mixture look like bread crumbs. Add water in little proportions and knead to make the dough for parantha. Keep aside for one hour. Proceed as earlier for making the parantha.
  • Refined flour with out adding samolena or whole wheat flour can be taken for making parantha.

Tuesday, 8 October 2013

Kurmuri-Chatpati Arbi (Crisp-Spicy Taro Tuber )


Kurmuri-Chatpati Arbi
Arbi/ taro is a tuber grown in almost whole of the world. In northern part of India especially Uttar Pradesh dry vegetable which is crisp and spicy is liked very much. In Kumaon apart from dry vegetable of arbi, thick gravy vegetable is made in iron pot. The tangy taste of iron, hot flavor of spices blends with arbi giving a unique taste to the vegetable. Another form of arbi preparation is arbi cooked in curd oh so yummy. How much I miss the savories made by my grandmother. God bless her soul for introducing me to such lovely food. I love making grandma recipes, but for today it is Crisp-Spicy Arbi.

Preparation Time: 30 min. (Boiling of arbi included)
Cooking Time:40-50 min
Servings: 4 Medium servings

Ingredients Required For Making Kurmuri-Chatpati Arbi (Crisp-Spicy Taro Tuber ):
  • 500 gm. Arbi (Taro tuber)
  • 50 ml. Ghee (Clarified butter) / cooking oil
  • 1/2Tea spoon Turmeric Powder
  • 2 Tea spoon Red chili powder
  • 2 Tea spoon Amchur powder (Dry raw mango powder)
  • 1 Teaspoon Coriander powder
  • 1/4Tea spoon Sugar
  • 1 Tea spoon Cumin seeds
  • 1 teaspoon Carom seeds (Ajwain)
  •  3-4 Whole Red chilies
  • 1 Pinch Asafoetida (Optional)
Direction For Making Kurmuri-Chatpati Arbi:
  • Wash arbi and boil them to tender state. Let the boiled arbi cool.
  • Peel and cut the peeled boiled arbi to long thick pieces. 
Boiled Arbi Cut to long thick pieces
  • Mix
    • Turmeric powder
    • Amchur
    • Red chili powder
    • Coriander powder
  • Add the spices mixture to the pieces of boiled arbi and mix by gentle turning so that the spices coat the arbi pieces evenly.
All spices except salt mixed with Arbi pieces
  • Cover and keep aside for 10-15 minutes.
  • Heat ghee in a thick bottom wok.
  • Add cumin seeds, carom seeds and whole red chilies when the seeds splutter and chilies become darker in color add asafoetida and immediately add marinated arbi to the seasoning.
Cumin and carom seeds and red chili cooked in ghee
  • Mix the seasoning and arbi nicely by turning with care, Car.
Marinated Arbi added to ghee ans seasoning and mixed
  • Bring the flame to low and cover the wok.
  • Cook for 10 min. with occasional turning to make sure all arbi gets cooked nicely.
  • Add salt and mix.
  • Cover and cook for 20-25 min on low flame with occasional stirring and turning.
  • After 10-15 min of cooking the arbi will start becoming crisp and golden brown in color. Turning and stirring will make sure all arbi pieces start becoming crisp and brown.
  • After 20-25 min of cooking with cover remove the cover and cook for 5-10 min. on low flame. Turning the crisp arbi every now and then is must to ensure that it becomes crisp and brown evenly. The cooked arbi will become absolutely crisp and dry.
  •  Add 1/2tea spoon sugar powder and mix and cook for 2-3 minutes without covering.
  • Kurmuri-chatpati Arbi is ready to be served.
Kurmuri-Chatpati Arbi
  • Serve hot Arbi with roti/parantha and curd.
  • If you want to store this vegetable then while reheating sprinkle 5 ml. water and cover and heat this will make sure that the arbi remains crisp without losing their tenderness.
Tips:
  • Do not boil the arbi till they become too soft and gooey else the vegetable will become mashed pulp not crisp.
  • Kurmuri-chatpati arbi tastes best when cooked in Ghee (Clarified butter). Changing the cooking medium to oil is not advisable until unless medical reasons say so.
  • Add salt only once the sticky liquid of arbi has dried this will make cooking easier and the pieces of arbi will not stick to each other.
  • Do not add salt while marinating the arbi.
  • Arbi can be marinated overnight in fridge.
  • Cut the boiled arbi only when it has cooled down to make sure the pieces come out without breaking.
Suggested Variations:
  • Boiled arbi pieces can be directly added to the oil and seasoning and then all spices except salt can be added. Salt should be added only when the sticky liquid has dried off. That is after 5-10 minutes of cooking on low flame.
  • If cooking medium has to be changed for any reason then mustard oil is the best replacement for ghee.

LinkWithin

Related Posts Plugin for WordPress, Blogger...