Showing posts with label Curd. Show all posts

Wednesday, 25 November 2015

Bathua-Raita/बथुआ का रायता (Dip of Goose-foot in curd)

bathua Raita with Mustard-Curry Leaf Tempering
Bathua Raita
Winter is the season of my favorite green leafy vegetables, Sarson, Batua, Methi, Mooli to name the few. Bathua (Chenopodium Album) is also known as Pig weed, Wild spinach, Lamb Quarters and Goose foot.
The common names are really undeserved names bestowed on Bathua, as it is rich in Iron, Calcium, Magnesium, Vitamin A, B6, C and thus very nutritious and I would say very tasty. Bathua is grown in northern India and harvesting starts in winter season. It is used either alone to make savories like raita, sabzi and stuffed parantha or mixed with mustard leafs, spinach to make Sarson ka Saag. Today I am writing the recipe of most loved raita of winters in my family “Bathua Raita”. This raita if made in skimmed milk curd (Yoghurt)  then the fat content becomes extremely low and the nutrients present in milk and Bathua complement each other.

Preparation Time: 10 min.
Cooking Time: 2- minutes
Servings: 4 large servings (400 gm approx..)

Nutritional Value of Bathua raita: (made from skimmed milk curd)
Cal: 180
Carbs: 26 gm.
Fat: 0.8 gm
Cholesterol:  5 mg.
Sodium: 230 mg
Potassium: 452 mg
Sugars: 19 gm
Protein: 18.2 gm.
Dietary Fibers: 4gm.
Vitamin A, B6, C
Minerals: Calcium, magnesium, Iron

Ingredients Required For making Bathua raita:
  • 1 Big Bunch of Bathua Sprigs 
  • 250 gm Fresh Thick Curd (Full cream/Skimmed milk)
  • 1/2 Lemon
  • 1 Green Chili or to taste
  • 1/2 Teaspoon Mustard seeds
  • 2-3 Sprigs of Fresh Coriander leafs
  • Salt to taste
Directions For making Bathua raita: 
  • Clean coriander sprigs in flowing water and keep aside.
  • Separate leafs of Bathua from its stem. The top soft crown can be taken as it is if it does not have flowers or seeds. 
  • Wash the separated leafs in flowing water. Drain water from the washed leafs.
  • Take 10ml. ((lesser the water taken better it is) in a thick bottom pan and heat it. When the water heats up add the washed Bathua leafs to it and cover.
  • Let it simmer for a minute then switch off the heat and allow it to cool.
  • There will be very little water left in the cooked leafs and they will be of bright green color. If cooked on high flame and for longer time then they will gain darker color and the taste will not be so good.
Cooked Bathua Leafs
  • Pulse the cooked leafs of Bathua with cleaned and washed leafs of fresh coriander leafs and green chilies.
  • The paste should be fine and smooth. The thick paste should be a bowl of 200 capacity full (or slightly less, too less paste will not give full taste of bathua)
Cooked Bathua Paste
  • Beat the curd with the help of a beater or fork.
  • Add paste of Bathua to the curd and mix.
  • Add freshly squeezed juice of half a lemon (Not more than 2 teaspoon).
  • Add salt to taste and mix nicely.
Bathua Raita
  • In a pan take 1/2ml of oil and heat till it smokes. Add mustard seeds and let them splutter.
  • Top the mixture with the tempering of mustard seeds.
Raita is ready to be enjoyed with stuffed parathas, dal-chawal, roti etc.

Bathua Raita With Mustard Tempering

Tips:
  • The Bathua stems remaining after removing the leafs for raita should not be thrown. The soft portion should be separated from hard part and used in making soup with tomato or can be added to spinach while making savory.
  • Bathua leafs should not be cooked for longer that 2 minutes as they are delicate and the delicate flavors will be lost along with the green color.
  • Curd should not be sour and thin. Thick fresh curd is required for raita.
  • Very little oil is required for tempering; excess oil will make the raita unnecessarily oily.
  • Check the green chili for the hotness. Else you will end up with bland or very hot raita.
Suggested Variations:
  • 1 teaspoon powdered sugar can be added to balance the salt and acidity.
  • Curry leafs can be added to hot oil along with the mustard seeds while preparing tempering. The crisp curry leafs add great texture to the raita.
bathua Raita with Mustard-Curry Leaf Tempering

Friday, 13 July 2012

Pahari /Kumaoni Kheere Ka Raita (Cucumber and curd preparation)

Pahari Kheere Ka Raita
There are many ways of preparing cucumber raita; my favorite is Kumauni kheere ka raita. It has got a tangy taste and makes a very good accompaniment with all vegetarian as well as non-vegetarian dishes. In Uttarakhand though it is eaten with each and every meal but dry potato vegetable, puri and raita is the most popular combination. I can never forget the chill of December and hot aloo ki sabji, piping hot puri and raita served most lovingly by my dear mom. The smell and taste lingers till now. Try this raita I can assure you and your family are going to love it.

Preparation: Time 15 min.
Servings: 5 – 6 medium  helpings

Ingredients Required For Making Raita:

  • 250 gm. Kheera (cucumber)
  • 250 gm. Thick Curd
  • 1 Tea spoon Mustard Seeds (Yellow mustard seeds are best for it)
  • 1 tea spoon paste of green chili / finely cut green chili
  • Salt to taste
  • 1/4 Tea spoon Turmeric powder
  • 1 Tea spoon powder of roasted Cumin seeds
  • 1/2 Tea spoon Red chili
  • Few sprigs of coriander leaves

Directions  For Making Kheere Ka Raita:
  • Grind the mustard seeds with water into paste filter it and keep aside or make fine powder of mustard seeds.
Filtered Paste of Mustard seeds

Mustard Paste
  • Wash and peel the cucumber.
Peeled Cucumber
  • Remove the inner soft part with seeds.
Pulpy portion of Cucumber not to be used in Raita
  •  Grate the remaining part of cucumber.
Center pulpy portion of cucumber removed


  • Squeeze the water from grated cucumber and keep it aside.
Grated Cucumber
  •  Beat the curd add grated cucumber to it and mix it.
Cucumber mixed in Curd
  •  Add salt, turmeric powder, mustard seed paste / powder, green chili paste / finely cut green chili and mix nicely.
Green Chili, Mustard powder, Turmeric powder salt added to curd and cucumber
  • Keep it aside for at least 30 min. for the flavor of mustard seeds to come out and give the tangy taste to the Raita.
  • Take the raita in a serving bowl and decorate it with roasted cumin seed powder and red chili powder / any green herb of your liking.
  • Wash and drain coriander sprig, cut finely.
  • Garnish the decorated raita with the coriander leaves.
  • Tangy raita with wonderful flavor is ready.
  • Serve this raita with any type of meal it goes well with everything.
  • Kumauni fare would be raita, aloo Gutuk and puri.
Pahari Kheere Ka Raita
Tips:
  • Make sure all inner pulp with seeds is completely removed.
  • Squeeze away as much water from grated cucumber as possible to get thick raita.
  • Do not throw the water you get by squeezing the cucumber; use it for making dough of Roti / puri.

Suggested Variations:
  • Radish or Potato can be used in the absence of cucumber.
  • If radish or potato are used then they have to be peeled before grating and then boiled in salted water till they become soft and cooked.
  • Cool after boiling then squeeze excess water  and then put into thick curd

Monday, 7 May 2012

Paneer Tikka (Cottage cheese cooked with spices)

Juicy Paneer Tikka with salad on the sides
Cottage cheese is one of my favorite milk products. When it is made to Tikka it takes the subtle flavor of the herbs put in the marinade yet maintains the classic taste of its own. Though Paneer Tikka is made in different manner I write this recipe on the demand of my daughter-in-law’s sister Amrita. She liked it especially because it is literally oil less. Paneer Tikka can be had as snacks as well as side dish to the main course. I love it so much that for me every time is paneer tikka time.

Preparation Time: 45 min. (Including marination time)
Cooking Time: 10– 15 min.
Servings: 10- 12 Medium servings

Ingredients required for Paneer Tikka:
  • 250 gm. Paneer (cottage cheese)
  • 50 - 100 gm.  Cream (Malai)
  • 100 gm. Thick Curd
  • 1/4 Tea spoon Turmeric Powder
  • 1 Tea spoon Amchur Powder (Dry raw mango powder)
  • 1 Tea spoon Red chili Powder
  • 1 Tea spoon Kasoori methi (Dried and powdered green leaves of methi)
  • Salt to taste
  • 2 Tea spoon Olive oil.
Direction for marinating Paneer:
  • Cut paneer to 2cm.x2cm. pieces.
Cottage Cheese (Paneer ) cut into pieces
  • Take Paneer pieces in a bowl.
  • Add Turmeric powder, salt, chili powder and amchur.
Turmeric powder, Salt, Chili powder and Amchur added to Paneer pieces
  • Add malai(cream).
Cream and curd added to Paneer pieces
  • Add kasoori methi and mix well.
Mixed after adding Kasoori Methi
  • Keep aside for at least 30 min.
Direction for Making Tikka
  • Take a nonstick Tawa and keep it on high flame.
  • When hot lower the flame and spread one tea spoon of olive oil on it.
Hot non stick tawa with one teaspoon of oil
  • Place marinated paneer pieces on Tawa and let them cook for 3-4 min, without disturbing.
Marinated Paneer pieces placed on hot Tawa and being cooked
  • The side of paneer which are in touch of tawa directly will become brownish pink.
  • Carefully turn them upside down.
Turning Paneer pieces upside down to cook from both side
  • Cook the other side also till brownish pink in color
Paneer Tikka with salad
  • Serve the tikka with coriander mint chutney, 
    •  http://jyotsna-pant.blogspot.com/2011/10/green-coriander-and-mint-chutney.html
    • http://jyotsna-pant.blogspot.com/2012/06/hariyali-chutney-raw-mango-chutney.html
       
Tips:
  • Do not make the paneer pieces very small.
  • Tawa should not be smoking hot when you place paneer on it, because paneer will get burnt spoiling the taste.
  • Curd should be thick and not too sour.
Suggested Variations:
  • Kasoori methi can be replaced by oregano/ parsley/ basil to change the flavor of paneer tikka.
  • Malai (cream) can be replaced by curd to reduce the fat content due to malai.
  • Paste of green chili and coriander can be added to marinade instead red chili powder and methi, this gives very good flavor and color to tikka.

Friday, 16 March 2012

Kadi ( Thick gravy of besan/ gram flour in curd with pakodas )


Kadi
Kadi is made in almost all over India though in different style. The one being mentioned today is most popular and is made in northern part of India.In North India Kadi is relished with rice. In Kumaon it is called besan ke Dubke और payo (प्यो). Thick broth of gram flour (Besan) with curd seasoned with cumin, hing, red chili powder and having floating pakodas is simply irresistible and my children used to finish half of it before it used to come on table.

Preparation Time     5 min.
Cooking Time        60 min.
Servings:  Makes eight large servings.

Ingredients Required For Making Kadi:-
  • 200 gm. Besan (black gram flour)

Besan
  • 250 gm. Thick Curd 
Curd
  •   Salt to Taste
  •  1/2 Tea spoon Cumin Seeds
  •  1/2 Tea spoon Mustard Seeds

    Mustard seeds

    • 1/2 Tea spoon Methi seeds
      Fenugreek seeds

      •  1 Dry Red Chili
      •  Oil for frying
      •  Water
      Direction For Making Kadi:-
      Step 1

      Making the Pakodas(dumplings of gram flour)
      • Take 100 ml. of oil in a wok and heat it on high flame.
      • Lower the flame when the oil is smoking hot.
      • Take 100 gm. of besan in a bowl.
      • Add 1/2 tea spoon of cooking oil, salt, and mix.
      • Add water slowly and beat with your fingers / fork / spoon to make batter.
      • The batter should be of pourable thickness, and it should be free of lumps.
      • Beat the batter for 5min. to make it fluffy.

      Batter for pakoda
      •  With the help of a spoon pour little amount to the hot oil (the amount of batter you put in oil for frying depends upon the size of pakodas you want.
      Pakodas being fried
       Put the flame on high and fry the pakodas golden brown by turning them regular.
        Fried Pakoda for kadi
        • Take the fried pakodas and soak them in water.

        Pakodas being soaked in water
           Step 2

          Making Kadi

          • Beat curd with an egg beater or in the mixer to smooth paste.
          • Take 75gm. Of besan in a bowl and add curd paste with regular beating.
          Besan and curd mixture
          •   Add salt, turmeric powder and 250 – 300 ml. water and mix thoroughly so that no lumps are formed.
          • Take 1ml. oil in a wok and heat and heat on high flame till smoking hot.
          • Put mustard seeds, cumin seeds and in the last methi seeds.
          •  Let the seeds splutter for 10-15 sec.
          • Lower the flame and add the mixture of besan, curd, salt and water to the wok.
          • Mix thoroughly and put the flame to high.
          • Cook with regular stirring till it starts boiling.
          • Besan - curd mixture of kadi being cooked with seasoning
          • Once it starts boiling lower the flame and cook for at least 30 min.
          • Keep on adding water to maintain the consistency of kadi. 
          •  More the kadi is cooked better the taste becomes.
          • Squeeze the excess water from the soaked pakodas gently by pressing between your palms.
          • Add the pakodas to the kadi and give it a gentle stir and cook for two min.
          Kadi being cooked with Pakodas

          • Take out cooked kadi in a serving bowl .
          •  For garnishing take 2 ml. of oil in a pan heat.
          • When hot add red chili let the chili become brownish red then red chili powder, asafetida and immediately pour over kadi.

          Kadi with garnishing of red chilli powder and cumin seeds
          • You can decorate with few leaves of coriander or by sprinkling little amount of kasoori methi.
           Kadi is ready to be enjoyed with rice. Some people like kadi with chapatti also, but in whole of northern India kadi has one and only one companion that is RICE. Make some vegetable of spinach / methi or any other vegetable and you have a complete meal!!.
          Enjoy your Sunday lunch with your family eating Kadi Chawal (cooked rice).
          Kadi,Rice and palak (spinach )ki sabji

          Tips:-                                                 
          • Do not decrease the amount of curd as the taste of kadi will not come out as it should be.
          • The amount of curd can be increased it will make the kadi more tasty.
          • Pakodas should be soft otherwise the kadi will not seep into the pakodas.
          • While preparing the garnish, make sure the chili powder retains its red color.
          • Asafetida should be added last and the oil poured immediately over kadi.
          Suggested Variations:
          • For healthier eating pakodas can be avoided and thin 2-3 cm. long pieces of beans, carrots,cauliflower can be added to Kadi once it is half cooked so that the vegetables get cooked in kadi yet remain crisp.

          Thursday, 15 December 2011

          Vegetable Pulav (Rice cooked with vegetables)

          Vegetable Pulav
          Vegetable pulav is a complete food by itself. Rice when cooked with lots of vegetables makes it very attractive and colorful in appearance. It is a real fun in our family when pulav is being made as my husband loves making pulav for the family, and the minutest details right from the amount of vegetable to cutting them to appropriate size and so on, he looks himself where as I have a fields day and get to enjoy the vegetable pulav without doing any work.!!

          Preparation Time: 20min.
          Cooking Time: 30min.
          Servings: Four large servings

          Ingredients required for making Vegetable Pulav:
          • 200gm. Rice
          • 50gm. French Beans
          • 50gm. Carrot
          • 2 Medium size Potatoes. (optional)
          • 50 – 75gm. Nutrela (soya nuggets, optional)
          • 2 medium size Tomatoes
          • 50-75gm. Onions
          • 1/2 Tea spoon Turmeric Powder
          • 3-4 Cloves.
          • 1 black cardamom
          • 2 Bay leaves
          • 2-3cm. cinnamon stick
          • 5gm. Garam Masala(1 tea spoon approx..)
          • 50gm. Ginger- Garlic paste (2-3 tea spoon approx..)
          • Salt to taste
          • 25ml. Ghee / cooking oil
          • Water
          Directions to prepare Vegetable Pulav:
          • Clean and wash rice
          • Soak the washed rice in 250ml. water
          • Soak Nutrela for 30min. in water
          .
          Soaked Nutrela
          • Wash and dry all vegetables.
          • Cut beans, carrots, into 3-4cm. long thin pieces.
          Carrot and French beans cut for Pulav
          • Cut onions to thin long pieces.
          Onions cut length wise for Pulav
          • Cut Tomatoes to pieces.

          Tomatoes for pulav
          • Take 10ml. Ghee/oil in a pressure cooker and heat it on high flame.
          • When the ghee/oil is smoking hot reduce the flame.
          • Squeeze water from soaked Nutrela and shallow fry them in oil/ghee.

          Carrot, French beans and soaked squeezed nutrela
          • Remove Nutrela when they become golden brown and keep aside.
          • Add remaining 15ml. of ghee/oil and heat.
          • Add bay leaves, cloves, black cardamom and cinnamon stick.
          • Cloves will start spluttering and wonderful smell of spices will start coming.
          • Add Onion and cook on low flame till they become transparent
          • Add Ginger-garlic paste and cook for 2 min. with regular stirring.
          • Add Potatoes and cook for 2-3 min. with regular stirring..
          • Add beans, carrots and cook for 2-3min. with regular stirring.
          • Add tomatoes and cook they become soft.
          • Add shallow fried Nutrela and mix
          .
          All vegetables and soaked fried nutrela being cooked
          • Drain the soaked rice and keep the water aside.
          • Add rice to the cooker and mix with gentle stirring so as the rice, vegetable, spices mixture becomes homogeneous.

          Soaked rice added to the vegetable mixture
          • Add turmeric powder, salt, garam masala , red chili powder and mix.

          Salt, Turmeric powder, Garam masala and Red chili powder added to rice and vegetables

          Spices mixed to rice and vegetable mixture
          • Add the water kept aside after draining the rice.

          Water added to rice, vegetable and spices mixture
          • Mix gently.
          • Close the lid of cooker and put the flame on high.
          • When the pressure is built in the cooker reduce the flame to low and cook for 5 min.
          • Switch off the gas and allow the pressure in the cooker to subside.
          • Open the cooker and get the first look and wonderful smell of vegetable pulav.
          Vegetable Pulav
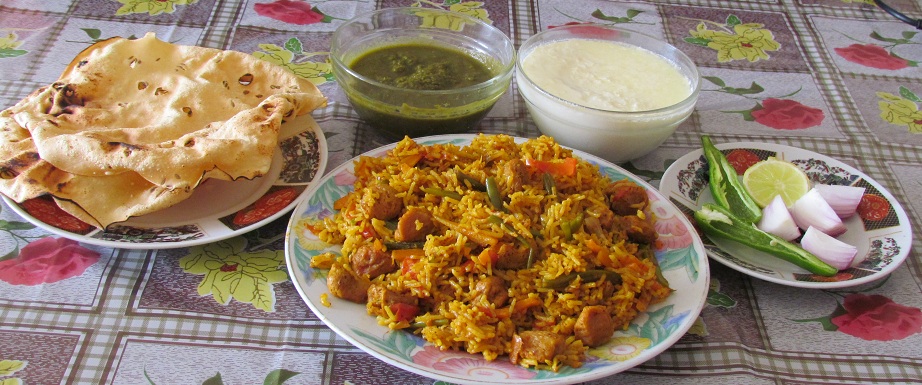
          Take it out on a serving dish and serve with curd/raita, pickle
          http://jyotsna-pant.blogspot.com/2012/06/mango-pickle-north-indian-style.html
          http://jyotsna-pant.blogspot.com/2012/06/tangy-mango-pickle-maharashra-style.html
           http://jyotsna-pant.blogspot.com/2012/06/spicy-mixed-vegetable-pickle-less-oily.html
           / chutney  http://jyotsna-pant.blogspot.com/2011/10/green-coriander-and-mint-chutney.html, salad and roasted papad.
          I love eating this pulav with Ghee and pickle.
          Vegetable Pulav with Curd, Coriander chutney, Salad and Papad
          Tips:-
          • Those who do not take onions, garlic can omit it and instead replace onions, garlic with cumin seeds.
          • The rice used in the above recipe is Dulhan basmati rice, the requirement of water may vary little with different variety of rice.
          • While washing basmati rice wash them in a sieve with running water.
          • Do not rub rice with hands as the flavor goes off with vigorous washing.
          • If you like spicy food then you can add red chili powder to you taste.
          • Do not release he pressure from cooker after switching off the gas let it subside by itself, the flavor of spices will get seeped in rice nicely.
          Suggested Variations:
          • Cauliflower, Broccoli,Cottage cheese can be also be put in pulav.
          • Fresh Peas added to the pulav gives it a very good flavor and color.
          • Badi can be fried and added instead of nutrela.
          Fried Badi
          • Pulav tastes best with basmati rice, but you can choose rice as per your choice.
          • For those who for any reason like less oil, can reduce the amount of ghee/oil as per the requirement.

          LinkWithin

          Related Posts Plugin for WordPress, Blogger...