Showing posts with label Chutney. Show all posts

Sunday, 12 April 2020

Turai Ke Chilke Ki Chutney (Chutney From Peels Of Ridged Gourd)


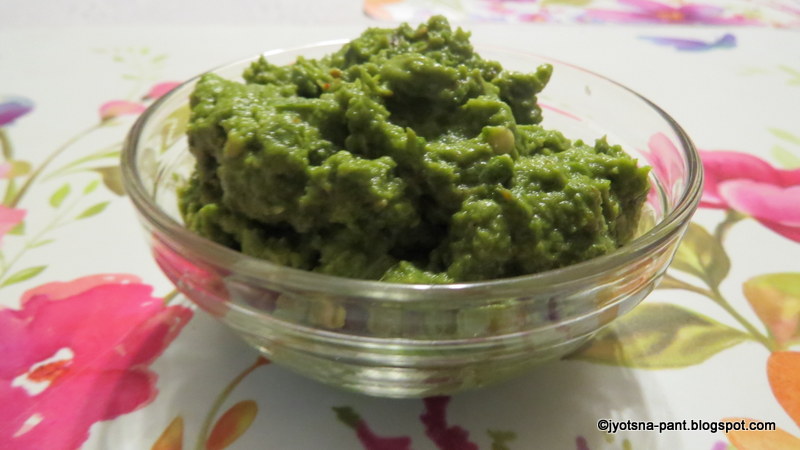
Turai chilke ki chutney
Turai/tori are of two types one with smooth skin another with ridges, Ridged gourd and sponge gourd. In Maharashtra ridged gourd is called Dondka and sponge gourd as Ghosali.
Whenever I make the vegetable of ridged gourd, my mind is flooded with the memories of my house help Sharda Jagtap. She used to carefully remove the ridges of gourd which are having slightly tough string like fibers. Then she used to peel the gourd. She would chop the gourd for my cooking it and pack the soft peels to take home. This exercise was repeated every time I had ridged gourd for meal.
My curiosity took over me and one day I asked her what she does of the peels. Chutney she said. I was flummoxed as I had never had Turai ke Chilke ki chutney. One day, she got a little for me to taste. I loved it. The routine of her taking the peels and bringing little chutney for me continued, as it was used as main course by her, to be had with bhakri (Jowar roti).
Today I share this recipe so lovingly taught by Sharda to me.

Preparation Time: 10 Minutes
Cooking Time: 7-8 minutes
Servings: 5-6 small helpings

Ingredients For Making Turai Ke Chilke Ki Chutney:
  • 100 gm Turai ke Chilke (Soft peel of Ridged Gourd) I got this amount from 500 gm of Ridged Gourd.
  • 50 gm  Garlic or 15-20 medium size pods of garlic
  • 8-10 Green Chilies / to taste
  • 1 teaspoon cooking oil
  • Salt to taste
Direction For Making Turai Ke Chilke Ki Chutney:
  • Wash and towel dry Ridged Gourd.
  • Remove the ridges with the help of a peeler. Discard them.
Ridges to be discarded
  • Peel the gourd like any other vegetables are peeled with the help of the peeler. Keep the soft peels aside for use.
Soft Peels Of Ridged Gourd
  • Use the peeled gourd/Turai/dondka for making savory dish for main course. https://jyotsna-pant.blogspot.com/2015/07/turai-mooli-shimla-mirch-ki-sabzi.html
  • Peel garlic and keep aside.
  • Check the hotness of green chilies and take the green chilies according to taste. Break them to pieces. Keep aside.
  • Heat oil in a thick bottom wok/pan.
  • When the oil is hot add
    • Peeled garlic
    • Green chili pieces and cook on low flame till garlic and chili pieces acquire slightly brown color.
Garlic and Green Chilies in oil
After 2 minutes of cooking
After 5 minutes of cooking
  • Add the peels and mix nicely.
Soft peels added to Garlic and Green Chilies
  • Add salt and mix. Cover and cook on low heat for 2-3 minutes with stirring two three times.
After 2 minutes of cooking
  • Switch off the heat and let the contents cool in the wok. This will slow cook the peels with garlic and green chilies. The peels will have changed the color and texture maintaining the moisture in them.
  • When cooled to room temperature grind the cooked mixture to a slightly course paste/ Fine paste as per liking. I prefer little course texture.
Chutney of Peels of Ridged Gourd
  • Water is not required while grinding, because garlic, chili and peels have sufficient moisture.
  • Remove in a bowl and add few drops of fresh lemon juice to give the tangy taste.
  • Chutney is ready to be served with Stuffed paranthas / Dal-chawal / Khichadi
https://jyotsna-pant.blogspot.com/2013/01/patta-gobhi-ke-paranthe-cabbage-stuffed.html

https://jyotsna-pant.blogspot.com/2013/05/aloo-parantha-potato-stuffed-pan-fried.html
https://jyotsna-pant.blogspot.com/2012/12/mooli-ka-parantha-radish-stuffed-pan.html
Tips:
  • Always remove the ridges before peeling. The ridges are stringy and will give unpalatable texture to chutney.
  • Always check the hotness of the chili (Green/red/dry/fresh/powder) before use. The hotness varies from one variety to other.
Suggested Variations:
  • 3-4 Teaspoons coursely ground roasted groundnut can be added to give crunchy texrure.

Friday, 13 March 2020

Vegetable Pulav (Rice cooked with vegetables)


 Vegetable Pulav
Vegetable pulav is a complete meal by itself because it has starch, carbs, protein, micro nutrients as well as much needed dietary fibers. Pulav served with curd/riata/chutney/salad /pickle elevates the whole experience of eating pulav to next level. In this post I have given recipe for making pulav without onion and garlic, though later on in suggested variation column  I have given the steps for adding onion and garlic to pulav.

Preparation Time: 20-30 minutes
Cooking Time: 30- 40 minutes
Servings: 4 Large servings

Nutritional Value (Approx. value for the total cooked amount)
Energy 1250cal
Carbs    294 carbs
Fat       80g 
Dietary fibers  40.5 gm 
Folates  216ug
Niacin  1.04mg niacin
Vit A   40 iu,
Sodium 150mg +rest from  salt 
 Potassium 1400 + from salt 
Calcium  1.0 g 
copper  982 mg,
magnisium  534mg,
Iron 12 mg  
Phosphorous 758mg,
Zinc   5.70mg
Sugars 10.5 g
Protein 25 g protein 

Ingredients Required For Making Vegetable Pulav:
  • 150 gm Basmati Rice (Long grained rice)
  • 100gm French Beans
  • 100 gm Carrot (1 medium size)
  • 50 gm Capsicum (1 lagre)
  • 100 gm Potato (1 large)
  • 75-100 gm Cauliflower florets
  • 100 gm Shelled Peas
  • 200-250 gm Paneer
  • 1 Teaspoon Cumin seeds (Jeera)
  • 4-5 Cloves (Lawang)
  • 2 Black Cardamom ( Badi/kali elaichi)
  • 2 Green Cardamom (Hari elaichi)
  • 2-3 Bay leafs (Tej patta)
  • 1 Pinch Nutmeg Powder
  • 1 flower of Mace
  • 2 Teaspoon grated ginger (or ginger paste)
  • 1 Teaspoon of Red chili powder (or to taste)
  • 1/2 Teaspoon Turmeric powder (Optional)
  • Salt to taste
  • 50 gm Of Clarified Butter (Ghee)
Directions for Making Pulav:
  • Wash and pat dry all vehgetables.
  • Peel and cut potato to big pieces or of size of your liking.
  • Cut carrots, beans , cauliflower to long pieces.
 Few Vegetables For Pulav
  • Remove the stem and seeds of capsicum and cut capsicum to big pieces.
  • Wash the rice in running water and soak it in 200 ml  water.
  • Pound cardamoms and mace and keep them aside
  • Cut paneer to the size of your liking and sautee them on a thick bottom pan till both sides become pinkish brown. Keep aside
  • Heat ghee in a pressure cooker on high flame.
  • Once the ghee is hot enough but not smoking lower the heat and add
    • Cumin seeds
    • Cloves
    • Bay leafs
    • Pounded bleck and green cardamoms
    • Mace
    • Nutmeg poder
  • Cook for say 30-40 sec. The seeds will splutter and wonderful aroma of cooked spices with come.
  • Add ginger and cook for 10-15 sec.
  • Add potatoes and cook on low heat for about 2 minutes with continuos stirring. Potatoes will change the color and textue.   The outer skin will look crispy.
  • Add capsicum and cook for 1-2 minutes with continuous stirring. Do not allow the capsicum to attain dark coclor(burn).
Potatoes and Capsicum Being cooed with spices
  • Add cauliflower and cook for 1-2 minutes with continuous stirring.
Cauliflower with shallow fried Potatoes and Capsicum
  • Add beans and carrots. Cook for a minute or so with continuous stirring,
Beans and Carrots added 
  • By now all vegetables will be seeped well in floavors of spices and cooked partiailly,
  • Drain water from soaked rice keep the water aside for further use.  Add soaked, drained  rice to the vegetables in the cooker.
Soaked Rice being sauteed with veggies
  • Add shelled peas and mix.
  • Stir and mix nicely.
  • Add
    • Turmeric
    • salt
    • Red chili powder
  • Mix.
  • Add paneer and mix nicely.
Paneer added 
  • Add water kept aside after draing the rice. Mix and check for water level if required add more water.
Water added as per requirement
  • The measure of water is that the level of water should be 1/2 centimeter abouve the rice-vegetable mixture. (Use spoon handle forchecking water level). The water requirement may changes for different variety of rice. Regular cooking of steamed rice the measurement is one cm above the rice level, but in pulav rice is less and veggies are in large quantity (rice1 : veggies4) thus water requirement is less.
  • Close the lid of pressure cooker with weight on it. Bring the heat to maximum till pressure starts building in cooker.
  • Once the pressure is built in pressure cooker bring the heat to low and allow it to cook for 10 minutes (If the cooker gives whistle then cook till three whistles are given by cooker).
  • Switch off the heat and allow it to cool. Open only when there is no pressure in the cooker. Sprinkle 10-20ml. of melted ghee and give a gentle twirl to pulav.
Vegetable Pulav

Serve hot pulav with raita/curd/pickle/chutney papad. and enjoy the meal of pulav.
https://jyotsna-pant.blogspot.com/2012/07/pahari-kheere-ka-raita-cucumber-and.html
http://jyotsna-pant.blogspot.com/2011/10/green-coriander-and-mint-chutney.html
http://jyotsna-pant.blogspot.com/2012/06/mango-pickle-north-indian-style.html
Tips:
  • Make sure the spices added for tempering don't turn black(Burn) this will bring undesired change in the appearance as well as the taste of pulav. 
  • Too much water will make pulav mushy and less water will cause undercooking of rice so add water properly as per the measurement.
  • Adding ghee when the pulav is cooked gives amazing flavor to pulav.
  • The ratio of vegetables to rice should be 4:1. But you can change as per taste. I prefer lots of veggies so that I get full nutrition and ofcourse delectable taste.
  • If the peas are frozen peas then they should be added along with paneer so that they donot over cook and lose their color and texture.
Suggested Variation:
  • Since the recipe does not ask for onion and garlic, but veg-pulav is also made by adding lots of onion and garlic.
    • Take 2 medium size onion (!00gm) slllicethem thin and log,
    • 8-10 cl.oves of garlic, peel and crush then in mortar and pestle.
  • Afetr the spices are cooked add garlic and onion cook till translucent then add potato and follow the recipe then onward as above.
  • Paneer can be replaced by soaked nutri-nuggets (Soya nuggets). Squeeze all water from soaked nutri-nuggets and fry them along with potatoes, then add veggies as per the recipe.
Vegetable Pulav with Nutri-nuggets

Monday, 24 February 2014

Dhokla (Indian Snack)


A typical Gujarati Meal of Dhokla, Khichadi,Kadi, vegetables,Roti, Papad and Chutney
Dhokla is a Gujarati savory made from rice and mixture of split pulses. It is very healthy and nourishing snack. A typical Gujarati meal consists of Dhokla, Farsan, Khichadi, kadi, aloo sabji, puri/roti and chutney. Of course gulab jamun cannot be missed as sweet. Another variation of Dhokla is made from besan (Split black gram flour) which is quite often mistaken for Dhokla, it is actually called Khaman. It can be made instantly without the hassle of soaking, grinding and fermenting. But the taste of Dhokla and Khaman are absolutely different and both have a their own place in the platter and taste buds. I always used to make Khaman as I did not know how to make Dhokla. In Ethiopia I learnt it from Sefali my wonderful young friend from Gujarat. Now I can fulfill my desire to have Dhokla also. My  thanks to Sefali. 

Preparation Time: 15 min. (Soaking and fermentation time not included)
Cooking Time: 15-20 minutes each batch
Servings: 30-40 Medium size Dhokla pieces

Ingredients Required For Making Dhokla:
(Measurements should be done with the same cup)
  • 3 cups rice
  • 1/2 cup Split black gram (Chana dal)
  • 1/2Cup Dhuli Urd Dal
  • 1 Cup Thick Curd (200gm)
  • 4-6 Green Chilies
  • 2 Inch Ginger piece
  • I Pinch of Asafoetida
  • Salt to taste
  • 1 Teaspoon ghee (2-3ml)
  • 2 Tea spoon (4-5 ml)/cooing oil
  • 1/2 Teaspoon Cooking Soda (soda bi Carbonate)/ENO/Fruit salt
  • 10-12 Black Pepper Seeds
  • 1 Tea spoon cumin Powder
  • 1 Tea spoon Red chili Powder
  • 1/4Teaspoon Turmeric Powder (Optional)
  • 3-4 Teaspoons White Sesame Seeds
  • 3-4 Sprigs of Cilantro
  • 8-10 Curry leafs
Directions For Making Dhokla:
  • Wash Rice and both the dal in flowing water till water comes out clean.
  • Make coarse powder of pepper seeds.
  • Make paste of ginger piece.
  • Wash and pat dry coriander sprigs and cut fine.
  • Mix the washed rice and pulses and soak them for 6-8 hours.
  • Drain all water and grind to fine paste using as little water as possible.
  • Cover the paste and keep aside for 4-5 hours in summers (the temperature is high) for 6-8 hours in winters (the temperature is low). The batter should rise due to fermentation.
Fermented Paste of Dal and rice in Curd
  • Fill the container of double boiler half with water and keep for heating on high flame. When the water boils then lower the flame.
  • Beat the batter with a fork/spoon and add:
    • Curd
    • 2 Teaspoon oil
    • Turmeric
    • Ginger paste
    • Green chili pieces
    • Coarsely ground Pepper
    • Salt
    • Sugar
  • Mix nicely.
  • Add soda bi carbonate (eating soda)/ENO/fruit salt and mix with a fork/spoon. Batter will start becoming fluffy due to carbon-di-oxide coming out of soda-bi-carb/ENO/fruit salt.
  • The batter should be like cake batter neither too thick nor too thin, it should be pourable like cake batter.

Fermented Dhokla Paste Mixed With Spices
  • Immediately transfer the batter to the oiled plate of double boiler of Dhokla maker. Sprinkle one teaspoon red chili powder and cumin powder. Keep the plate with batter in the Dhokla making container with water boiling in it.
Plate of Double Boiler Oiled
Dhokla Batter in the Plate of Double Boiler
Plate With Dhokla Batter Placed In Double Boiler
  • Cover and cook on low heat for 10-15 minutes. Keep checking by poking a dry stick/needle in the Dhokla mixture. If it comes out clean then the Dhokla is cooked otherwise cook till it comes out clean
Steaming Dhokla Ready, Before being Cut to Pieces
  • Remove the Dhokla plate with cooked Dhokla from boiler and let it cool. 
  • Cut to pieces of required shape and size.
Dhokla Cut To Pieces After Being Cut To Pieces

  • Heat ghee/oil in a wok and when it is hot add curry leaves and sesame seeds. Cook till the sesame seeds splutter.
  • Add cooked Dhokla and mix by turning them upside down carefully.
     
    Dhokla Pieces Being Tempered With Sesame Seeds
  • Remove tempered Dhokla from wok and garnish with finely cut cilantro and serve hot/cold with coriander-mint chutney.
  • Dhokla in Gujarat is very important side dish. It also is very healthy, nourishing and light snack.
    Sefali with Dhokla
A typical Gujarati Meal of Dhokla, Khichadi,Kadi, vegetables,Roti and Chutney
 Tips:
  • Depending upon the temperature change the time for which the paste of pulses and rice is kept for fermentation. The idea is that batter should be nicely fermented.
  • Check the sharpness of green chilies before adding and increase/decrease the amount according to your taste and the sharpness of chilies.
  • Do not use ghee in solid state if it is being added to batter. Better add oil keep ghee for tempering only.
  • If double boiler of Dhokla is not available oil any steel plate with edges and keep it on a broad mouthed container, do not cover with flat cover which will touch the batter when it rises while cooking, with water and cook.
  • Curd should be thick else the batter will become thin.
Suggested Variations:
  • Finely cut green chilies can be added to tempering.
  • Green chilies can be replaced with flakes/powder of red chilies.
  • Turmeric can be avoided to get white color Dhokla.
  • Idli maker can be used to make round shape Dhokla.
  • Batter can be divided to three parts, to one part add turmeric, to second part add paste of coriander leafs (Cilantro leafs) and let the third part be white. Put the batter in three layers in the oiled plate and cook to get three layered Dhokla.

Saturday, 12 October 2013

How to Increase The Shelf Life Of Fresh Coriander Leaves (Cilantro/Dhania)

Dhania (Coriander sprigs) cleaned before storing
Dhania patta (Fresh coriander leaves) are used extensively in Indian kitchen either as a condiment, for making chutney, or for garnishing. Problem with Dhania is that it perishes very fast. It is very difficult especially for working ladies to do shopping for greens daily. Fresh Dhania some time comes with lots of soil and if not stored properly it gets spoiled even in fridge very fast. To overcome the problem of Dhania I have devised a simple procedure hope it comes handy to all my followers and readers.
  • Clean Dhania (Coriander sprigs) by removing the stems with dirt.
Dhania (Fresh Coriander sprigs) as I got from market
Mud and roots removed during cleaning
  • Remove all yellow / black and other rotten leaves.
  • Make sure not a single rotten / black / yellow leaf is with green sprigs.
Cleaned Dhania
  • Wash the cleaned sprigs in flowing water.
  • Drain all water through a sieve and allow it to stand for draining till all water is drained off.
  • Keep the cleaned Dhania (Coriander sprigs) under the sun for 5 min. Or under fan to make sure all surface water has evaporated.
Cleaned, washed dhania kept under sun for evaporating surface water
  • Wrap the cleaned washed and dried fresh coriander sprigs in a paper.
Cleaned and dry dhania
Cleaned and dry dhania being wrapped in paper before storing
  •  Keep the wrapped Dhania (Coriander sprigs) in a cloth bag or container / bag having holes.
  • If the Dhania (coriander sprigs) do not have mud stuck to them then washing is not required,
  • Dhania will not perish for 10 days also.

Monday, 27 May 2013

Aloo Parantha (Potato Stuffed Pan Fried Indian Bread)

Aloo Parantha (Potato stuffed Pan Fried Indian Bread)

Stuffed parantha are the specialty of northern part of Indian especially Uttar Pradesh, Uttaranchal. Pahari of Kumaon are absolutely crazy after potatoes. Every vegetable must have potatoes. Parantha aloo ka with bhanga chutney and piping hot tea are one of the favorite breakfasts. Many people are averse to potatoes thinking it is rich in starch. Yes it is full of starch but what about other nutrients which are in it. Potatoes are rich source of Potassium, calcium and iron. It is rich in vitamin A and B. If taken in moderation they are good for health. Aloo parantha taken with chutney and curd make a complete healthy meal and parantha with mango pickle are good alternative for children lunch box.
Preparation Time: 30 min.
Cooking Time: 40 -50 min. (Each parantha takes 10 min.)
Servings: 6 Paranthas of Medium Size

Ingredients required For making Aloo Parantha:
For dough:
  • 250 gm. Wheat Flour
  • 1/2Teaspoon salt
  • 150 ml. water
For filling:
  • 500 gm. Potatoes (6-7 medium size potatoes)
  • 4-5 Sprigs of Fresh Coriander
  • 2-3 Green chilies
  • 1/2Tea spoon Amchur (Optional)
  • 1/2 Tea spoon garam masala
  • Salt to taste
  • Ghee/ oil as cooking medium
Direction For making Dough for Aloo Parantha:

        Making Dough For Aloo Parantha:

        Making Filling:
  • Boil the potatoes and keep aside for cooling.
  • Peel the boiled potatoes and mash them nicely so that lumps are not left in mashed potatoes.
  • Cut green chilies finely.
  • Wash and drain the coriander sprigs.
  • Cut coriander sprigs finely.
  • To the mashed potatoes
    • Finely cut coriander sprigs
    • Finely cut green chilies
    • Amchur
    • Garam masala
    • Salt
  • Mix nicely.
  • Filling of Aloo Parantha is ready.
Potato filling for Aloo parantha
         Making Parantha:
  • Divide the filling into six portions and make round ball of each portion.
  • Divide the dough into six portions and round ball of each portion.
  • Sprinkle some dry flour on the rolling board as well as on the dough ball.
Dough ball and filling for one parantha
  • Roll one ball by the help of rolling pin to a round of 6 cm. diameter.
  • Place the potato filling ball at the center of the rolled dough and bring the edges of dough to the center thus covering the filling nicely with the dough.
Potato filling placed on the rolled dough
Dough ball stuffed with potato filling
  • Sprinkle some dry flour on both sides of the filled dough ball and roll it to a round of 10-12 cm. diameters.
Rolled Aloo Parantha
  • Place the rolled parantha on the hot tawa and lower the flame.
Parantha placed on hot Tawa
  • Cook on low flame till the brown dots start appearing on the lower surface. The color and texture of upper surface will also change.
Parantha after 3 min. of cooking on low flame
One side cooked till brown dots appeared
  • Turn over the parantha and cook for 2-3 min. till brown dots start appearing on the other side also.
Stage when ghee/oil is to be sprinkled
  • Sprinkle 1/2 tea spoon ghee/oil on the top surface and turn the parantha upside down press gently and cook for 0ne minute.
One side cooked
  • Sprinkle 1/2tea spoon ghee / oil on the other surface also, turn upside down and cook along with pressing with a spatula gently.
  • Aloo Parantha is ready.
Crisp, Soft Aloo Parantha (Potato Stuffed Pan fried Indian bread)
  • Serve with thick Butter, Curd, Coriander mint /Hariyali chutney, Indian Pickles.


Aloo Parantha With Stuffed Red Chili Pickle
Tips:
  • Filling should not be made and kept in fridge or outside for long, otherwise the filling will not remain firm.
  • Do not add salt much before making the paranthas; otherwise the filling will become runny and difficult to manage.
  • Make sure the potatoes are not over cooked while boiling the peeling should remain intact in boiled potatoes. This will make sure the filling is firm not runny.
  • The dough should be soft and pliable not hard, otherwise the dough cover will crack and the filling will come out of the dough while rolling the parantha.
  • If you are making the parantha for the first time then sprinkle extra dry flour every time to ensure the parantha does not stick to the rolling board.
  • Roll always with soft hand and soft strokes, do not put too much pressure while rolling.
  • No tip is greater than practice so do not get disheartened if the result is not too encouraging first time. Practice makes a person perfect.
Suggested variations:
  • Finely cut onions can be added to the mashed potatoes.

LinkWithin

Related Posts Plugin for WordPress, Blogger...