Showing posts with label #. Show all posts

Monday, 29 December 2014

Trifle A Yummy Dessert


Trifle Served with Pomegranate
Trifle
Trifle is basically a dessert with three layers made from custard, cake, and jelly. But many other variations are made using biscuits/cake, whipped sweetened cream, chocolate, fruits etc. The recipe I am going to explain today is the one which my children love from their childhood and I get excellent reviews from my customers who come with more take away orders. They even want me to do minimal decoration on the top for birthdays. 
Make the cake from whole wheat flour or multigrain flour and fill the jelly with fruits and you have a healthy nutritious and yummy dessert. Without much ado I write the steps to make it. Do not get riled up by the details written in the recipe because it may look tedious but is very easy to make and assemble. Your efforts will be appreciated by friends and family and you will also give yourself a pat in the back.:)

Preparation Time: 15-20 min (for cake)
Cooking Time: 30 min for baking cake, 10 min. for custard, 10 min for jelly
Assembling Time: 10 min
Setting Time: 1 hr
Servings: 8 large Servings

Ingredients Required For Making Trifle:

For Cake:
  • 2 eggs
  • 100 gm. All purpose flour (Maida) /whole wheat flour /Multigrain flour
  • 50 gm, Sugar
  • 50 gm, Butter
  • 1 Teaspoon baking soda
  • 1 Teaspoon Vanilla essence
  • For Custard:
  • 50 gm. Custard powder ( vanilla flavoror anyother flavor of your choice)
  • 500 ml. Full Cream Milk
  • 50 ml. Cream (optional)
  • 100 gm. Sugar/to taste

For Jelly:
  • 100 gm, Jelly packet of the flavor of your choice (Blue bird/Rex). I prefer raspberry / Strawberry flavor for the rich color and flavor it gives
  • Water 350 ml

Directions for Making the Cake:
  • Grind the sugar to powder.
  • Mix maida. Salt and baking powder and sieve three to four times to make sure all ingredients have mixed properly. Cover and keep aside,
  • Separate egg white and egg yolk. Beat egg white to stiff peaks.
  • In a large bowl take butter and sugar and beat them to creamy consistency.
  • Add egg yolk spoonful at a time and beat to creamy consistency till all egg yolk is incorporated.
  • Into this creamy beaten mixture add stiffly beaten egg white and maida baking soda mixture alternately, Mixing should be done in folding motion and with light hand.
  • When all flour and egg whites are added then add vanilla essence and mix.
  • Pour the batter in the baking pan lined with butter paper.
  • Bake in a pre- heated oven at 180 degree centigrade for 30-35 min. or till the cake is baked.
  • Check by poking a dry smooth thin knitting needle or wooden stick, if the stick comes out clean then the cake is baked.

Direction for Making Custard:
  • Dissolve custard powder in 100 ml. of milk at room temperature.
  • Boil 500 ml of milk. Add sugar and stir to dissolve it in the milk. Sugar is completely dissolved reduce the heat and add custard dissolved in milk along with constant stirring to avoid formation of lumps.
  • Cook on low flame till thick consistency is obtained.

Consistency of Custard
  • Switch off the heat, add cream and mix (optional) cover with lid and allow to cool.
  • Second component of Trifle is ready.

Direction to make jelly:
  • Though the directions are given on the packs of jelly, the proportions given result is jelly good to be eaten as dessert but not to make trifle.
  • Instead of 500 ml. water as given in the pack take only 350 ml. water. This will result in thick setting jelly required for trifle.
  • Also add 50-60 gm. of sugar to the water while boiling otherwise the jelly tastes too sour. Adding sugar gives jelly slightly sweeter taste with subtle sour taste which is desirable.
  • When the sugar is dissolved add jelly mixture as instructed in the pack.
  • Stir continuously to ensure solid does not settle at the bottom. When all solid is dissolved boil the solution for 2-3 minutes stirring occasionally. Switch off the heat and allow it to cool to room temperatue.

Directions For Assembling Trifle:
  • Assemble the first two layers while the jelly is getting cooled to room temperature.
  • Take a 4-5 inches deep glass 10x10 inches square dish and place cake at the bottom nicely packing all the corners and edges.
  • The cake layer should be minimum 1 inch.

Apple cake pieces being layered 
Cake baked in The Serving dish
  • Pour thick custard on the top of cake and pat the dish from all sides to remove any air bubbles. 

Custard being poured over cake
  • Smoothen the top layer with a spatula. Cover with a cling film and keep in fridge to set till the jelly comes to room temperature.
  • Custard layer should be almost same thickness as that of cake.

Cake and custard Layred
First Two Layers Done
  • When the jelly comes to room temperature it will start to become thick and the setting process will have started.
  • Pour the jelly over the layer of custard with the help of ladle without damaging the custard layer.
  • Jelly layer also should be almost of the same thickness as that of cake and custard.

Jelly Poured Over Custard Layer
  • This is to make sure that each spoonful gives the taste of all components of trifle in a balanced way.
  • Cover again with a foil or cling film and allow it to set in the fridge for 2-3 hrs.
  • Trifle with a distinct three layers having three textures and taste is ready.

Jelly sey and Trifle Ready to be served
  • Cut to rectangular pieces and serve.
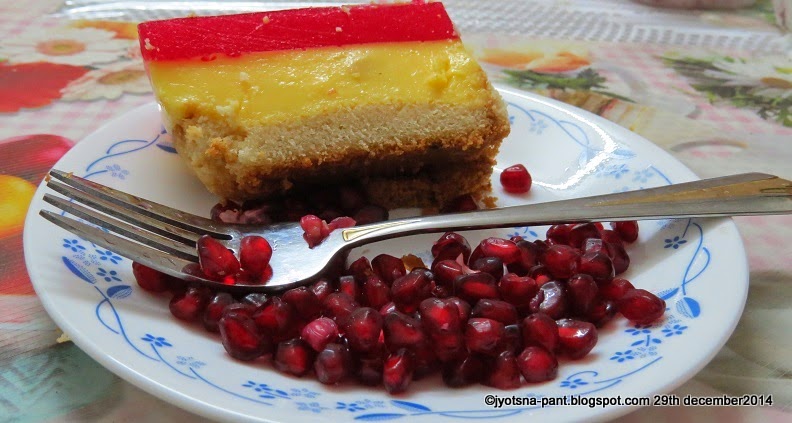
Trifle
Tips:
  • Cake can be baked in the same dish in which trifle is to be assembled.
  • Cake can be prepared beforehand. For vegetarians eggless vanilla cake can be made.
  • Spoonful of custard and jelly can be kept in fridge to see if it is setting to form a good layer, if not then it can be cooked for 3-4 min with continuous stirring.
  • The cooking pan for custard should be thick bottom to avoid custard from getting burnt.
  • If the jelly is not setting then one teaspoon of gelatin / 2x2 inches of jelly sheet/2 inches of agar-agar dissolved in lukewarm water can be added to the jelly followed by a nice boil to the mixture.

Suggested Variations:
  • To give the trifle a fruity taste apple/banana/orange cake can be made instead of vanilla cake.
  • Finely cut Apple/ banana/ strawberry/pieces of raspberry or the fruit similar to the jelly flavor can be added to jelly.
  • Finely chopped roasted nuts can be added to the custard to give crunchy texture. Do not add fruits to custard as they will cause custard to become thin and it will not set to the thick layer.


Friday, 29 August 2014

Chicken in wine With Crunchy Veggies

Drunk-Tangy Chicken With Crunchy Veggies
Chicken is a lean meat and for all non-vegetarians it is one of the best foods to be incorporated for keeping weight and cholesterol under control. The benefits of chicken diet is lost if it is cooked with too much of oil/fat. This recipe deals with tastier and easy to cook method of making chicken, retaining all the benefits of lean meat. The veggies by the side of juicy, slightly sweet, chicken with wine and mustard flavor add not only crunchiness to the meal, but also all other type of required proteins, dietary fibers , minerals and vitamins which chicken alone chicken cannot provide. Those who are not averse to carbs can add any type of bread. I prefers it without any accompaniment. My daughter in law loves this preparation of chicken and needless to say how much I enjoy the happiness and appreciation I see on her face while she is relishing the dish.

Preparation Time: 20 min.(marination time not included)
Cooking Time: 10 min.
Servings 2 Large servings

Ingredients Required For Making Chicken Sautéed in Wine:
  • 500 gm. Boneless Chicken
  • 100-120 ml. Red Wine (I used homemade wine which is not having any sweet taste)
  • 3 Teaspoon Honey
  • 2 Teaspoon Mustard powder (Preferably freshly powdered yellow mustard)
  • 1/2teaspoon Red chili Powder (Optional)
  • 3-4 Tea spoon Thick Curd
  • 2 Teaspoon fresh Ginger-Garlic Paste
  • Salt to taste
  • 5-6 French Beans
  • 1 Medium size Carrot
  • 1 Medium size Capsicum
  • 4-5 Mushrooms
    Veggies 
  • 1 ml. Olive Oil
Directions For Making Typsy Chicken:
  • Making Marinade For Chicken:
    • In a bowl take:
    • 50 ml. wine
    • Ginger- Garlic Paste
    • 3-4 Tea spoons of thick curd
    • Red chili powder
    • Mustard powder
    • Honey
    • Salt
    • Mix all ingredients with a spoon. It will be slightly liquidish marinade.
  • Marinade for chicken is ready.
  • Wash the chicken and cut them to 3-4 inches pieces.
  • Drain all water from the washed chicken.
  • Poke the pieces of chicken with a fork so that the marinade reaches inside the chicken pieces.
  • Add marinade to the chicken and mix nicely to ensure every piece coated with the marinade.
  • Cover and keep for minimum of 30 min. for marinating. (It can be kept in fridge for 2 days also for later use). I normally keep for 5-6 hrs for marinating to get full taste of marinade in the chicken.
  • Wash all vegetables.
  • Devein the beans and remove any thin roots present in the carrots. (I prefer not to peel it as lots of nutrients are lost in the process).
  • Dry the mushrooms with a cloth.
  • Cut beans to 2-3 inches pieces.
  • Cut carrots to 2-3 inches long and thin pieces.
  • Remove the stalk and seeds of capsicum and cut capsicum to the thin 2inches pieces.
  • Cut each mushroom to 4 pieces and if they are huge then to 6-8 pieces.
  • In a thick bottom pan take ½ ml of Olive oil and heat till hot (not smoking hot)
    Olive oil for Chicken
  • Put all chicken pieces and the marinade in the pan and cook on medium flame/heat flame with continuous tossing / stirring and turning to make sure chicken gets cooked with marinade evenly.
    Marinated chicken with marinade in hot oil
  • Add remainder 50-70 ml. of wine and bring down the flame to medium and let the chicken cook in wine for 4-5 min. Stir two or three times to ensure even cooking. Do not allow the juices to dry up completely. The chicken should be moist, juicy with little wine sauce along with it.
  • While the chicken is cooking the color of chicken will change to pink. If not checked then the honey will get caramelized leading to brown color of chicken. This will also change the taste.
  • While the chicken is cooking in wine take 1/2 ml. oil in another pan and heat it.
  • Add carrots and beans and capsicun to the hot oil and stir for just 1 min. keeping the flame on high.
    Veggies in 1/2 ml. oil on high flame
  • Add mushrooms and cook for 1 more min.
  • Mushrooms added and being cooked
  • Sprinkle salt to taste and mix all the while heat being on high flame for just one min.
  • Switch off the gas and sprinkle 3-4 drops of honey and 1/2ml. of vinegar to the veggies and stir. I use apple cider.
  • While the veggies were cooking the chicken becomes ready to be plated.
    Chicken ready to be plated along with Veggies
  • Place the veggies and chicken side by side in a plate and serve hot.
  • Drunk-Tangy Chicken with Crunchy Veggies
  • Clear chicken / vegetable soup and any type of bread goes very well along with this dish .
Tips:
  • In the absence of boneless chicken, chicken with bones can also be taken.
  • If you are not comfortable cooking veggies and chicken together then cook chicken and keep aside then do the veggies as it takes 3-4 minutes only to do the veggies. Heat chicken by sprinkling 2-3 ml wine, then plate it with piping hot veggies.
  • Too much reheating of chicken causes it to become dry so avoid heating again and again.
  • Veggies should be cooked for 2-3 min. only. They should be crunchy not limp.
Suggested Variations:
  • 1-2 ml of dark soy sauce can be added to the chicken while it is cookeing with marinade.
  • Broccoli, Asparagus, cauliflower, Red/yellow/purple bell pepper can be added to the veggies. Let your imagination run wild in choosing veggies. It will add a different dimension to your dish.
  • Little (2-3) ml. honey can be poured to the cooked chicken just before plating. Believe me it tastes yummy.

Tuesday, 24 June 2014

Arbi ke Patte Ki sabji (Indian savory Of Taro Leaves)

Arbi Ke Patte Ki Sabji

Arbi (Taro/colocasia leaves) are made to different savories in India. Patode/Patra is one of them Its vegetable is very tasty and healthy. It has 12%Calcium, 10 %Iron, 86% Vitamin C, Vitamin A and B, Dietary fibers1% saturated fats, Proteins, no carbs.In Kumaon (Uttarakhand) and Maharashtra both of the preparation are very popular. In Kumaon it is taken with Dal-Chawal and is called papadok saag, in Maharashtra with roti also. Millet bread and taro/colocasia leaf vegetable are real good combination with groundnut chutney by the side. Once after my marriage I made this vegetable and was so eagerly waiting to get thumbs up by my husband. But with one spoon down his throat and he started feeling itchy in the throat same with me and it was all ten fingers and both hands up. I was highly disillusioned. I spoke to my mom staying thousands of miles away from me and got the tips how to avoid such situation. Actually my cooking method was itself flawed. Next time I made the vegetable as per my mom’s instruction. My husband put one spoonful in his mouth and swallowed feeling very scared. But what followed was what I was looking for first time when I had cooked it. Since then I regularly make it and the appreciation goes like “It is very tasty but your mom makes it better”.  Well she always cooked in iron wok I cook in non-stick wok.


Preparation Time: 10 min.

Cooking Time: 15 min

Servings: 4 Large servings


Ingredients required For Making Arbi ke Patte ki Sabji (Taro/Colocasia Leaves Savory):

  • 15 Leaves of Arbi (Taro)
  • 4 Tea spoon Whole wheat flour/Rice flour
  • 1/2Teaspoon Turmeric Powder
  • 3-4 Whole Red Chilies
  • 1 Teaspoon Ghee (Clarified butter)/Mustard oil/Any cooking oil
  • 150 ml. Water
  • 1 Teaspoon Cumin Seeds
  • Red chili powder to taste
  • Salt to taste
  • Pinch of Asafoetida
Direction For Making Arbi Ke Patte Ki Sabji (Taro Leaves Savory):

  • Roast the flour on low heat till golden brown in color.
  • Wash the Taro (Arbi) leafs nicely in lots of water.
  • Pat dry them with cloth.
  • Remove the stalk from the leaves.
  • Peel the thin outer covering from the stalks. Discard the peel and keep the cleaned stalks aside.
Arbi ke Patte Cleaned and in small bowl peels of stalk to be discarded
  • Cut the cleaned stalks and the leaves very fine.
Finely cut Arbi ke Patte and Stalks
  • In a wok take ghee/oil and heat.
  • When the oil is hot add:
    • Cumin seeds
    • Broken whole red chilies
    • Asafoetida
Tempering of Cumin seeds and Red chili and Asafoetida
  •  When the seeds had spluttered and chilies color wonderful flavor of cumin, chilies and asafoetida will come.
  • Add Water to the tempering. This is the step where I had gone wrong I had added finely cut leaves first. An absolutely no no in this case, water should be added to the spices in oil first.
  • Add
    • Turmeric
    • Salt
    • Red chili powder
Water added to the seasoning
  • When the water comes to boil add finely cut taro leaves and stalks.
Arbi ke patte added to the boiling water with seasoning
  • Cover and lower the flame. Cook for 4-5 min on low flame this should result in the leaves and stalks to become soft.
Stage when roasted flour to be added
  • Add roasted whole wheat flour/Rice flour in little amount with continuous stirring so that lumps do not form.
Flour added and being mixed
Cooking for 2min. after added the flour
  • Bring the heat to high and cook for 2-3 min. or till you achieve the consistency of your requirement.
Water added and cooked to thick consistency
  • Remove from wok into a serving bowl and enjoy with any type of bread/steamed rice-Dal.
Arbi ke Patte Ki Sabji
Tips:

  • Never make the mistake I made of putting the uncooked vegetable into oil with spices directly. Water should be added first until unless you want itchy throat. 
  • Never over cook the green leafy vegetable else the color and taste spoils.
Over cooked  Arbi ke patte ki sabji
  • Apply oil to your palms before chopping the leaves and stalks otherwise your fingers and palm may itch for some time after chopping work is done.
  • Always break the red chilies before adding to hot oil otherwise they may burst open causing hot oil droplets to fall on you. Sure we do not want that to happen.
  • Asafoetida should be added after cumin and chilies have been added to get best flavor of asafoetida.
Asafoetida added to Tempering
  • Wheat/rice flour can be added by making thin paste for easing the work but while it is added continuous stirring is must to avoid lump formation.
  • Removing the thin skin from the stalks is must else the texture4 and taste will get spoiled.
  • Best results are obtained when cooked in mustard oil or ghee.
Suggested Variation:

  • Roasted groundnut with outer skin removed can be added after adding the flour.
  • After adding flour 15-20 ml. of milk can be added to the vegetable in wok and cooked on high heat for a minute or two before removing in serving bowl, this causes the vegetable to get creamy texture.
  • Tadaka (tempering) using 1/2ml. oil/ghee and cumin and red chilies can be given to enhance the flavor.

Friday, 23 December 2011

Mutton Biryani (Rice layered with Spicy Mutton)


Mutton Biryani
Most of the cooking is done by me now a days in pressure cooker on gas/cooking range, yet the sight of mutton biryani brings the old memories back when it used to be cooked in a big Degchi on coal stove with smoldering amber on the top of lid and we children used to wait patiently for the lid to be opened by my friends mom in most ceremonious manner, by first removing the ambers then removing the dough used for sealing and last lifting the lid slowly! There is no other word in my lexicon for this rice preparation except mouthwatering and lip smacking. It is said that to believe you have to see but in case of food eating is believing, so I encourage you to put some hard work and cook mutton Biryani. Goat meat being red meat is high on fat content and so not too good for people with high cholesterol and heart diseases. But nothing is too harmful if taken in moderation.

Preparation Time: 30min. (Marinating time not included)
Cooking Time: 60min.
Servings: Makes 6 Large Servings.

Ingredients required for making Mutton Biryani
  • 150gm.Basmati Rice.
  • 500gm. Mutton cut to pieces.
Mutton
  • 8 cloves.
  • 2 Black Cardamoms.
  • 3-4 Green Cardamom. 
  • 1/2Teaspoon of Saffron.
Saffron
  • 4 Petals of Star aniseed.
  • 2cm. Cinnamon sticks (two).
  • 50gm. Garlic Paste.
  • 50gm. Ginger Paste.
  • Red chili powder to taste.
  • Salt to taste.
  • 5mm. Piece of Nutmeg (grated)
  • 1kg Onions for mutton.
  • 2 medium size onions for frying.
Onion slices
  • 15-20 Cashew
Cashew
  • 20-30 Fresh Mint Leafs (made to coarse paste) and 10-15 mint leafs shredded.
Mint 
    • 50-75 gm.Ghee
    • Water.
    Ingredients for Marinade
    • 200gm.Thick Curd.
    • 1/2 tea spoon Turmeric Powder.
    • 1 Tea spoon Red chili Powder.
    • 1 Pinch of Nutmeg Powder.
    • 50 gm. Garlic Paste.
    • 50gm. Ginger Paste.

    • 1 Tea spoon juice of Raw Papaya (optional).
    Marinade Ingredients
    Directions for making Marinade:
    • Take thick curd, garlic paste, ginger paste, nutmeg powder, red chili powder, turmeric powder, and papaya juice (Optional) in a bowl.
    • Mix all ingredients to a creamy consistency by beating them with a spoon/fork.
    •  Marinade is ready to be used.
    Marinade
    Directions to make Mutton Biryani
    Step 1.
    • Wash the rice in running water and soak it in water for 30min.
    • Wash mutton pieces in running water and drain them of excess of water.
    • Take washed and drained mutton pieces in a bowl and coat each piece with the marinade.
    • Keep aside for marinating for minimum 2-3 hrs.
    •  Soak saffron in 10 ml. water.
    • Cut 2 onions thin, long and fry them to light brown color and keep aside.
    •  Fry 2-3 whole green chilies and keep aside.
    Fried Onion slices and green chilli

    Step 2.
    • Take the fat and few small pieces and bones of mutton in a thick bottom pan.
    • Add 4 cloves, one 2cm. stick of cinnamon, I black cardamom, 2 petals of aniseed and salt.
    • Add 300ml. of water cover.
    • Keep it on high flame and boil.
    • Once the water starts boiling lower the flame and let it simmer till the water reduces to 200ml. (It will take approx.. 15min.).
    • Cool it and sieve the stock. Keep the stock aside for cooking the rice.
    Mutton Stock
    Step 4.
    • Drain water from  the soaked rice. 
    • Take drained rice in a thick bottom pan and add the stock of mutton, little salt (to taste).
    • Cover and cook till the rice is partially cooked.
    • Remove from gas and allow it to cool.
    • The grain of partially cooked rice should separate from each other.
    • If the rice grain are sticking to one another then wash hot rice in running water and spread to cool. The picture of cooked rice is to show how rice should be after cooking. It was cooked in water for vegetable biryani. The rice cooked in stock will be yellowish in color. But the texture will be same.
    Partially cooked Rice
    Step 5.
    • When the partially cooked rice is cooled divide it into three equal portions and keep aside.
    Step 6.
    • Cut  Onions to thin long slices.
    Onions for Gravy
    • Take 20 gm. ghee. 
    • When the Ghee is hot add 4 cloves, 2 petals of star aniseed, I black cardamom, one 2 cm. cinnamon stick, grated nutmeg piece, and cook for 30sec.
    • Add cut onions and cook till they are brown in color.
    • Add 1 tea spoon Garlic paste and 1 tea spoon Ginger paste and cook for 1 min.
    Onions and ginger garlic paste cooked for mutton
    • Add tomato , chopped coriander leafs  and cook for a minute.
    Tomato, coriander leafs added
    • Add 
      • Red chili powder 
      • Mint paste and cook for 1 minute with regular stirring
    Fresh Coriander and Mint added to Onions
    • Add marinated mutton and cook on medium heat with occasional stirring for 15-20 minutes or till the mutton gets cooked.
    Mutton added and mixed
    • Cover and cook for 5 min. Mutton should have a very thick gravy.
    Mutton For Biryani
      • Remove from gas and cool.
      • Divide into two equal portions.
        Step 7.
        • Take a 10ml ghee in a thick bottom pan or pressure cooker / oven proof container.
        • Put a layer of cooked rice and pat gently.
        layer of rice over ghee
        •  Put layer of mutton with the gravy on the top of rice layer.
        First layer of Mutton over rice
        • Put 1/3part of fried onions on the top of mutton.
        • Put another layer of rice and pat gently.
        • Put the remainder mutton and it’s gravy on the top of rice layer.
        • With the third portion of rice make the final layer of rice.
        First layer of Mutton over rice
        • Spread the remaining mint leafs after shreddind and chili on the rice layer.
        • Pour the 15-20 gm of ghee / 10-15 ml. oil over the last layer of rice.
        • Spread saffron water over the rice laye. (Optional)
        Final layer of rice on the top sprinkled with shredded mint and chilli
        • Cover the pan / pressure cooker / Oven proof container. (If you are using pan then seal it with wheat dough / oven proof container can be seal packed with Aluminum foil).
        • Keep on low flame for 30-40 min.over a thick iron plate (tawa) 
        Sealed and being cooked 
        • Remove from gas and allow the steam to settle.
        •  Mutton biryani is ready.
        Mutton Biryani
        •   Take out biryani in a Rice serving dish and garnish with fried Almonds and Cashew nuts and fried onions.
        Mutton Biryani
        • Biryani's best companions are Curd/raita/Pickles and papad.
          Tips
        • If you want to shorten the procedure then you can omit making the mutton stock and cook rice in excess water and when rice is partially cooked drain the excess of water.
        • I personally prefer making mutton stock and cooking rice in it as rice gets rich flavor of mutton when cooked in mutton stock.
        • Raw papaya juice enhances the cooking of mutton and reduces cooking time.
        • Make sure the partially cooked grains of rice are well separated.
        • Use ghee as the flavor of mutton biryani comes best with ghee (clarified butter).
        • Saffron adds distinct color and flavor to the biryani.
        Suggested Variations:
        • Layering of rice and mutton can be done in a pressure cooker and then cooked without putting gasket on the lid. Just weight on the lid. Keep this cooker on the tawa and cook over low heat.
        • Finely cut almond, cashew nuts pistachios can also be used for layering along with mutton and fried onions.
        • The ratio of mutton to rice is 2:1, if so desired you can increase the rice ratio.

        LinkWithin

        Related Posts Plugin for WordPress, Blogger...