Pages

Monday, 29 December 2014

Trifle A Yummy Dessert


Trifle Served with Pomegranate
Trifle
Trifle is basically a dessert with three layers made from custard, cake, and jelly. But many other variations are made using biscuits/cake, whipped sweetened cream, chocolate, fruits etc. The recipe I am going to explain today is the one which my children love from their childhood and I get excellent reviews from my customers who come with more take away orders. They even want me to do minimal decoration on the top for birthdays. 
Make the cake from whole wheat flour or multigrain flour and fill the jelly with fruits and you have a healthy nutritious and yummy dessert. Without much ado I write the steps to make it. Do not get riled up by the details written in the recipe because it may look tedious but is very easy to make and assemble. Your efforts will be appreciated by friends and family and you will also give yourself a pat in the back.:)

Preparation Time: 15-20 min (for cake)
Cooking Time: 30 min for baking cake, 10 min. for custard, 10 min for jelly
Assembling Time: 10 min
Setting Time: 1 hr
Servings: 8 large Servings

Ingredients Required For Making Trifle:

For Cake:
  • 2 eggs
  • 100 gm. All purpose flour (Maida) /whole wheat flour /Multigrain flour
  • 50 gm, Sugar
  • 50 gm, Butter
  • 1 Teaspoon baking soda
  • 1 Teaspoon Vanilla essence
  • For Custard:
  • 50 gm. Custard powder ( vanilla flavoror anyother flavor of your choice)
  • 500 ml. Full Cream Milk
  • 50 ml. Cream (optional)
  • 100 gm. Sugar/to taste

For Jelly:
  • 100 gm, Jelly packet of the flavor of your choice (Blue bird/Rex). I prefer raspberry / Strawberry flavor for the rich color and flavor it gives
  • Water 350 ml

Directions for Making the Cake:
  • Grind the sugar to powder.
  • Mix maida. Salt and baking powder and sieve three to four times to make sure all ingredients have mixed properly. Cover and keep aside,
  • Separate egg white and egg yolk. Beat egg white to stiff peaks.
  • In a large bowl take butter and sugar and beat them to creamy consistency.
  • Add egg yolk spoonful at a time and beat to creamy consistency till all egg yolk is incorporated.
  • Into this creamy beaten mixture add stiffly beaten egg white and maida baking soda mixture alternately, Mixing should be done in folding motion and with light hand.
  • When all flour and egg whites are added then add vanilla essence and mix.
  • Pour the batter in the baking pan lined with butter paper.
  • Bake in a pre- heated oven at 180 degree centigrade for 30-35 min. or till the cake is baked.
  • Check by poking a dry smooth thin knitting needle or wooden stick, if the stick comes out clean then the cake is baked.

Direction for Making Custard:
  • Dissolve custard powder in 100 ml. of milk at room temperature.
  • Boil 500 ml of milk. Add sugar and stir to dissolve it in the milk. Sugar is completely dissolved reduce the heat and add custard dissolved in milk along with constant stirring to avoid formation of lumps.
  • Cook on low flame till thick consistency is obtained.

Consistency of Custard
  • Switch off the heat, add cream and mix (optional) cover with lid and allow to cool.
  • Second component of Trifle is ready.

Direction to make jelly:
  • Though the directions are given on the packs of jelly, the proportions given result is jelly good to be eaten as dessert but not to make trifle.
  • Instead of 500 ml. water as given in the pack take only 350 ml. water. This will result in thick setting jelly required for trifle.
  • Also add 50-60 gm. of sugar to the water while boiling otherwise the jelly tastes too sour. Adding sugar gives jelly slightly sweeter taste with subtle sour taste which is desirable.
  • When the sugar is dissolved add jelly mixture as instructed in the pack.
  • Stir continuously to ensure solid does not settle at the bottom. When all solid is dissolved boil the solution for 2-3 minutes stirring occasionally. Switch off the heat and allow it to cool to room temperatue.

Directions For Assembling Trifle:
  • Assemble the first two layers while the jelly is getting cooled to room temperature.
  • Take a 4-5 inches deep glass 10x10 inches square dish and place cake at the bottom nicely packing all the corners and edges.
  • The cake layer should be minimum 1 inch.

Apple cake pieces being layered 
Cake baked in The Serving dish
  • Pour thick custard on the top of cake and pat the dish from all sides to remove any air bubbles. 

Custard being poured over cake
  • Smoothen the top layer with a spatula. Cover with a cling film and keep in fridge to set till the jelly comes to room temperature.
  • Custard layer should be almost same thickness as that of cake.

Cake and custard Layred
First Two Layers Done
  • When the jelly comes to room temperature it will start to become thick and the setting process will have started.
  • Pour the jelly over the layer of custard with the help of ladle without damaging the custard layer.
  • Jelly layer also should be almost of the same thickness as that of cake and custard.

Jelly Poured Over Custard Layer
  • This is to make sure that each spoonful gives the taste of all components of trifle in a balanced way.
  • Cover again with a foil or cling film and allow it to set in the fridge for 2-3 hrs.
  • Trifle with a distinct three layers having three textures and taste is ready.

Jelly sey and Trifle Ready to be served
  • Cut to rectangular pieces and serve.
Trifle
Tips:
  • Cake can be baked in the same dish in which trifle is to be assembled.
  • Cake can be prepared beforehand. For vegetarians eggless vanilla cake can be made.
  • Spoonful of custard and jelly can be kept in fridge to see if it is setting to form a good layer, if not then it can be cooked for 3-4 min with continuous stirring.
  • The cooking pan for custard should be thick bottom to avoid custard from getting burnt.
  • If the jelly is not setting then one teaspoon of gelatin / 2x2 inches of jelly sheet/2 inches of agar-agar dissolved in lukewarm water can be added to the jelly followed by a nice boil to the mixture.

Suggested Variations:
  • To give the trifle a fruity taste apple/banana/orange cake can be made instead of vanilla cake.
  • Finely cut Apple/ banana/ strawberry/pieces of raspberry or the fruit similar to the jelly flavor can be added to jelly.
  • Finely chopped roasted nuts can be added to the custard to give crunchy texture. Do not add fruits to custard as they will cause custard to become thin and it will not set to the thick layer.


Tuesday, 25 November 2014

Karela Ki Sabji /करेले की सब्ज़ी (Indian Savory of Bitter Gourd)


Karele (Bitter gourd) Ki Sabji
Karela is known as bitter gourd in English. There are many varieties of bitter gourd. Difference is in color and size, All are bitter. The long and light green is more fleshy and can be used for making vegetable by chopping it but the smaller version can be used to make savory by stuffing it (Bhara Karela) or by chopping it to pieces. Though many feel it is too bitter to eat the bitterness can be well balanced by adding appropriate amount of sugar and amchur powder. Bitter gourd vegetable is very tasty and healthy. The juice of bitter gourd is used in naturopathy to cure diabetes. The recipe I am posting today is the version I like most and has been perfected after lots of permutation combination in my earlier stages of cooking. More credit should go to my husband who braved tasting every time I changed the proportions and he gave his inputs.

Preparation Time: 20-30 min.
Cooking Time: 50-60 min
Servings: 4 Large Servings

Ingredients Required For Making Karele Ki Sabji:
  • 1/2Kg. Karela (Bitter Gourd)
  • 1/2Kg. Onion
  • 2 Teaspoon Saunf (Fennel Seeds)
  • 1/2Teaspoon Turmeric Powder
  • 1 Teaspoon Red chili Powder
  • 1 Teaspoon Garam Masala
  • 2-3 Teaspoon Amchur Powder
  • 10-15 ml. of Mustard oil / any cooking oil
  • 2 Teaspoon Sugar
  • 50 gm  Groundnuts
  • Salt to taste
Direction For Making Karele Ki Sabji (Indian savory of Bitter Gourd):
  • Scrape the bitter gourd with knife to remove just the protruded green part, do not peel it.
  • Cut thin round pieces with the help of potato chip cutter or thin long 3-4 inches pieces.

Thin slices of Bitter Gourd
  • Put a spoonful of salt and mix to the pieces of bitter gourd. Cover and keep aside.
  • Roast ground nuts and remove the brown cover of ground nuts.
  • Grind coarsely the roasted ground nuts. Keep aside the coarse ground nut powder.
  • Cut onions to thin long slices.
  • Heat oil in a big thick bottom wok till oil is smoking hot.
  • Add
    • Fennel seeds
    • Broken pieces of whole red chilies
    • Let the seeds of fennel splutter and chilies (optional) become dark brown in color. Do not let the seeds and chilies become black. Black color means that they have got burnt and the taste as well as flavor of vegetable will get spoilt.
Fennel seeds spluttering in hot oil
  • When the seeds splutter add chopped onion and lower the heat.
Onions in oil tempered with fennel seeds
  • Cook the onion to transparent state with frequent stirring.
Transparant state of onion 
  • Squeeze the bitter gourd pieces. This will remove the bitter juice from them. Discard the bitter juice and keep the bitter gourd pieces aside.
  • When the onions are transparent add bitter gourd pieces and mix nicely.
Bitter Gourd added to onions
  • Add
    • Turmeric powder
    • Salt
    • Red chili powder
  • Mix and cover with a lid.
  • Cook for 25-30 min. on low heat with occasional stirring. This will cook the bitter gourd and make the onions little brown.
  • If you like the bitter gourd to be more crisp then cook for another 15 min on low heat stirring 4-5 times.
Ready for Groundnut and Garam masala 
  • Add amchur powder and sugar and mix nicely.
  • Add
    • Coarsely ground groundnut
    • Garam masala and mix nicely.
Groundnut and Garm masala added
  • Cover and keep aside for the flavors of spices to mix with each other.
Ready to Serve
  • Serve hot bitter gourd vegetable garnished with fresh coriander leaves with roti/parantha.
Karele (Bitter Gourd) Ki  Sabji
Tips:
  • Make sure the fennel seeds and chili pieces do not turn black.
  • Cooking should be done on low heat else the bitter gourd will become brown in color but remain under cooked.
  • If you are using mustard oil heat it to smoking hot.
  • If you wish groundnuts can be omitted. 
Suggested Variations:
  • Groundnuts can be replaced by roasted sesame seeds. Groundnuts and sesame seeds add crunchiness and nutrition to the vegetable.
  • Bitter gourd pieces can be blanched in salted water then squeezed. This will make them soft and less bitter also the cooking time will reduce.
  • Sugar can be replaced by jaggery.
  • 15 ml. of freshly squeezed lemon juice can be taken instead of amchur. But lemon juice should be added just before adding groundnut and cooked for just a minute or two. Lemon juice if cooked for longer time it develops very unpleasant taste.

Thursday, 16 October 2014

Mutton-Do-Pyaja मटन दो प्याज़ा (Indian Mutton Savory)


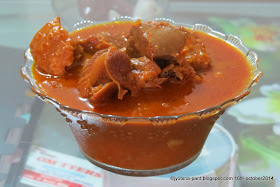
Mutton-Do-Pyaja
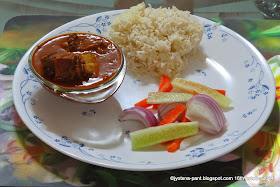
Steamed Rice and Mutton-Do-Pyaja
Mutton-do-pyaja is succulent pieces of mutton in gravy made by using onion in two different form i.e. long thin cut onion and well browned onion paste. The amount of onion taken is almost double by weight than that of mutton. I personally feel that since mutton has its own flavor which it imparts to the gravy also thus too much masala (Spices) overwhelm mutton and the muttonny flavor is completely camouflaged. Do-pyaja gravy has its origin in Lucknow in Mughal era. To give it Mughlai aura lots of Cashew nut, Almonds were added. I prefer Mutton-Do-Pyaja without any further addition of nuts so that the mutton can be enjoyed completely.

Preparation Time: 1 hrs.(Marination time not included)
Cooking Time: 1.30 hrs (Approximately)
Servings: 10 Large Servings

Ingredients Required For Making Mutton-Do-Pyaja:
  • 1 kg. Mutton (Goat meat)
  • 1 and 1/2kg. Onion
  • One tomato (roughky 100 gm)
  • 10-15 gm Garlic
  • 15 gm. Ginger
  • 2-3 Teaspoon Powder of Red Kashmiri Mirch Powder(optional)
  • 2-3 Lawang (Cloves)
  • 2 Bay leafs
  • 2 Whole Red Chili
  • 4-5 Sabut Kali Mirch (Pepper corn)
  • 2-3 cm. Stick of Cinnamon
  • 4-5 Teaspoon Coriander seed powder (Dhaniya)
  • 1 Teaspoon Turmeric
  • Salt to taste
  • 4 Red chili powder(Or to taste) (optional)
  • 10 ml. Cooking oil (I use mustard oil) 5+5 ml.
  • 10-15 ml. Ghee (Clarified butter)
  • 100 gm. Thick fresh Curd
Direction for Making Mutton-Do-Pyaja:
1.       Making Marinade:
  • Make fine paste of Garlic and Ginger. 
  • In a large bowl mix:
    • Curd
    • 1 Teaspoon salt
    • 1 Teaspoon Red chili powder
    • 1 Teaspoon Kashmiri Mirch powder
    • 2 Teaspoon Dhaniya powder
    • Garlic-Ginger paste
    • Turmeric powder
  • Thick uniform paste of marinade is ready.
2.       Marinating the Mutton:
  • Wash mutton thoroughly in flowing water.
  • Drain water completely.
  • Mix marinade to mutton making sure all pieces of mutton are coated with marinade.
  • Keep the mutton with marinade in a covered bowl for at least 2 to 3 hrs. Longer it is kept more will be the flavor of mutton and spices mixed with each other. Or 
  • Can keep for marinating before chopping work is done.
Marinated Mutton
3.       Cooking Process for Mutton-Do-Pyaja:
  • Peel 1/2 kg of onions and cut them to long pieces. Any thickness will do as they have to be cooked and made to paste.
  • In a thick bottom wok take 5 ml. of oil and heat. When the oil is hot add all cut onion and reduce the flame.
  • Cook on low flame till brown. Switch off the heat and allow the cooked onions to cool.
  • By the time onions are cooking peel rest of the 1 kg. Onions and cut them to long thin slices.
  • In a thick bottom wok take remaining 5 ml. of oil and heat on high flame. When the oil is hot, add the thinly slice onions and cook on low flame till transparent. Need not to brown them.
Sliced Onion cooking to trasparent state
  • In the same wok (Or other as per your wish) take 5 ml. of ghee and heat on high flame.
Spices in hot Ghee
  • When the ghee is smoking hot reduce the flame and add 
    • cinnamon
    •  cloves
    •  pepper corn 
    • Whole Red chili
    • Bay leafs
    • Cloves
 Let them split. (It will take a min. or two).
  • Add the marinated pieces of mutton without the thick liquid. Keep the liquid aside for later addition.
Mutton pieces in hot ghee with spices
Left over liquid of Marinated Mutton
  • Cook the mutton for 15 minutes with continuous stirring and turning upside down to make sure all pieces are evenly cooked in the oil. This will give the mutton a beautiful reddish brown color. Wonderful aroma of mutton and spices will start coming.
  • Add the thinly sliced transparent onions to mutton and cook for another 10 minutes with continuous stirring.
Transparently cooked onions added to mutton
  • Add onion paste and mix nicely and cook for another 5 min. this will make your onion mutton slightly brown and the color looks really wonderful.
Cooked onion paste added and mixed
  • Add all the liquid left from the marination and bring the flame to high.
  • Cook with continuous stirring till all the water evaporates.
Liquid of marination added and reduced
  • Bring the heat to low and add:
    • Salt (totaste)
    • Chili powder (to taste)
    • Remaining Dhaniya powder 
    • Kashmiri mirch powder
Basically all remainder spices are added at this stage.
  • Mix nicely and cook for another 2-3 min.
Ready for water to be added
  • Add water as per your requirement and mix. Cover and cook for 15-20- minutes with stirring occasionally. Or you can transfer the mutton from the wok with all the spices mixture to a pressure cooker and add water, cover the cooker with its lid and bring the heat to high till pressure is formed in the cooker. Lower the flame and cook for 10 min (Two whistles from the cooker).
Mutton-Do-Pyaja
  • Switch off the heat and allow pressure cooker to cool before removing the cooked mutton-do-pyaja from it.
  • Pour the remaining ghee on the top of cooked Mutton-Do-Pyaja and mix.
  • Serve piping hot delicious Mutton-Do-Pyaja with steamed rice/parantha/Chapatti.
Steamed rice with Mutton-Do-Pyaja 
Tips:
  • The state of mutton when it just starts falling off the bone is best cooked mutton. Over or undercooked mutton would spoil the whole dish.
  • Do not add too much water right in one stage as excess af water will have to be evaporated and this can cause overcooking of mutton, where as if more water is required then it can be added anytime of cooking.
  • Onion paste masala and ginger-garlic paste can be made before hand and kept in fridge.
    http://jyotsna-pant.blogspot.in/2013/11/onion-masala.html)
    http://jyotsna-pant.blogspot.com/2012/11/home-made-ginger-garlic-paste.html
  • Non-stick/Anodized woks reduce the usage of oil thus I always use them if you are using any other wok then oil requirement may change.
  • Always taste the chili powder before adding as the degree of hotness of different brands is different.
  • You can garnish the cooked Mutton-Do-Pyaja with finely cut Coriander leafs.
  • Curd/Papad/salad served along with steamed rice and Mutton-Do-Pyaja are best accompaniment.
  • If you wish you can avoid adding ghee to cooked Mutton-Do-Pyaja but believe me it brings a certain different texture and flavor to the dish.
  • The consistency of gravy can be changed as per requirement by adding required water.
  • Whole spices should be cooked in ghee not oil to get best result.
Alternate Suggestions:
  • If in hurry one hour marination will do.
  • Mutton can be cooked along with sliced 1 kg onions. This reduces the cooking time and efforts.
  • If you wish then the amount of onions can be reduced to 1.500 kg. (1 kg +500 gm).
  • Red Kashmiri mirch powder adds lovely red color so if you do not have it then avoid. Only color will be different not the taste.
  • If curd is not available then 8-10 small pieces of raw papaya can be added in marinade. Papaya pieces should be removed before cooking the mutton. Curd/papaya helps in cooking the mutton fast. If papaya pieces are not removed then mutton pieces will literally melt in gravy an unwelcome thing.

Tuesday, 23 September 2014

Baigan-tamatar ki sabzi (Eggplants / Brinjals with Tomatoes)


Granny's Achari Baigan
Eating brinjal savory (Baigan ki sabji) at my daughter’s place was like jogging down the memory lane. It has been years that my grandma left us and though I remembered her cooking yet do not know how such a wonderful dish had not come to my mind earlier. In Kumaon many people at that time not used to eat (as well as store in house) onions and garlic thus my grandmother used to make brinjal my mom’s favorite vegetable with lots of tomato and spices. I had completely forgotten about it till my daughter made it for me. What a delightful experience it was to be reminded of my grandma’s cooking by my daughter. Today I share this recipe with nostalgia of childhood visits to my granny’s place and have nasmed it as Granny's Achari Baigan in her memory. Absolutely easy, least oily full of flavors and taste this recipe is a must try for all brinjal lovers. Even those who do not like brinjal much will fall in love with this brinjal preparation.

Preparation Time: 15-20 minutes
Cooking time: 30-40 minutes
Servings:  6 Large servings

Ingredients Required For Making Granny's Achari-Baigan:
  • 1 kg Big Dark Violet Color Brinjal  
    Brinjals
  • 1 kg Red Ripe Tomatoes
Ripe Tomatoes
    • 3 Teaspoon Fennel Seeds
    • 3 Teaspoons Kalonji (Black Caraway seeds)
    • 1/2Teaspoon Asafoetida powder (I use LG Asefoetida powder)
    • 10 ml Mustard oil (any cooking oil)
    • 3-4 Teaspoon Red chili powder (or to taste)
    • 2 teaspoon sugar (Optional)
    • Salt to taste
    Direction For Making Grand-Ma’s Achari-Baigan:
    • Mix Turmeric, salt, 2 teaspoon Red chili powder to make spices mixture for brinjals. Keep aside for later use.
    • Wash the brinjals, tomatoes and dry with a cloth.
    • Cut one brinjal horizontally to get 2-2.5 mm round pieces.
    Brinjal Pieces
    • Immediately sprinkle the brinjal pieces with the spices mixture. Make sure all pieces are coated on both sides with spices mixture.
    • Heat non-stick tawa and sprinkle 1 oil on it. Spread oil on tawa and place the brinjal pieces on hot tawa and lower the flame.
    Brinjal Pieces Cooking with spices mixture
    • Repeat the same with all brinjals.
    • Cook for 8-10 min on low flame without covering it.
    One side cooked 
    • Flip the brinjal pieces and cook on the other side also for 4-5 min. This will make the brinjal pieces soft. Do not cook on high flame and do not overcook brinjal.
    I love the stalk also yummy to chew and suck the juices
      • While the brinjals are cooking make paste of tomato in a grinder- mixer.
      • Take 2 ml oil in a wok and heat it till smoking hot.
      • Lower the flame and add Black caraway seeds (Kalonji), Fennel seeds (Saunf) and let them split to get maximum flavor. Make sure they do not burn.
      • Add asafoetida mix and add tomato paste.
      Ready for tomato paste
      Tomato paste cooking with tempering 
      • Cook on low flame with regular stirring till tomato paste becomes thick and starts leaving the edges of wok. It took me 15 min.
      Tomato paste and Brinjal pieces cooking side by side
      Tomato paste ready fort cooked Brinjal pieces to be added
      • Add the cooked brinjal pieces to the cooked tomato paste and mix lightly so that the brinjal pieces get coated with tomato paste but not get mashed up.
      Brinjal pieces added to tomato paste and mixed
      • Add salt and chili powder according to your taste.
      • Cover and cook for 2-3 min. stirring with light hands once or twice max.
      • Add sugar and mix. Cook for 1 min with lid on the wok.
      • Grand-ma’s Achari baigan is ready.
      Ready to be served
      • Remove from the wok in a serving bowl and garnish with fresh coriander leafs.
        Granny's Achari Baigan
        Granny's Achari Baigan
      • Serve hot with any type of Indian bread/Dal-Chawal.
      Tips:
      • Make sure brinjals do not have seeds.
      • All utensils used by me are non-stick thus less amount of oil usage. If other non-stick vessels are not used then oil for brinjal pieces cooking will have to be increased so that they do not stick to pan and break.
      • Cut the brinjals and add spice to only that many pieces which can be accommodated on your cooking pan/tawa rest can be kept covered in fridge till one lot is cooked.
      • Do not add spices mixture to all pieces until unless you can cook them immediately, else juices will start coming out of brinjal and they will become soggy (Undesired change).
      • Make sure brinjal pieces are not cut too thin or too thick. Thin pieces will burn off and break while mixing with tomato paste and too thick will become lumpy.
      • The wok taken for mixing the cooked tomato paste and brinjal pieces should be large enough to allow them to spread nicely not get crowded, else mixing will take properly also brinjal pieces will get crushed while mixing.
      • This dish tastes best with mustard oil.
      • Always take chili powder quantity according to the hotness of it. All variety of chilies, chili powders have different degree of hotness.
      • Sugar adds that extra element to tangy, spicy, sour taste of Achari baigan. This is the only change I made to original recipe.
      Alternative Suggestions:
      • I do not throw away the stalk with green on it, but cook a;longwith. It is yummy to chew and suck juices out of it.
      • Tomatoes amount can be increased to 1:1.5 ratio by weight. 
      • You can cook baigan and tomato paste as directed in recipe and store them separately in fridge. Mix the required quantity of both cook and enjoy as and when needed.
      • If tomatoes are too sour in taste then sugar adding is must.